
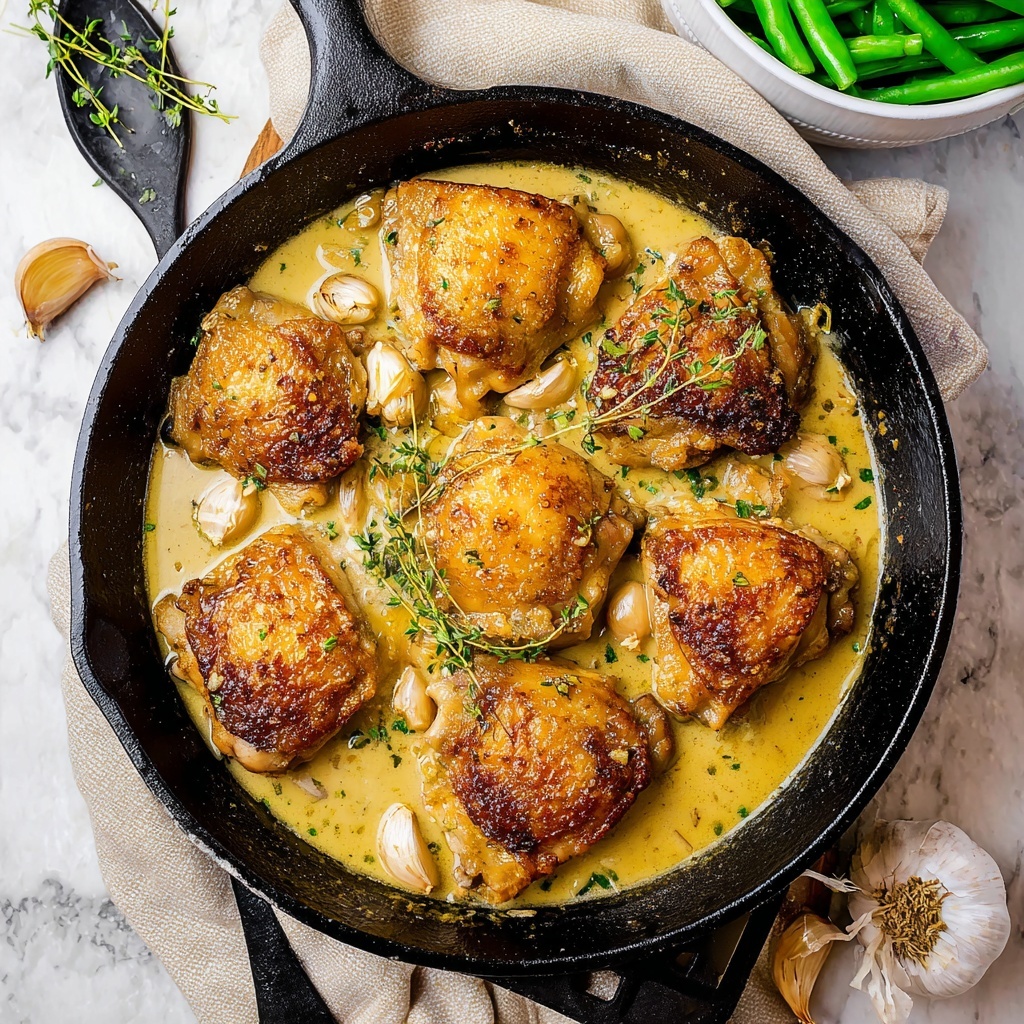
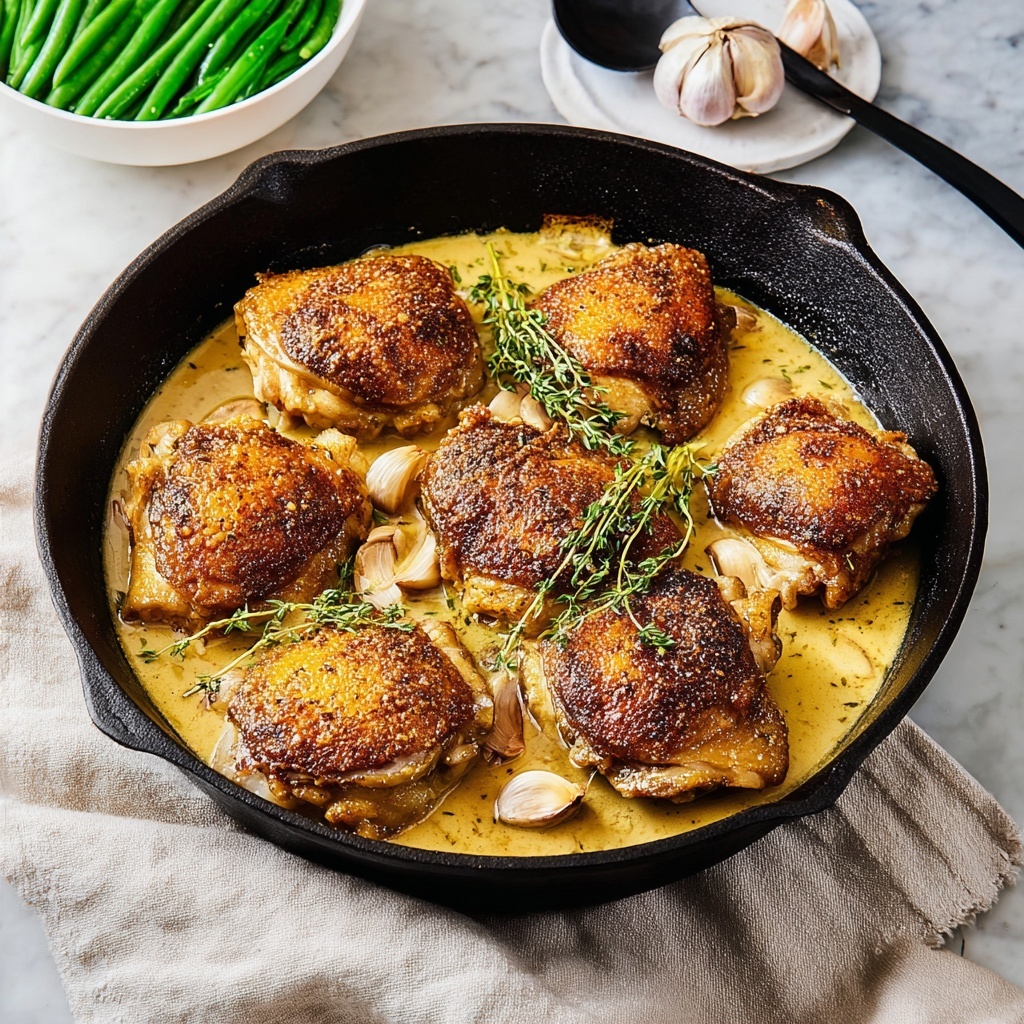
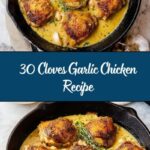
If you’re looking for a comforting yet show-stopping dish to impress friends or cozy up your dinner table, the 30 Cloves Garlic Chicken Recipe is an absolute favorite worth embracing. This delightful recipe combines crispy, golden chicken skin with buttery, mellow roasted garlic that practically melts in your mouth. As the garlic softens and infuses the broth with its rich aroma, every bite is layered with deep, savory flavor that feels both rustic and refined. Preparing this dish is surprisingly straightforward, and the result is a harmonious balance of textures and tastes that will have you coming back for seconds — and thirds! Let’s dive into the magic behind this classic, garlic-packed chicken that feels like a warm hug on a plate.
Ingredients You’ll Need
The beauty of this 30 Cloves Garlic Chicken Recipe lies in its simplicity, featuring ingredients that are both accessible and essential. Each one plays a crucial role, whether it’s lending flavor, creating texture, or elevating the overall character of the dish. These basics come together to make something greater than the sum of their parts.
- 6 chicken thighs (skin on): Skin-on thighs ensure juicy meat with that coveted crispy skin texture.
- 1 ½ teaspoons kosher salt: Perfect seasoning to draw out flavor and help crisp the chicken skin.
- 30 whole garlic cloves (peeled): The star of the show, roasted to sweet, buttery perfection without any harsh bite.
- 1 cup low-sodium chicken broth: Adds depth and moisture to the cooking liquid while keeping saltiness in check.
- ½ cup light dry white wine: Enhances the dish with subtle acidity and complexity; Sauvignon Blanc is an excellent choice.
- 5 sprigs fresh thyme: Brings a gentle herbal aroma and delicate earthiness to the broth.
- 2 dried bay leaves: Impart a subtle depth and warmth to the simmering sauce.
- 1 teaspoon Dijon mustard (optional): Adds a little tang and emulsifies the sauce beautifully when you finish it on the stovetop.
How to Make 30 Cloves Garlic Chicken Recipe
Step 1: Preparing the Chicken
Start by preheating your oven to 375°F. Season the chicken thighs generously with kosher salt and let them sit at room temperature for at least 30 minutes. This resting step isn’t just idle time — it’s key for unlocking a perfectly crisp skin, since the salt draws out moisture on the surface. If you plan ahead, salting the chicken overnight uncovered in the fridge can make the skin even crispier, which is always a treat.
Step 2: Browning the Chicken
Grab a large 12-inch oven-safe skillet—cast iron or enamel-coated works great—and spray it lightly with cooking spray. Heat over medium, then add the chicken thighs skin side down. Let them cook until the skin turns a gorgeous golden brown and becomes crisp, about 5 to 7 minutes. Don’t rush this step. Moving the thighs occasionally ensures even browning. Once the skin is perfect, flip the chicken over and turn off the heat to pause the cooking process gently.
Step 3: Adding Garlic and Liquids
Now, it’s time to scatter all those peeled garlic cloves in the pan’s open spaces, nestling them between the chicken pieces. Pour in the chicken broth and white wine carefully; the liquid should rise just below the chicken skin to keep that crispness intact while baking. Toss in the fresh thyme sprigs and dried bay leaves, tucking them to one side so their flavors mingle without overpowering the chicken.
Step 4: Baking to Perfection
Transfer the skillet to your oven and let the chicken bake for 35 minutes at 375°F. Then, cranking the heat up to 400°F for an extra 10 to 15 minutes helps finish things off with a beautifully caramelized finish on the chicken skin and a rich, flavorful roast on the garlic. This two-step bake lets flavors deepen and textures develop in a way that’s both mouthwatering and irresistible.
Step 5: Letting Flavors Rest
Once baked, allow the chicken to rest in the luscious garlic-scented broth for at least 10 minutes. This rest period keeps the chicken juicy and lets flavors marry beautifully. Then, carefully remove the chicken pieces and place the skillet back on the stovetop over medium-high heat to prepare the sauce.
Step 6: Finishing the Sauce
Add the optional Dijon mustard to the skillet and bring the sauce to a gentle boil. Let it simmer for 2 to 3 minutes until it reduces slightly and thickens up, creating a luscious glaze to coat the chicken. Return the chicken to the skillet, nestle it back in the fragrant sauce, and prepare for serving.
How to Serve 30 Cloves Garlic Chicken Recipe
Garnishes
A sprinkle of fresh chopped parsley or a few lemon wedges can brighten the richness of the garlic chicken wonderfully. The green herb adds a fresh fragrance and a vivid pop of color, making each plate look as inviting as it tastes. For an extra special touch, drizzle a little extra virgin olive oil just before serving—it adds silkiness and depth.
Side Dishes
This dish pairs beautifully with simple accompaniments that soak up the garlicky sauce. Creamy mashed potatoes or buttery polenta make incredible bases, inviting you to enjoy every drop of sauce. Roasted or sautéed green beans, asparagus, or a crisp salad also balance the richness with their fresh, slightly bitter notes. Don’t be afraid to serve a crusty loaf of bread alongside to mop up every last bit.
Creative Ways to Present
For a rustic family-style meal, serve the chicken and garlic cloves right in the cast iron skillet so everyone can help themselves. Or plate individual portions on warm white plates, arranging the chicken neatly with a spoonful of garlic and some sauce to the side for a more formal presentation. For a fun twist, mash some of the roasted garlic and spread it on toasted baguette slices as a side spread—pure garlic bliss!
Make Ahead and Storage
Storing Leftovers
If you’re lucky enough to have leftovers, store them in an airtight container in the refrigerator within two hours of cooking. The garlic-infused chicken will keep well for up to 3 days, and the flavors often deepen overnight, making next-day meals even more satisfying.
Freezing
You can freeze the cooled cooked chicken along with some of the garlic broth in a freezer-safe container or bag for up to 2 months. To preserve the best texture, try to freeze portions rather than the whole batch at once. When thawed, the gentle garlic flavor remains vibrant and delicious.
Reheating
Reheat leftovers gently in a skillet over medium heat, spooning the garlic sauce over the chicken to keep it moist. Alternatively, warming in a 325°F oven covered with foil prevents the chicken from drying out and helps the sauce soak in again beautifully. Avoid microwaving if possible, as it can make the chicken skin less crispy and garlic mushy.
FAQs
Can I use chicken breasts instead of thighs?
While chicken breasts can work, thighs are recommended for their fat content and ability to stay moist during the cooking process. Breasts may dry out and won’t get as much crispy skin, which is part of what makes this 30 Cloves Garlic Chicken Recipe so special.
Do I have to peel all 30 garlic cloves?
Yes, peeling the garlic cloves is key to enjoying their soft, spreadable texture once roasted. The peeled cloves roast down to a sweet, buttery consistency that infuses the sauce and chicken with deep flavor.
Can I skip the wine or use a substitute?
If you prefer not to use wine, a dry white grape juice or additional chicken broth can be used as a substitute, though the complexity and brightness the wine adds will be slightly diminished.
Is it necessary to let the chicken rest before cooking?
Allowing the chicken to rest after salting helps draw out surface moisture, ensuring the skin crisps up beautifully in the pan – this step makes a noticeable difference in texture.
Can I make this dish gluten-free?
Absolutely! This recipe is naturally gluten-free as long as you choose gluten-free Dijon mustard and verify your chicken broth has no gluten-containing ingredients.
Final Thoughts
The 30 Cloves Garlic Chicken Recipe is a true treasure in the kitchen—a dish that’s as approachable as it is delicious. With layers of crispy skin, sweetly roasted garlic, and a rich yet balanced sauce, it makes every meal feel special. Whether you’re cooking for a crowd or treating yourself to a cozy night in, give it a try and enjoy a dish that feels like a warm invitation to savor every bite.
Print
30 Cloves Garlic Chicken Recipe
- Prep Time: 40 minutes
- Cook Time: 1 hour
- Total Time: 1 hour 40 minutes
- Yield: 6 servings
- Category: Main Course
- Method: Baking
- Cuisine: French
Description
This classic 30 Cloves Garlic Chicken recipe features succulent chicken thighs cooked with a generous amount of whole garlic cloves, fresh thyme, and bay leaves. The chicken is first pan-seared to achieve crispy skin, then baked in a savory broth and white wine mixture. Finished with a mustard-infused reduction sauce, this dish offers rich flavors with a balance of garlic pungency and herbaceous notes, perfect for an impressive yet straightforward meal.
Ingredients
Chicken and Seasoning
- 6 chicken thighs (skin on)
- 1 ½ teaspoons kosher salt
Garlic and Herbs
- 30 whole garlic cloves (peeled)
- 5 sprigs fresh thyme
- 2 dried bay leaves
Liquids and Sauce
- 1 cup low-sodium chicken broth
- ½ cup light dry white wine (e.g. Kim Crawford Illuminate Sauvignon Blanc)
- 1 teaspoon Dijon mustard (optional)
Instructions
- Prep and Season Chicken: Preheat your oven to 375°F. Season the chicken thighs evenly with kosher salt and let them sit for at least 30 minutes at room temperature to help the skin crisp up during cooking. For even crispier skin, you can salt the chicken overnight and leave it uncovered in the fridge.
- Sear Chicken Skin-Side Down: Spray a large 12-inch oven-safe skillet, preferably cast iron or enamel, with cooking spray. Heat it over medium heat and add the chicken thighs, skin side down. Cook for about 5 to 7 minutes, moving them around to brown the skin evenly and achieve a crisp, golden crust. Flip the chicken and turn off the heat.
- Add Garlic, Broth, Wine, and Herbs: Scatter the peeled garlic cloves around the skillet in the spaces between the chicken pieces. Pour in the chicken broth, ensuring the liquid comes just below the skin to keep it crispy, and add the white wine. Add the fresh thyme sprigs and bay leaves to one section of the pan.
- Bake the Chicken: Place the skillet in the preheated oven and bake at 375°F for 35 minutes. Then increase the oven temperature to 400°F and bake for another 10 to 15 minutes until the chicken is cooked through and tender.
- Rest the Chicken and Prepare Sauce: Remove the skillet from the oven and let the chicken rest in the broth for at least 10 minutes. Then transfer the chicken pieces out of the pan and place the skillet back on the stovetop over medium-high heat. Stir in the Dijon mustard if using, and bring the sauce to a boil.
- Reduce Sauce and Serve: Allow the sauce to simmer and reduce for 2 to 3 minutes until slightly thickened and flavorful. Return the chicken to the skillet to coat it with the sauce, then serve immediately, enjoying the rich garlic-infused broth with the tender, crispy chicken.
Notes
- Salting the chicken overnight and leaving it uncovered in the fridge enhances skin crispiness.
- Adjust the amount of chicken broth depending on skillet size; the liquid should stay just below the chicken skin to maintain crispiness.
- Substitute the white wine with additional chicken broth if you prefer to avoid alcohol.
- Use fresh thyme sprigs for the best flavor; dried thyme can be substituted but use less.
- Dijon mustard is optional but adds a nice tangy depth to the sauce.