
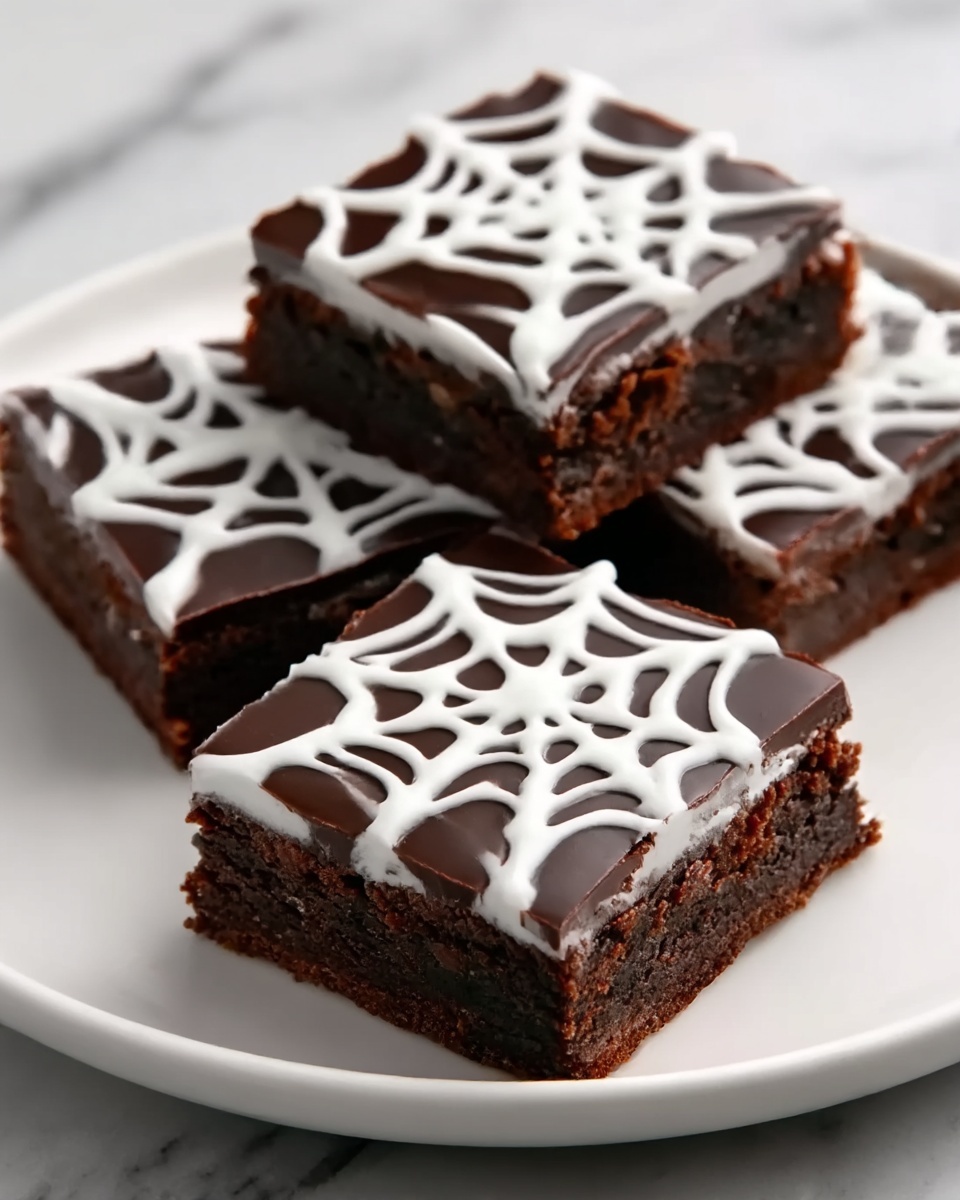
If you’re looking to wow your guests this Halloween with a treat that’s as fun to look at as it is delicious, the Spider Web Halloween Brownies Recipe is an absolute must-try. Rich, fudgy brownies form the perfect base for a striking white chocolate spider web design that feels spooky yet elegant. This recipe balances deep chocolate flavor with a dash of festive creativity, perfect for carving out some sweet spooky moments with friends and family. Dive into this easy yet impressive dessert that’ll become a Halloween tradition in no time!
Ingredients You’ll Need
Gathering simple but essential ingredients is the first step toward creating these irresistible brownies. Each component plays a role in building that perfect fudgy texture, rich chocolate taste, and eye-catching contrast for the spider web design.
- 1/2 cup melted butter (or coconut oil for dairy-free): Provides richness and moisture, giving the brownies their tender crumb.
- 1 cup granulated sugar: Adds sweetness and helps create a slightly crisp top layer.
- 2 large eggs: Bind everything together while contributing to the fluffy yet dense texture.
- 1 teaspoon vanilla extract: Enhances the natural chocolate flavor with warm, sweet notes.
- 1/3 cup cocoa powder: Delivers that glorious chocolate richness without added fat.
- 1/2 cup all-purpose flour (or gluten-free flour for gluten-free version): Forms the structure of your brownies keeping them just the right amount of chewy.
- 1/4 teaspoon salt: Balances the sweetness and deepens the chocolate flavor.
- 1/4 teaspoon baking powder: Gives a slight lift so your brownies aren’t too dense.
- 1/3 cup chocolate chips (optional): Extra pockets of melty chocolate goodness to elevate every bite.
- 1/4 cup white chocolate or vanilla icing: For piping the delicate spider web design on top.
- 1-2 drops black food coloring (optional): Adds a spooky contrast when mixed into the icing for more dramatic webs.
How to Make Spider Web Halloween Brownies Recipe
Step 1: Prepare Your Pan and Oven
Start by heating your oven to 350°F (175°C). Line an 8×8-inch baking pan with parchment paper to make sure your brownies come out easily and with clean edges. Setting up correctly now means smooth sailing later!
Step 2: Mix the Wet Ingredients
In a medium-sized bowl, whisk together the melted butter and granulated sugar until the mixture is smooth and glossy. Then, crack in the eggs one at a time and pour in the vanilla extract, mixing until everything is combined into a luscious, uniform batter. This step ensures your brownies will be moist and flavorful.
Step 3: Combine Dry Ingredients and Fold In
Sift in the cocoa powder, all-purpose flour, salt, and baking powder to avoid any lumps and ensure even mixing. Stir gently just until the flour disappears and the batter looks even. If you’re feeling indulgent, fold in the chocolate chips now for little bursts of surprise chocolate gooeyness in every bite.
Step 4: Bake Your Brownies
Pour the batter into your prepared pan and smooth out the surface with a spatula. Pop it into the oven and bake for about 20-25 minutes. The brownies are done when a toothpick inserted near the center comes out mostly clean but still slightly moist. This guarantees that fudgy perfection.
Step 5: Cool Completely Before Decorating
Patience is key here! Let the brownies cool fully in the pan before moving onto the fun part—the spider web decoration. Cooling helps the brownies set firmly so your design will look neat and sharp instead of melting away.
Step 6: Create the Spider Web Design
Melt your white chocolate or prepare the vanilla icing and transfer it into a piping bag or a small squeeze bottle. Starting from the center of the brownies, pipe concentric circles. Then, using a toothpick, drag lines from the center outward to the edges to create a spider web effect. To add an eerie touch, mix a drop or two of black food coloring with some icing and alternate colors for a striking contrast.
Step 7: Serve and Enjoy
Once decorated, cut your brownies into squares and get ready to impress your guests. The Spider Web Halloween Brownies Recipe is not only a feast for the eyes but also a treat that will disappear fast at any Halloween party.
How to Serve Spider Web Halloween Brownies Recipe

Garnishes
To elevate the spooky feel, consider adding a few fun garnishes like plastic spider rings, edible candy eyes, or a sprinkle of orange and black Halloween-themed sprinkles around the platter. These simple touches make the presentation pop and turn the brownies into a festive centerpiece.
Side Dishes
Pair these brownies with a scoop of vanilla or pumpkin spice ice cream for a seasonal twist. A hot cup of cinnamon-spiced cider or rich hot chocolate perfectly complements the dense cocoa flavor and the sweet white chocolate web.
Creative Ways to Present
Go beyond the usual square pieces and cut the brownies into fun shapes like mini pumpkins or bats using cookie cutters for a playful twist. Serving them on a rustic wooden board with fall leaves or a themed Halloween platter adds a charming vibe to your spooky dessert table.
Make Ahead and Storage
Storing Leftovers
The Spider Web Halloween Brownies Recipe keeps beautifully in an airtight container at room temperature for up to 3 days. This lets the brownies retain their fudgy goodness without drying out, though the spider web detailing might soften slightly over time.
Freezing
If you want to make these ahead of time, you can freeze the brownies before decorating. Wrap the cooled but undecorated brownies tightly in plastic wrap and aluminum foil; they’ll keep well in the freezer for up to 2 months. When ready, thaw completely and add the spider web design fresh for the best look.
Reheating
To enjoy the warmth and melty texture of freshly baked brownies, gently warm individual squares in the microwave for about 15 seconds. Avoid reheating the entire pan to preserve the spider web decoration and prevent it from melting into the brownie surface.
FAQs
Can I make the brownies dairy-free?
Absolutely! Swap the melted butter with coconut oil, and use a dairy-free white chocolate or icing for the spider web design. This way, the recipe remains just as delicious and inclusive for those avoiding dairy.
What if I don’t have white chocolate or vanilla icing for decorating?
You can easily make a simple glaze with powdered sugar and a little milk or water, coloring it with food coloring as desired. Another option is to use store-bought white frosting thinned slightly with milk to pipe the web design.
How do I ensure my spider web design looks neat?
Using a squeeze bottle or piping bag with a fine tip helps control the flow of white chocolate or icing. Work slowly and pipette concentric circles first, then use a toothpick with gentle pressure to create straight lines from the center outwards.
Can I make these brownies gluten-free?
Yes! Substitute the all-purpose flour with your favorite gluten-free flour blend in a 1:1 ratio. Just be sure that your baking powder is gluten-free as well to maintain the brownies’ texture and rise.
What’s the best way to cut the spider web brownies?
Wait until the brownies are fully cooled and the web is set. Use a sharp knife and clean it between each cut to preserve the design’s integrity. Cutting slowly and carefully ensures each square looks festive and well-defined.
Final Thoughts
This Spider Web Halloween Brownies Recipe is such a fantastic way to bring the spirit of Halloween right to your dessert table. It’s approachable, fun, and yields brownies that are perfectly moist and rich, crowned with that unforgettable spider web decoration. Whether you’re baking with kids or hosting a spooky party, these brownies bring magic in every bite. Give them a try—you’ll be so glad you did!
Print
Spider Web Halloween Brownies Recipe
- Prep Time: 10 minutes
- Cook Time: 20-25 minutes
- Total Time: 35 minutes
- Yield: 9 servings
- Category: Dessert
- Method: Baking
- Cuisine: American
Description
These Spider Web Halloween Brownies are a spooky and delicious treat perfect for Halloween parties. Rich and fudgy brownies are topped with a creative white chocolate spider web design that’s sure to impress. They are easy to make with simple ingredients and can be customized to be gluten-free or dairy-free.
Ingredients
Brownie Batter
- 1/2 cup melted butter (or coconut oil for dairy-free)
- 1 cup granulated sugar
- 2 large eggs
- 1 teaspoon vanilla extract
- 1/3 cup cocoa powder
- 1/2 cup all-purpose flour (or gluten-free flour for gluten-free version)
- 1/4 teaspoon salt
- 1/4 teaspoon baking powder
- 1/3 cup chocolate chips (optional)
Decoration
- 1/4 cup white chocolate or vanilla icing
- 1–2 drops black food coloring (optional)
Instructions
- Preheat and Prepare Pan: Preheat your oven to 350°F (175°C) and line an 8×8-inch baking pan with parchment paper to prevent sticking and ensure easy removal.
- Mix Wet Ingredients: In a medium bowl, whisk together the melted butter and granulated sugar until smooth and combined. Then, add the eggs and vanilla extract, mixing until fully incorporated for a smooth batter.
- Add Dry Ingredients: Sift in the cocoa powder, flour, salt, and baking powder to the wet mixture. Stir gently until just combined, being careful not to overmix. Fold in chocolate chips if using for extra chocolatey bites.
- Bake the Brownies: Pour the batter evenly into the prepared baking pan. Bake for 20-25 minutes or until a toothpick inserted in the center comes out mostly clean, indicating perfect fudgy texture.
- Cool Completely: Once baked, allow the brownies to cool completely in the pan. Cooling helps the brownies set and makes decorating easier.
- Create Spider Web Decoration: Melt the white chocolate or vanilla icing and transfer to a piping bag or squeeze bottle. Starting from the center of the brownies, pipe concentric thin circles outward. Use a toothpick to drag lines from the center to the edges, creating a spider web effect. Optionally, add black food coloring to accentuate the web design.
- Serve: Cut the brownies into squares and serve your spooky Halloween treats, perfect for parties or a themed dessert night.
Notes
- You can substitute coconut oil for butter to make these brownies dairy-free.
- Use gluten-free flour to make the recipe suitable for gluten-sensitive guests.
- Chocolate chips are optional but add extra richness and texture.
- Ensure the brownies are completely cool before decorating to prevent melting of the white chocolate.
- Store leftovers in an airtight container at room temperature for up to 3 days.

