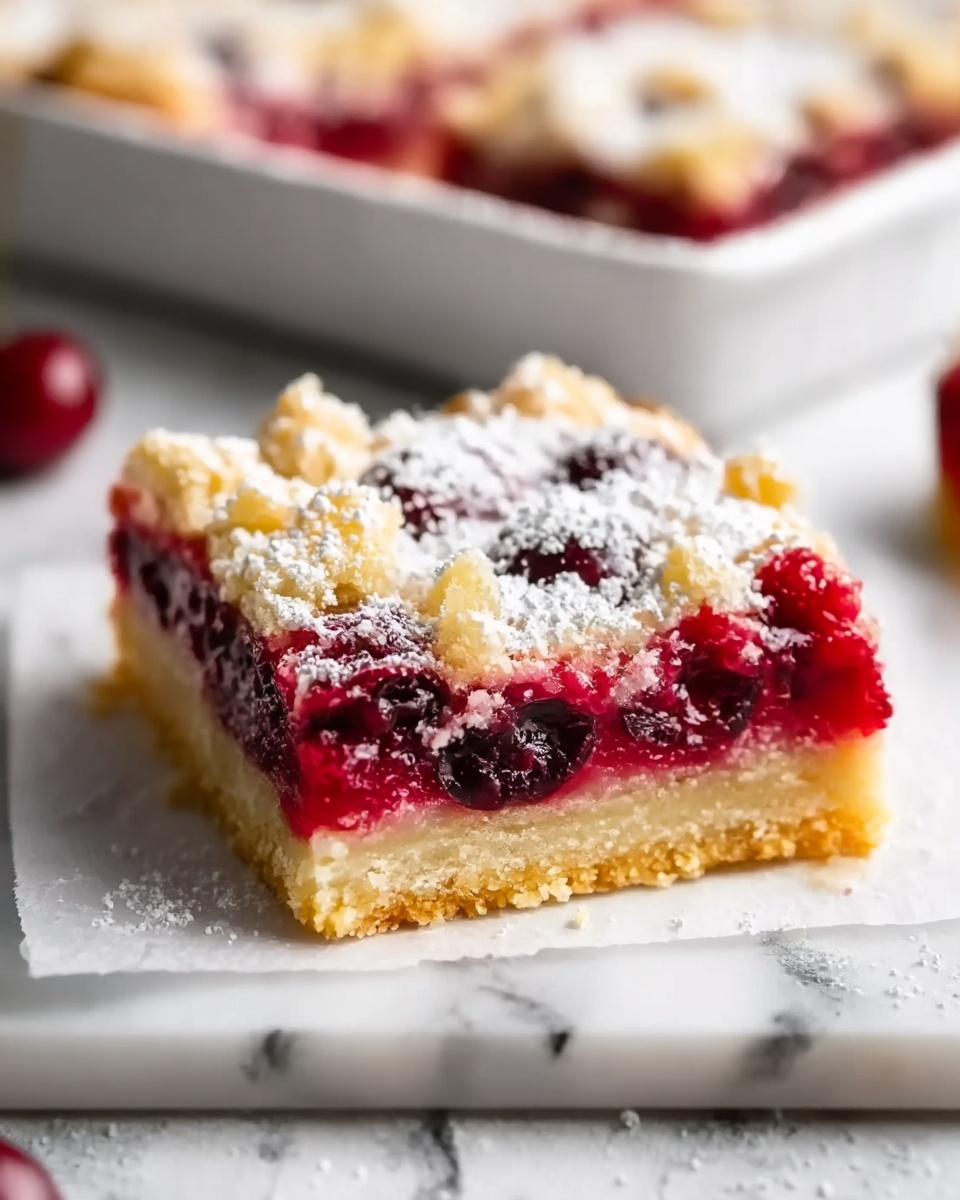
If you’re craving a dessert that’s bursting with juicy fruit flavor and wrapped in a buttery, crumbly crust, you absolutely have to try this Cherry Pie Bars Recipe. Imagine all the best parts of a classic cherry pie transformed into easy-to-handle bars that are perfect for sharing at any gathering or simply enjoying as a sweet little treat. The sweet-tart cherries paired with a tender, golden crust and a luscious glaze make every bite feel like a warm hug. Trust me, once you make these, they’ll quickly become a beloved staple in your baking repertoire.

Ingredients You’ll Need
Getting started with this Cherry Pie Bars Recipe is a breeze because it calls for straightforward, pantry-friendly ingredients that each add something special to the final taste and texture. From the rich butter creating a tender base to the fresh cherries offering that delightful pop of flavor, every component is essential.
- 1 cup unsalted butter, melted: Provides a rich, tender texture to both the crust and topping.
- 1 cup granulated sugar: Adds sweetness to the dough and balances the tartness of the cherries.
- 1/2 cup packed brown sugar: Brings a hint of molasses depth and moisture to the crust.
- 1 teaspoon vanilla extract: Enhances the flavor with a warm, aromatic note.
- 3 cups all-purpose flour: The structure that holds everything together with just the right crumb.
- 1/2 teaspoon salt: Balances sweetness and intensifies flavors.
- 4 cups fresh or frozen cherries, pitted: The star of the show, offering juiciness and vibrant color.
- 1 cup granulated sugar: Sweetens the cherry filling perfectly.
- 2 tablespoons cornstarch: Thickens the cherry filling to keep it from being runny.
- 1 tablespoon lemon juice: Adds brightness and helps balance the cherry sweetness.
- 1 teaspoon almond extract: Compliments cherries with a subtle nutty flavor.
- 1 cup powdered sugar: For the delicate, sweet glaze on top.
- 2-3 tablespoons milk: Adjusts the glaze to a perfect drizzling consistency.
- 1/2 teaspoon vanilla extract: Adds a final layer of flavor to the glaze.
How to Make Cherry Pie Bars Recipe
Step 1: Preheat Oven
Set your oven to 350°F (177°C) and line a 9×13-inch baking pan with parchment paper, making sure to leave enough overhang on the sides to easily lift the bars out later. This simple step ensures effortless cleanup and neat slices.
Step 2: Make the Crust and Topping
In a large bowl, combine the melted butter, granulated sugar, brown sugar, and 1 teaspoon of vanilla extract until smooth and fragrant. Next, stir in the flour and salt until you have a thick, crumbly dough. Pull out about 1 cup of this dough and set it aside to use as your topping later. Then, press the rest evenly into the bottom of your prepared pan to form the crust—a solid, buttery base that will hold all the delicious layers.
Step 3: Prepare the Cherry Filling
In a medium bowl, mix the pitted cherries with the remaining sugar, cornstarch, lemon juice, and almond extract. This step ensures every cherry is coated evenly, thickening the filling nicely while enhancing that signature cherry pie flavor with a subtle almond twist.
Step 4: Assemble the Bars
Spread the cherry filling evenly over your crust, taking care to distribute the juicy cherries and syrupy goodness. Then crumble the reserved dough evenly over the cherry layer. This crumb topping will bake into a golden, buttery finish that contrasts perfectly with the luscious filling underneath.
Step 5: Bake to Perfection
Bake the bars for 45-55 minutes until the crumb topping is lightly golden and the cherry filling is bubbling joyfully. If you notice the top browning too fast, loosely cover the pan with aluminum foil to prevent burning while still allowing the filling to thicken.
Step 6: Cool and Glaze
Let the bars cool completely in the pan set on a wire rack—this helps the cherry layer set perfectly. Once cooled, whisk together the powdered sugar, milk, and vanilla extract to make a luscious glaze, then drizzle it over the bars for a sweet, glossy finish. Finally, lift the bars out with the parchment overhang and cut into squares—pure bliss in every bite!
How to Serve Cherry Pie Bars Recipe

Garnishes
For an inviting presentation, sprinkle a few fresh cherries or a dusting of powdered sugar on top of the glazed bars. Fresh mint leaves also make a lovely, colorful garnish that adds a hint of herbaceous freshness to each bite.
Side Dishes
These cherry pie bars shine wonderfully when paired with a scoop of vanilla ice cream or a dollop of whipped cream. The cool, creamy sides beautifully contrast the warm flavors and make for an indulgent dessert experience.
Creative Ways to Present
Looking to wow your guests? Serve individual bars on pretty plates alongside a drizzle of chocolate or berry coulis. You can also stack bars on a dessert tower for a charming, rustic touch at parties or casual get-togethers.
Make Ahead and Storage
Storing Leftovers
Once completely cooled, store your cherry pie bars in an airtight container at room temperature for up to two days, or refrigerate them for up to a week to keep them fresh and flavorful. Keeping them covered ensures that glorious glaze stays luscious without drying out.
Freezing
These bars freeze beautifully! Wrap individual squares tightly in plastic wrap and place them in a freezer-safe bag or container for up to three months. When you’re ready for a treat, simply thaw at room temperature or warm briefly in the oven.
Reheating
To revive that fresh-baked warmth, pop the bars in a 300°F oven for about 10-15 minutes. This will gently reheat the cherry filling without drying out the crumb topping or glaze, making every bite as delightful as the first.
FAQs
Can I use frozen cherries for this Cherry Pie Bars Recipe?
Absolutely! Frozen cherries work just as well—just be sure to thaw and drain any excess liquid to avoid a soggy filling.
Is it possible to make these bars gluten-free?
Yes, you can substitute the all-purpose flour with a gluten-free flour blend, but be aware that the texture might be a bit different. Adding a binder like xanthan gum can help achieve a similar crumbly crust.
What can I use if I don’t have cornstarch for the filling?
You can replace cornstarch with an equal amount of arrowroot powder or tapioca starch; these will also help thicken the cherry filling effectively.
How do I prevent the topping from burning while baking?
If you see the topping browning too quickly, simply cover the bars loosely with aluminum foil halfway through baking to protect it while the filling finishes cooking.
Can this Cherry Pie Bars Recipe be made without almond extract?
Definitely! You can omit the almond extract or replace it with an additional 1/2 teaspoon of vanilla extract—though the almond adds a lovely, subtle complexity that complements the cherries beautifully.
Final Thoughts
This Cherry Pie Bars Recipe is truly a treasure for anyone who loves the nostalgic flavors of cherry pie but wants a more portable, easy-to-share dessert. Whether you’re whipping these up for a family gathering, a potluck, or just because, they’re guaranteed to bring joy and smiles all around. Dive into this recipe soon—you’ll wonder how you ever lived without these irresistible cherry delights in your baking collection!
Print
Cherry Pie Bars Recipe
- Prep Time: 20 minutes
- Cook Time: 50 minutes
- Total Time: 1 hour 10 minutes
- Yield: 16 servings
- Category: Dessert
- Method: Baking
- Cuisine: American
Description
Delight in these luscious Cherry Pie Bars, featuring a buttery crust topped with a sweet-tart cherry filling and a delicate powdered sugar glaze. Perfect for dessert or a festive treat, these bars combine the best flavors of cherry pie in an easy, handheld form.
Ingredients
Crust and Topping
- 1 cup unsalted butter, melted
- 1 cup granulated sugar
- 1/2 cup packed brown sugar
- 1 teaspoon vanilla extract
- 3 cups all-purpose flour
- 1/2 teaspoon salt
Cherry Filling
- 4 cups fresh or frozen cherries, pitted
- 1 cup granulated sugar
- 2 tablespoons cornstarch
- 1 tablespoon lemon juice
- 1 teaspoon almond extract
Glaze
- 1 cup powdered sugar
- 2–3 tablespoons milk
- 1/2 teaspoon vanilla extract
Instructions
- Preheat Oven: Preheat your oven to 350°F (177°C). Prepare a 9×13-inch baking pan by lining it with parchment paper, ensuring you leave some overhang on the sides for easy removal of the bars after baking.
- Make the Crust and Topping: In a large mixing bowl, combine the melted butter, granulated sugar, brown sugar, and vanilla extract until smooth. Gradually add the all-purpose flour and salt, stirring until a thick dough forms. Set aside one cup of this dough for the topping. Press the remaining dough evenly into the lined pan to create the crust layer.
- Prepare the Cherry Filling: In a medium bowl, mix the pitted cherries with granulated sugar, cornstarch, lemon juice, and almond extract. Stir well until the cherries are thoroughly coated and the mixture is evenly combined.
- Assemble the Bars: Evenly spread the cherry filling over the pressed crust in the baking pan. Crumble the reserved dough over the cherry layer, distributing it evenly to form the topping.
- Bake: Bake the assembled bars in the preheated oven for 45-55 minutes, or until the topping turns lightly golden and the cherry filling is bubbling. To prevent over-browning, loosely cover the pan with aluminum foil if the top gets too dark before the filling is fully cooked.
- Cool and Glaze: Remove the bars from the oven and allow them to cool completely in the pan set on a wire rack. Once cooled, whisk together the powdered sugar, milk, and vanilla extract to prepare the glaze. Drizzle this glaze over the bars before cutting into 16 squares for serving.
Notes
- For best results, use fresh cherries in season or frozen cherries that have been thawed and drained.
- If you prefer a thicker cherry filling, increase the cornstarch to 3 tablespoons.
- You can substitute almond extract with vanilla extract if you prefer a milder flavor.
- Use parchment paper with enough overhang for easy lifting of bars out of the pan.
- Store leftover bars in an airtight container at room temperature for up to 3 days or refrigerate for up to a week.
- For a dairy-free option, use a plant-based butter and milk alternative.
