
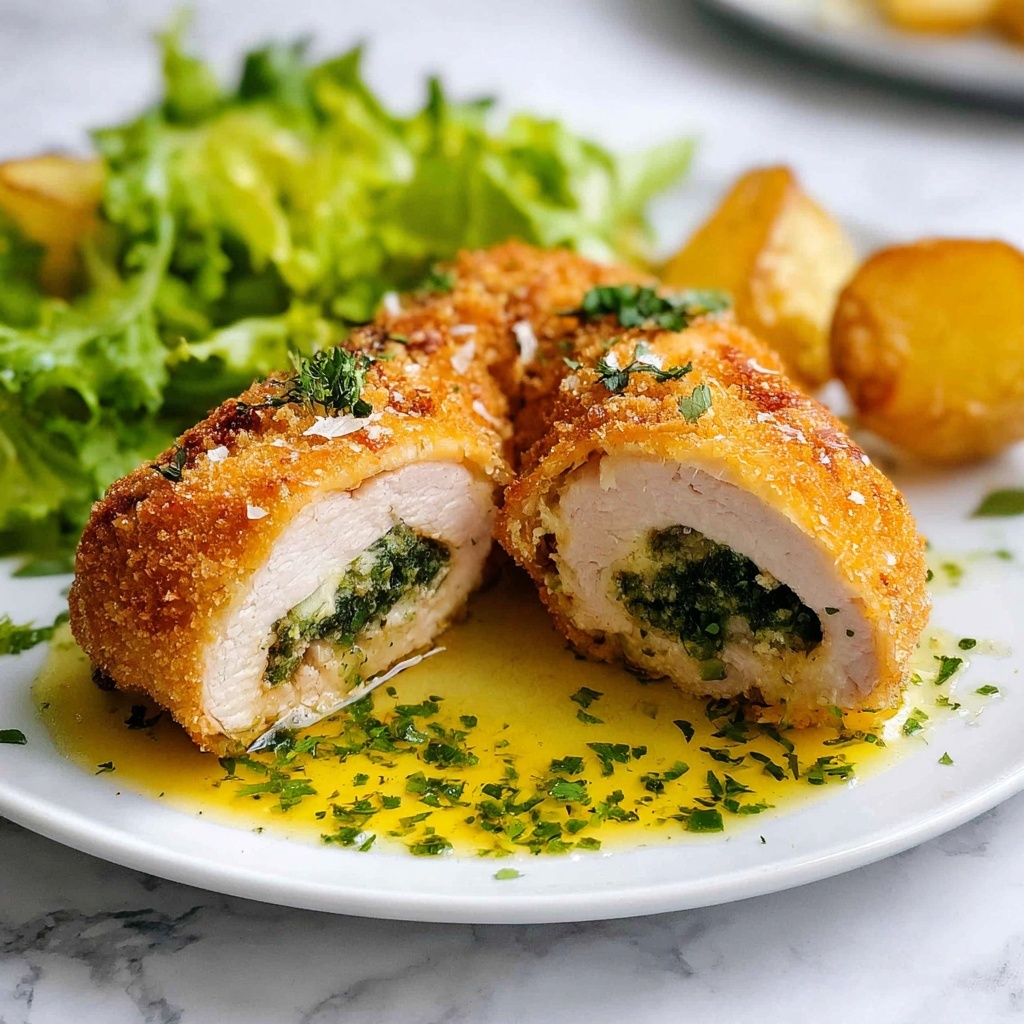
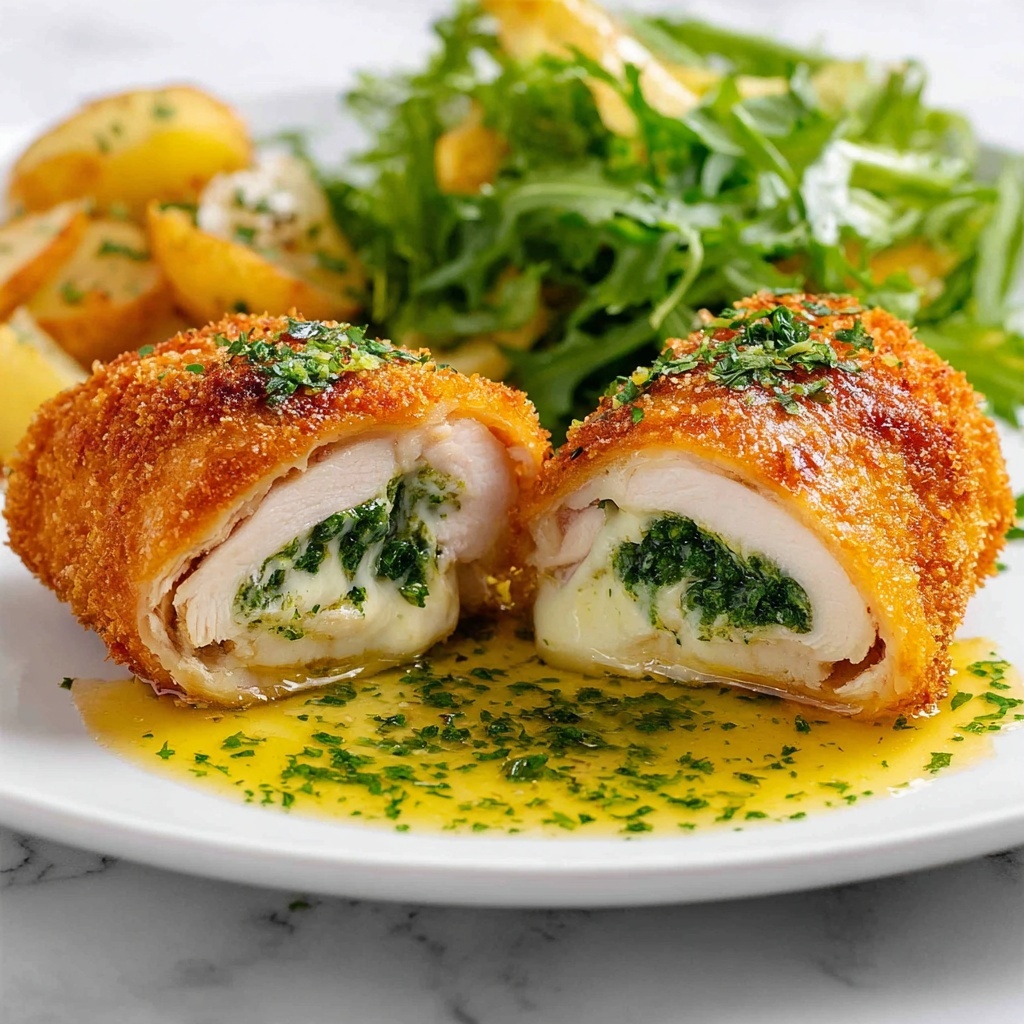
If you’ve ever wanted to wow your friends with something that looks fancy but is actually a total joy to make, this Classic Chicken Kiev Recipe is your golden ticket. Picture tender chicken breasts wrapped around a luscious garlic and parsley butter center that bursts with flavor the moment you cut into it. Crispy on the outside and meltingly delicious inside, this dish has all the comfort and charm you want for a special dinner without any complicated fuss. Trust me, once you try this Classic Chicken Kiev Recipe, it will become a beloved staple in your kitchen.
Ingredients You’ll Need
This Classic Chicken Kiev Recipe keeps things delightfully simple but absolutely essential—every ingredient plays a vital role in building that perfect balance of creamy, crispy, and savory notes. From the fresh parsley that adds fragrance to the golden panko breadcrumbs that provide crunch, these ingredients promise a delightful eating experience.
- Unsalted butter (6 tbsp / 90g, softened): The star of the filling, providing richness and a creamy texture.
- Parsley (2 tsp, finely chopped): Fresh and fragrant, it brightens up the butter filling and adds a pop of color.
- Garlic cloves (2, very finely minced): The punch of savory goodness that transforms the butter into an irresistible filling.
- Salt (1/4 tsp, optional): Enhances flavors; you can skip if using salted butter.
- Chicken breast (2 x 220-250g, skinless and boneless): Tender and lean, perfect for rolling around the butter.
- Salt (1/2 tsp) and pepper (1/4 tsp): Essential for seasoning the chicken to perfection.
- Egg (1, lightly whisked): Helps the breadcrumbs stick for that perfect golden crust.
- Flour (1/4 cup): Creates a dry surface for the egg to cling to.
- Panko breadcrumbs (1 cup): Extra crunchy and light, they deliver the irresistible crisp coating.
- Oil for frying (~4 cups / 1 litre): Choose canola or vegetable oil for a clean flavor and high smoke point.
- Parsley (finely chopped, garnish): Adds freshness and color when serving.
How to Make Classic Chicken Kiev Recipe
Step 1: Make the garlic butter filling
Start by mixing the softened butter with finely chopped parsley, minced garlic, and salt if you’re using unsalted butter. This mixture is what gives the dish its signature burst of rich, herby flavor encased in every bite.
Step 2: Shape and chill the butter
Spread the garlic butter onto parchment paper and shape it into a small rectangle roughly 10 by 6 centimeters. Refrigerate until firm so it holds its shape when wrapped inside the chicken, then cut it into two long batons.
Step 3: Pound the chicken breasts
Place each chicken breast between two sheets of freezer bags or parchment paper. Using a meat mallet, gently pound the chicken to an even thickness of about half a centimeter. This ensures even cooking and makes the rolling process easier.
Step 4: Season the chicken
Sprinkle salt and pepper evenly on both sides of each pounded chicken breast. Proper seasoning is the foundation for a flavorful Classic Chicken Kiev Recipe.
Step 5: Stuff and roll up the chicken
Place one baton of the chilled garlic butter in the center of the chicken. Fold the sides of the chicken over the butter, then carefully roll it up from the bottom, tucking in any trimmings to seal the butter inside. Finish with the seam side down to keep everything secure during cooking.
Step 6: Wrap and partially freeze
Wrap each rolled chicken log tightly in cling wrap, twisting the ends firmly like a candy wrapper. Pop them in the freezer for about 30 minutes until they’re firm to the touch but not frozen solid. This step helps maintain the shape when cooking and keeps the butter from leaking out.
Step 7: Prepare the coating stations
Set up three shallow bowls with flour, the whisked egg, and panko breadcrumbs. This classic breading trio creates the perfect crust for your chicken.
Step 8: Coat the chicken
Remove the chicken rolls from the cling wrap. First, dredge them in flour, shaking off any excess. Next, dip them in the egg, letting the excess drip away. Finally, coat them thoroughly with breadcrumbs, pressing gently so they stick well.
Step 9: Freeze the crumbed chicken
Place the crumbed chicken rolls back in the freezer for another 30 minutes until firm but not hard frozen. This pause makes frying easier and results in a crispier coating.
Step 10: Fry the chicken
Heat oil in a heavy bottom pot to 190°C (375°F). Carefully add the chicken Kievs and fry for 2 to 3 minutes, turning occasionally, until the outside is golden brown. They will still be raw inside at this point—no worries!
Step 11: Bake the chicken
Transfer the fried chicken onto a rack set over a baking tray and bake in a preheated 180°C (350°F) oven for 15 minutes or until the internal temperature reaches 65°C (150°F). To prevent butter from leaking prematurely, pierce the top lightly with a skewer before baking.
Step 12: Rest and serve
Let the chicken Kiev rest for 2 minutes after baking. This brief pause helps the juices settle and makes it easier to slice. Garnish with a sprinkle of fresh parsley for that inviting pop of color and freshness.
How to Serve Classic Chicken Kiev Recipe
Garnishes
A simple garnish of finely chopped parsley not only brightens the plate but also complements the herbaceous butter inside the chicken. A wedge of lemon on the side adds a nice zesty contrast that some people love to squeeze over the top.
Side Dishes
Classic Chicken Kiev Recipe pairs beautifully with buttery mashed potatoes or crispy roasted vegetables. If you want to keep things light, a fresh green salad with a tangy vinaigrette cuts through the richness perfectly.
Creative Ways to Present
For an elegant dinner party, slice the chicken rolls into medallions to showcase the beautiful garlic butter center. Arrange on a platter garnished with microgreens or edible flowers for an eye-catching presentation that will impress your guests.
Make Ahead and Storage
Storing Leftovers
If you have any leftovers, place them in an airtight container in the refrigerator and enjoy within two days for the best texture and flavor. Reheat gently to avoid drying out the chicken.
Freezing
You can freeze uncooked chicken Kievs either before or after breading. Wrap them tightly in cling wrap and store them in a freezer-safe bag or container for up to one month. Thaw them in the refrigerator overnight before cooking.
Reheating
To reheat, bake the chicken in a 180°C (350°F) oven until warmed through, about 10-15 minutes. Avoid microwaving, as it can make the crust soggy and the chicken unevenly heated.
FAQs
Can I use salted butter instead of unsalted?
Absolutely! If you use salted butter, simply skip the added salt in the garlic butter filling to avoid over-seasoning the dish.
What if I don’t have panko breadcrumbs?
You can substitute regular dry breadcrumbs, though panko provides a lighter, crispier texture which really elevates the Classic Chicken Kiev Recipe.
How can I make sure the butter doesn’t leak out during cooking?
Chilling the butter-filled chicken logs before breading and cooking is key. Also, carefully sealing the chicken around the butter and not piercing it before frying helps keep that luscious garlic butter inside.
Is it okay to fry and bake chicken Kiev?
Yes! Frying first creates that irresistible golden crust while baking finishes cooking the chicken gently and thoroughly, ensuring moist, juicy results inside.
Can I prepare Classic Chicken Kiev Recipe in advance?
Definitely. The butter-filled chicken logs can be made and frozen in advance, making it a convenient choice for guests or family meals whenever you’re ready.
Final Thoughts
This Classic Chicken Kiev Recipe is a wonderful way to treat yourself and others to a dish that feels so indulgent yet is surprisingly straightforward to make. With its crispy exterior, savory garlic butter core, and tender chicken, it’s a guaranteed crowd-pleaser. So go ahead, dive in, and bring this timeless favorite to your table—you’re going to love it as much as I do!
Print
Classic Chicken Kiev Recipe
- Prep Time: 30 minutes
- Cook Time: 30 minutes
- Total Time: 1 hour
- Yield: 2 servings
- Category: Main Course
- Method: Frying
- Cuisine: Eastern European
Description
Chicken Kiev is a classic Eastern European dish featuring tender chicken breasts wrapped around a flavorful garlic and parsley butter, coated in crispy panko breadcrumbs, and finished by frying and baking to create a golden, buttery, and juicy delight perfect for a special dinner.
Ingredients
Garlic Butter Filling
- 6 tbsp / 90g unsalted butter, softened (or salted butter)
- 2 tsp parsley, finely chopped
- 2 garlic cloves, very finely minced (2 tsp)
- 1/4 tsp salt (skip if using salted butter)
Chicken
- 2 x 220 – 250g (7 – 8oz) chicken breast, skinless and boneless
- 1/2 tsp salt
- 1/4 tsp pepper
Coating
- 1 egg, lightly whisked
- 1/4 cup flour
- 1 cup panko breadcrumbs
- Oil for frying, canola or vegetable oil (~4 cups / 1 litre)
Garnish
- Parsley, finely chopped
Instructions
- Prepare Garlic Butter Filling: In a bowl, mix softened butter, finely chopped parsley, minced garlic, and salt until well combined.
- Shape and Chill Butter: Spread the garlic butter onto a small sheet of baking/parchment paper and shape it into a 10 x 6 cm (4 x 2.4 inches) rectangle. Refrigerate until firm, then cut in half lengthwise to form two batons.
- Pound Chicken: Place chicken breasts smooth side down between two freezer bags or sheets of paper. Evenly pound the chicken to a thickness of 0.5 cm (0.2 inches) using a meat mallet.
- Season Chicken: Sprinkle both sides of each chicken breast with salt and pepper for seasoning.
- Stuff and Roll Chicken: Place one baton of garlic butter in the center of a chicken breast. Trim edges if necessary and add the trimmings on top of the butter. Fold the sides over the butter, then carefully roll the chicken up from the bottom, sealing it with the seam side down.
- Wrap and Partially Freeze: Wrap each chicken roll tightly in cling wrap, twisting the ends to form a firm log. Freeze for 30 minutes until the surface is firm to touch but not completely frozen.
- Prepare Coatings: Place the egg, flour, and panko breadcrumbs into separate bowls for breading.
- Coat Chicken Rolls: Remove chicken from cling wrap. Coat each roll first in flour, shaking off excess, then dip into the whisked egg, letting excess drip off. Finally, coat thoroughly with panko breadcrumbs, pressing gently to adhere.
- Partial Freeze Again: Return the crumbed chicken to the freezer for 30 minutes until fairly firm but not frozen solid, to help maintain shape during cooking.
- Preheat Oven and Prepare Tray: Preheat your oven to 180°C (350°F). Place a rack on a baking tray for even cooking.
- Fry the Chicken: Heat oil (canola or vegetable) in a heavy-based pot to 190°C (375°F). Carefully add the chicken rolls and fry, turning once or twice, until golden brown on all sides, approximately 2 to 3 minutes. The chicken will still be raw inside at this point.
- Bake to Finish: Transfer the fried chicken rolls to the prepared rack and bake in the preheated oven for 15 minutes or until the internal temperature of the chicken reaches 65°C (150°F). Pierce the top to prevent butter leakage during baking.
- Rest and Serve: Let the chicken rest for 2 minutes after baking. Garnish with a pinch of finely chopped parsley and serve immediately for best flavor.
Notes
- Make sure the chicken breasts are pounded evenly to ensure even cooking and proper rolling.
- Using salted butter means you can omit the additional salt in the garlic butter to avoid oversalting.
- Freezing stages help the chicken retain shape and prevent the butter from leaking during frying and baking.
- It’s important to pierce the chicken surface gently before baking to allow steam to escape and prevent bursting.
- Use a kitchen thermometer to ensure the chicken is properly cooked to a safe internal temperature of 65°C (150°F).

