
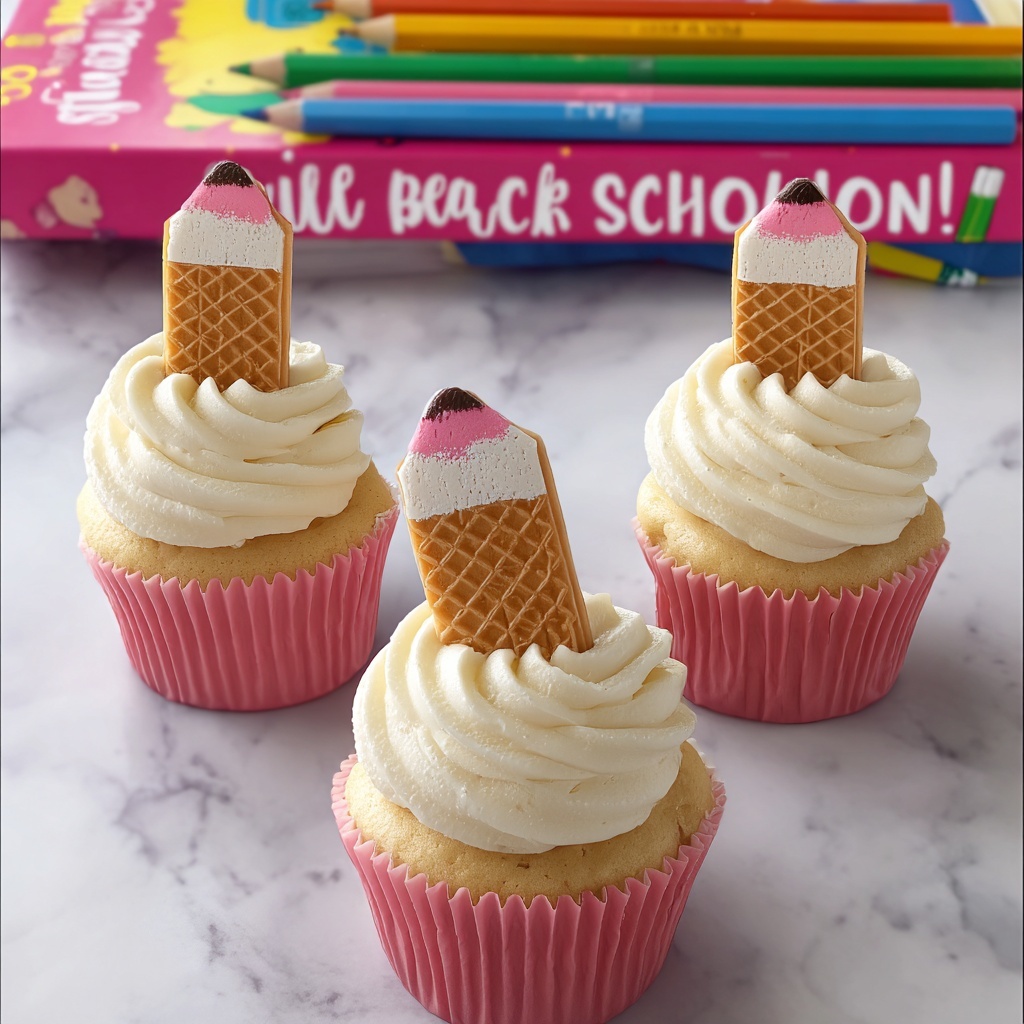
If you are looking for a fun, creative treat that will wow everyone at your next party or classroom celebration, this Pencil Cupcakes Recipe is your new go-to. Imagine a moist, fluffy yellow cupcake crowned with a charming “pencil” made from a vanilla sugar wafer dipped in vibrant pink and white candy melts, complete with a tiny chocolate chip tip that perfectly mimics a pencil point. It’s playful, delicious, and totally Instagram-worthy. These cupcakes not only taste amazing, but they also bring a nostalgic school-day vibe that’s perfect for teachers, students, or anyone who loves a little whimsy with their sweets.

Ingredients You’ll Need
This Pencil Cupcakes Recipe calls for simple ingredients that you probably already have on hand. Each one adds something special to the texture, flavor, or look of these adorable cupcakes, making sure every bite is delightful and every pencil looks just right.
- Yellow cake mix: The base of your cupcake, delivering a buttery, golden crumb that’s moist and tasty.
- Vegetable oil: Keeps the cupcakes tender and ensures they stay soft as glue to the candy pencil decoration.
- Large eggs: Bind all ingredients for a perfect rise and fluffy texture.
- Water: Helps activate the cake mix and keeps the batter smooth.
- Vanilla sugar wafers: These become the pencils; their sweet vanilla flavor complements the cake beautifully.
- Wilton bright pink candy melts: Create the iconic eraser end of the pencil with a pop of fun color.
- Wilton bright white candy melts: Used to form the sharpened tip, adding a clean, crisp detail.
- Chocolate chips: Halved to make tiny pencil points, adding a nice chocolate touch and finishing the look.
- White frosting: Acts as a luscious base crowning the cupcake and securing the pencils in place.
How to Make Pencil Cupcakes Recipe
Step 1: Prepare Your Oven and Cupcake Liners
Begin by preheating your oven to 350 degrees Fahrenheit. Line two 12-count muffin tins with cupcake liners. This step ensures your cupcakes bake evenly and are easy to remove once done.
Step 2: Mix the Batter
In a large bowl, combine the yellow cake mix, vegetable oil, eggs, and water. Stir everything together until the batter is smooth and lump-free, setting the stage for moist, tender cupcakes.
Step 3: Fill and Bake
Spoon the batter into the prepared muffin tins, filling each cup about halfway. Bake in the preheated oven for 18 to 20 minutes. Around minute 18, check for doneness by inserting a toothpick – it should come out clean when the cupcakes are fully baked.
Step 4: Cool the Cupcakes
Once baked, remove the cupcakes from the oven and let them cool completely on a wire rack. Cooling is important so your frosting doesn’t melt when applied.
Step 5: Shape the Pencil Tips
While cupcakes cool, take one vanilla sugar wafer at a time and gently slice both sides of the top to create the classic pointed pencil tip. Repeat this with all vanilla wafers – this is the start of your pencil masterpiece.
Step 6: Dip the Eraser Ends
Melt half of the bright pink candy melts in a microwave-safe bowl by heating in 30-second increments, stirring well each time until smooth. Dip the bottom portion of each sugar wafer into the melted pink candy to mimic the eraser end, then place the wafers on parchment paper to set.
Step 7: Dip the Pencil Tips
Next, melt half of the bright white candy melts using the same method. Dip the pointed end of each wafer into the white chocolate, allowing excess to drip off before laying them back on parchment paper to cool and harden.
Step 8: Add the Chocolate Chip Pencil Points
While the white chocolate sets, carefully slice each chocolate chip in half and affix one half at the tip of each pencil to resemble the graphite point. This smaller detail truly brings your “pencils” to life.
Step 9: Frost the Cupcakes and Assemble
Finally, attach a piping tip to your piping bag and fill it with white frosting. Frost each cooled cupcake in a smooth circular motion, then gently press one decorated pencil onto the top of every cupcake, completing this adorable design.
How to Serve Pencil Cupcakes Recipe
Garnishes
To elevate the presentation of your Pencil Cupcakes Recipe, consider adding colorful sprinkles or edible glitter around the base of the pencil. This adds whimsy and extra sparkle that’s sure to delight kids and adults alike.
Side Dishes
Pair these cupcakes with a glass of cold milk or a hot cup of coffee for an unbeatable combo. For a party setting, fruit skewers or a simple vanilla pudding make great accompaniments, balancing sweetness and freshness.
Creative Ways to Present
Transfer your cupcakes onto a themed platter, such as one decorated like a chalkboard or ruler, to emphasize the school-inspired vibe. You could also place each cupcake into mini chalkboard cupcake wrappers for an extra touch of charm.
Make Ahead and Storage
Storing Leftovers
Store any leftover cupcakes in an airtight container at room temperature for up to two days to keep them moist and fresh. Avoid refrigeration unless your room is very warm, as it can dry out the cupcakes.
Freezing
If you want to prepare ahead, these cupcakes freeze wonderfully. Freeze unfrosted cupcakes in a single layer on a tray, then transfer to a freezer-safe container for up to three months. Thaw completely before frosting and decorating with the pencils.
Reheating
Reheat cupcakes briefly in the microwave for about 10 seconds if you prefer them warm. Be careful not to overheat or you risk melting the frosting and candy decorations.
FAQs
Can I use homemade cake instead of a cake mix for this Pencil Cupcakes Recipe?
Absolutely! A homemade yellow cake recipe works perfectly, just be sure the batter isn’t too dense so your cupcakes remain light and tender.
What can I substitute if I can’t find vanilla sugar wafers?
If vanilla sugar wafers are unavailable, thin vanilla-flavored cookies or small rectangular butter cookies can be trimmed to create pencil shapes, though the texture may differ slightly.
How do I prevent the candy melts from getting too thick?
Always melt candy melts slowly in short bursts and stir continuously for a smooth texture. Adding a small amount of vegetable oil can also help maintain a pourable consistency.
Is it okay to frost the cupcakes with colored frosting instead of white?
Yes! Feel free to experiment with pastel or bright colored frostings to match a theme, but white frosting creates the best contrast for the pencil decorations.
Can these cupcakes be made gluten-free?
With a gluten-free cake mix and careful selection of gluten-free wafers and candy melts, you can definitely adapt this Pencil Cupcakes Recipe for gluten-free diets.
Final Thoughts
This Pencil Cupcakes Recipe combines simple ingredients and clever decorating techniques to create a dessert that’s as charming as it is delicious. Whether you’re celebrating a back-to-school event or just want a creative bake to brighten your day, these cupcakes bring joy in every bite. Give them a try and watch how quickly they become a treasured favorite among family and friends. You’ll love the smiles they bring!
Print
Pencil Cupcakes Recipe
- Prep Time: 15 minutes
- Cook Time: 20 minutes
- Total Time: 35 minutes
- Yield: 24 cupcakes
- Category: Dessert
- Method: Baking
- Cuisine: American
Description
These Pencil Cupcakes are a fun and creative treat perfect for back-to-school events or kids’ parties. Moist yellow cupcakes are topped with a swirl of smooth white frosting and adorned with adorable pencil-shaped vanilla sugar wafers dipped in colorful candy melts. The pink candy melt mimics the eraser, while white candy melt forms the sharpened tip, accented with a half chocolate chip to resemble the pencil lead. These cupcakes are as delightful to look at as they are to eat!
Ingredients
Cupcakes
- 1 box yellow cake mix (any brand)
- 1/3 cup vegetable oil
- 3 large eggs
- 1 cup water
Pencil Decorations
- 24 vanilla sugar wafers
- 10 oz Wilton bright pink candy melts
- 10 oz Wilton bright white candy melts
- Chocolate chips (for pencil tips)
Frosting
- White frosting (quantity as needed for frosting 24 cupcakes)
Instructions
- Preheat Oven and Prep Tins: Preheat your oven to 350°F (175°C) and line two 12-count muffin tins with cupcake liners to prepare for baking.
- Mix Cake Batter: In a mixing bowl, combine the yellow cake mix, vegetable oil, eggs, and water thoroughly until smooth and well blended.
- Fill and Bake: Fill each muffin cup half full with the batter and bake for 18-20 minutes, or until a toothpick inserted into the center comes out clean.
- Cool Cupcakes: Once baked, remove the cupcakes from the oven and allow them to cool completely before decorating.
- Prepare Work Surface: Line a large baking sheet with parchment paper to place the pencil decorations while they set.
- Shape Sugar Wafers: Take each vanilla sugar wafer and gently slice both sides of the top end to create a pointed pencil tip shape. Repeat for all wafers.
- Melt Pink Candy Melts: Place half of the pink candy melts in a microwave-safe bowl and heat in 30-second intervals, stirring between each until fully melted and smooth.
- Dip Pencil Erasers: Dip the bottom portion of each shaped sugar wafer into the melted pink candy, resembling a pencil eraser, then place on parchment paper to set.
- Melt White Candy Melts: Similarly, melt half of the white candy melts in 30-second increments, stirring until smooth.
- Dip Pencil Tips: Dip the pointed ends of the sugar wafers into the white melted candy, allowing excess to drip off, and place back on the parchment paper to set.
- Add Pencil Lead: While the white candy is setting, slice chocolate chips in half using a paring knife and place one half at the tip of each pencil to simulate the pencil lead.
- Repeat Decoration: Repeat dipping remaining wafers in pink and white candy melts and adding chocolate chip tips following the same steps.
- Prepare Frosting Bag: Attach a piping tip to a piping bag and fill it with white frosting.
- Frost Cupcakes: Frost each cooled cupcake with a circular swirl of white frosting using the piping bag.
- Top Cupcakes: Place one decorated pencil wafer on top of each frosted cupcake to complete the look.
Notes
- Ensure cupcakes are completely cooled before frosting to prevent melting.
- Use a sharp paring knife carefully when shaping sugar wafers and slicing chocolate chips.
- For easier candy melts melting, avoid overheating to prevent burning; stir frequently.
- If sugar wafers break, use extra wafers to replace or patch together.
- This recipe yields 24 cupcakes with 24 pencil decorations.

