
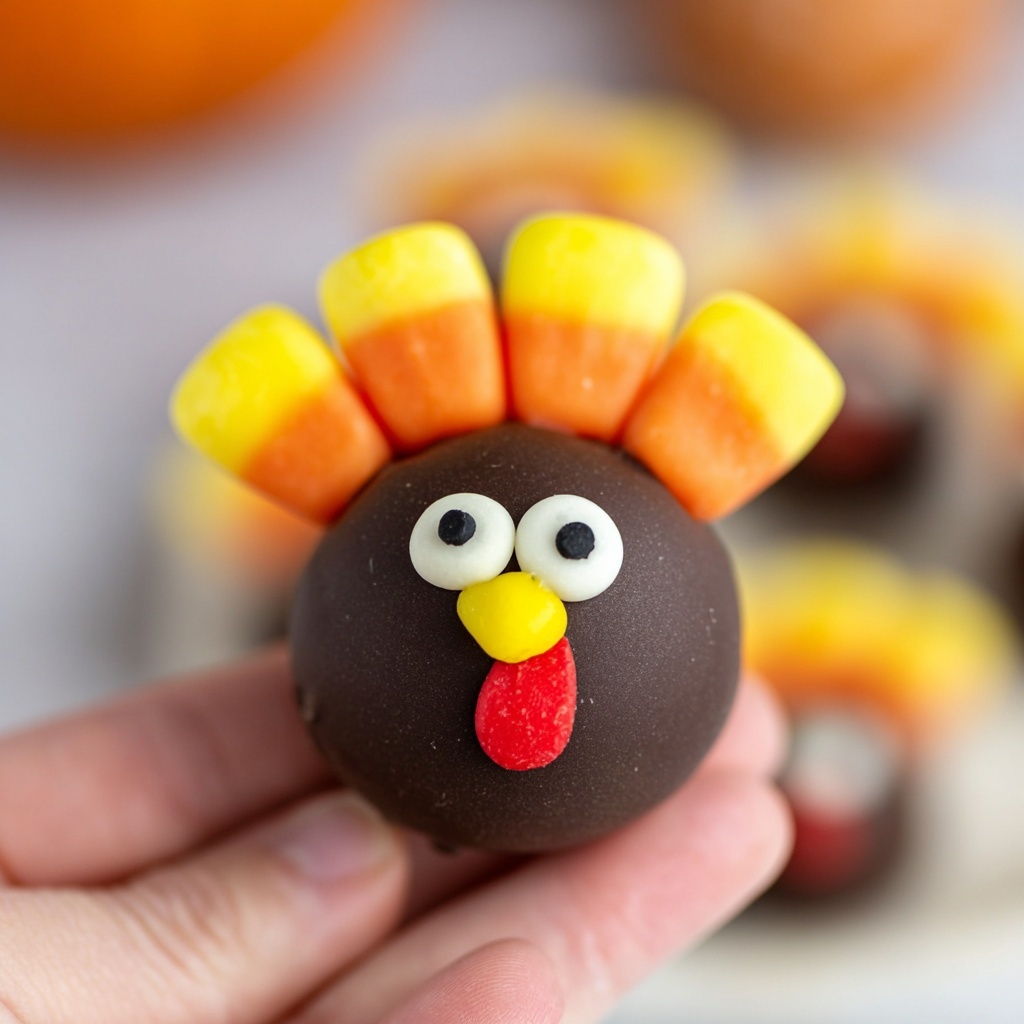
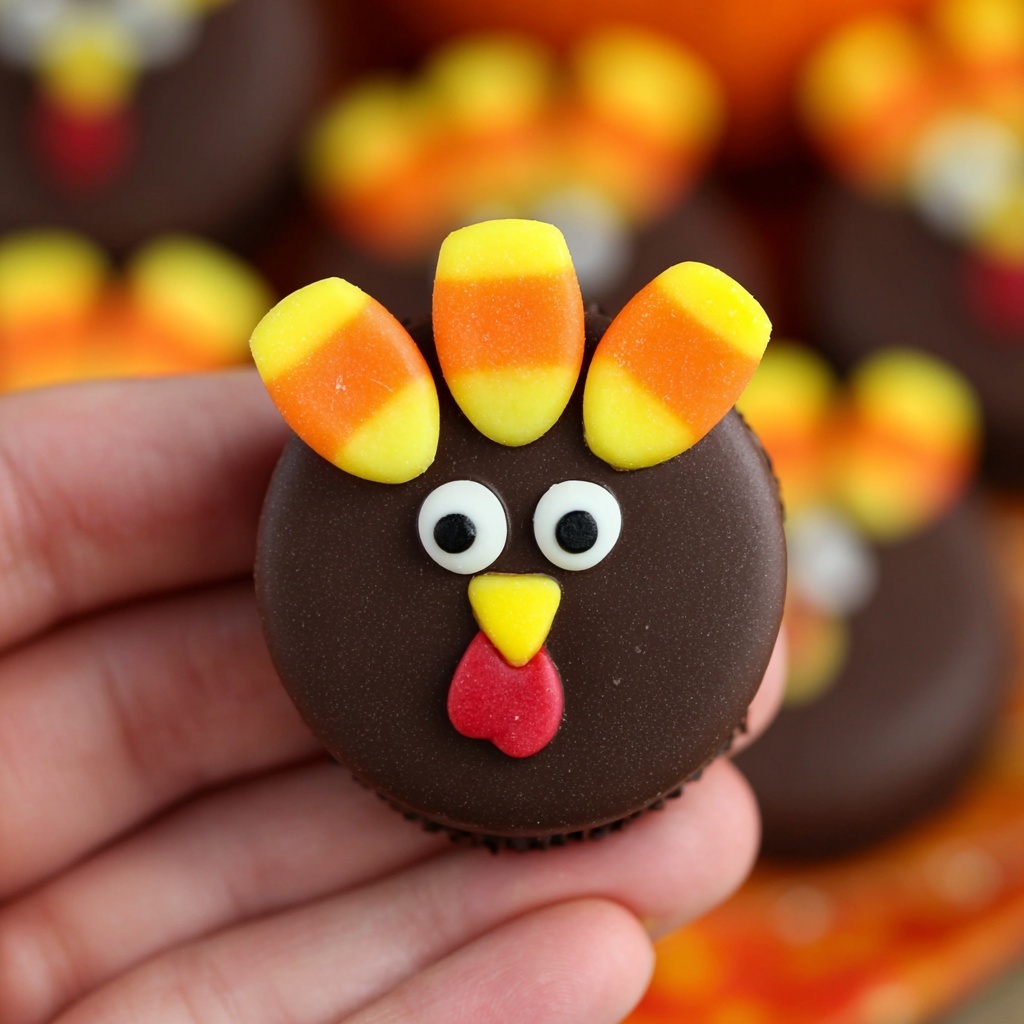
If you’re looking for a crowd-pleaser that combines whimsy with delicious flavor, this Turkey Cake Pops Recipe is exactly what you need. These bite-sized delights are not only charmingly festive but also easy to make, with moist chocolate cake blended into rich frosting and covered in glossy chocolate bark. Each pop is carefully decorated with candy eyes, noses, and candy corn feathers, making them perfect for holiday parties or fun family treats. Once you make these adorable turkey cake pops, they’re sure to become a beloved tradition that brings smiles all around.
Ingredients You’ll Need
Gathering simple, accessible ingredients is the first step to crafting these delightful cake pops. Every item plays a key role in giving these treats their irresistible taste, perfect texture, and eye-catching appearance.
- Chocolate cake mix: The base of these pops, providing rich cocoa flavor and tender crumb when baked.
- White frosting (2-3 tablespoons): Acts as the glue that binds cake crumbs into easy-to-handle balls without overpowering sweetness.
- Chocolate bark (16 ounces): Melts beautifully to coat each pop with a smooth, glossy shell.
- Oreos (28 thin dark chocolate): Serve as the turkey’s back, adding crunch and a chocolatey complement.
- Candy corn candies (84 pieces): A colorful and fun choice for turkey feathers, their shape and colors are perfect for the look.
- Candy eyeballs (56 pieces): Give the turkeys adorable, expressive faces.
- Yellow candy balls (28 pieces): Used for noses, adding a bright pop of color.
- Heart sprinkles (28 pieces): Create sweet little mouths, finishing each turkey’s charming face.
How to Make Turkey Cake Pops Recipe
Step 1: Bake and Cool the Cake
Begin by preparing the chocolate cake mix exactly as directed on the box. Once baked, allow the cake to cool completely—the cooler the cake, the easier it is to crumble and handle in the next steps, so be patient here.
Step 2: Crumble the Cake
Using a fork, crumble the entire cooled cake into fine crumbs inside a large mixing bowl. This will create the perfect texture base for building your cake pops, ensuring they hold together without being too dense.
Step 3: Mix in Frosting
Add 2 to 3 tablespoons of white frosting to the cake crumbs. Use your hands to gently work the frosting into the crumbs, continuing until the mixture forms a smooth, pliable dough that sticks together well but isn’t too sticky.
Step 4: Shape and Freeze
Roll the dough into 1-inch balls, placing each on a parchment-lined baking sheet. To help them firm up so they dip well later, freeze the cake balls for about 1 hour. This step is key to preventing messy melting.
Step 5: Melt the Chocolate Bark
While the cake balls chill, melt the 16 ounces of chocolate bark in a microwave-safe cup. Heat in short bursts, stirring often to create a smooth, velvety chocolate coating ready for dipping.
Step 6: Dip the Cake Pops
Using two forks, carefully dip each cake ball into the melted chocolate, letting the excess drip off. Once coated, place the dipped pops back onto a parchment-lined sheet, setting the stage for decoration.
Step 7: Attach the Oreo Backs
Before the chocolate coating hardens, press an Oreo cookie gently onto the backside of each cake pop. This adds a fun, crunchy texture and creates the turkey’s back for a realistic and tasty effect.
Step 8: Add the Facial Features
Use tweezers to carefully place the candy eyeballs, yellow candy noses, and heart-shaped sprinkles for mouths on each pop. If the chocolate hardens too fast, a tiny bit of melted chocolate on the back of candies works as edible glue to keep them perfectly in place.
Step 9: Create Candy Corn Feathers
Dip the tips of three candy corn pieces into melted chocolate and arrange them on the top side of each turkey pop as bright, festive feathers. Hold them in place briefly so the chocolate sets and secures them firmly.
Step 10: Chill Until Ready
Pop your finished turkey cake pops into the refrigerator for a while before serving. Chilling helps the chocolate fully harden and makes them easier to handle and enjoy without mess.
How to Serve Turkey Cake Pops Recipe
Garnishes
For an extra festive touch, consider sprinkling edible glitter or colorful nonpareils lightly around your serving platter. Fresh mint leaves or autumn leaves can create a lovely seasonal backdrop that enhances the turkey theme.
Side Dishes
These cake pops shine on their own but pair wonderfully with a warm cup of hot cocoa or a creamy pumpkin spice latte. For a sweet tabletop, offer small bowls of assorted nuts or caramel popcorn alongside your turkey cake pops for a delightful mix of textures.
Creative Ways to Present
Display these treats by sticking each pop upright in a foam block or a decorated flower pot wrapped in festive paper. Alternatively, arrange them on a tiered serving tray or place them in mini cupcake liners for easy grabbing at parties.
Make Ahead and Storage
Storing Leftovers
If you have any leftover turkey cake pops, store them in an airtight container in the refrigerator. Kept properly, they stay fresh for up to 4 days, allowing you to enjoy their charm even longer.
Freezing
You can freeze these cake pops by placing them in a single layer on a tray. Once frozen solid, transfer them to a freezer-safe container or bag. They freeze well for up to 2 months without losing texture or flavor.
Reheating
When ready to eat frozen pops, thaw them overnight in the refrigerator. Avoid microwaving, as it can melt the candy coatings. Simply enjoy them chilled or at room temperature for the best taste and texture.
FAQs
Can I make these cake pops with a different cake flavor?
Absolutely! While chocolate gives a rich backdrop, you can swap in vanilla, spice, or red velvet cake mixes. Just adjust frosting amounts slightly for texture, and have fun customizing your turkeys!
What if I don’t have candy corn for the feathers?
No worries! You can substitute with sliced fruit leather, colored fondant leaves, or even small jelly beans in autumn colors. Creativity is what makes this recipe truly special.
How do I keep the cake pops from falling apart?
Ensuring the cake is fully cooled before crumbling and adding just enough frosting to hold the dough together is key. Freezing the balls before dipping also helps them keep their shape during coating.
Can I use regular chocolate instead of chocolate bark?
Yes, regular chocolate chips or bars work fine. Just temper the chocolate or melt carefully using a double boiler or microwave in short intervals to avoid burning and to keep it smooth for dipping.
Is this recipe kid-friendly to make together?
Definitely! Kids love rolling the cake balls and decorating the turkey faces, making this a fun, hands-on project for family gatherings. Just supervise the hot chocolate melting steps to keep everyone safe.
Final Thoughts
This Turkey Cake Pops Recipe is a delightful way to celebrate any get-together with playful charm and scrumptious flavor. Baking and decorating these pops offers a wonderful opportunity to get creative and enjoy some sweet memories. I encourage you to gather your ingredients, have fun with the process, and watch these little turkeys steal the show at your next celebration!
Print
Turkey Cake Pops Recipe
- Prep Time: 10 minutes
- Cook Time: 35 minutes
- Total Time: 45 minutes
- Yield: 28 cake pops
- Category: Dessert
- Method: No-Cook
- Cuisine: American
Description
These delightful Turkey Cake Pops are a fun and festive treat perfect for Thanksgiving celebrations. Made from moist chocolate cake mixed with creamy frosting, shaped into bite-sized balls, and coated in rich chocolate bark, they are decorated with candy to resemble adorable turkeys. Easy to make and sure to impress, these cake pops combine the flavors of a classic chocolate cake with playful seasonal decoration.
Ingredients
Cake and Frosting
- 1 box (15.25 oz) chocolate cake mix, prepared according to box directions
- 2–3 tablespoons white frosting
Coating and Decorations
- 16 ounces chocolate bark
- 28 Oreos (thin dark chocolate)
- 84 candy corn candies
- 56 candy eyeballs
- 28 yellow candy balls (for noses)
- 28 heart sprinkles (for mouths)
Instructions
- Cool the cake: Allow the chocolate cake to cool completely after baking according to the box directions, ensuring it is easy to handle for crumbling.
- Crumble the cake: In a large bowl, crumble the entire cooled cake with a fork until it resembles fine crumbs.
- Add frosting: Mix in 2 to 3 tablespoons of white frosting with your hands, working it into the cake crumbs until the mixture holds together and forms a ball.
- Shape the cake balls: Roll the cake mixture into 1-inch balls and place them on a baking sheet lined with parchment paper. Freeze for one hour to firm up the cake balls.
- Melt the chocolate: Melt the chocolate bark in a microwave-safe cup or bowl, heating in short bursts and stirring until smooth and ready for dipping.
- Dip the cake pops: Using two forks, dip each frozen cake ball into the melted chocolate, letting excess chocolate drip off before placing them back on a parchment-lined baking sheet.
- Attach Oreos: Before the chocolate coating hardens, stick one Oreo on the backside of each dipped cake pop to represent the turkey’s body.
- Add facial features: Using tweezers for precision, carefully place two candy eyeballs, one yellow candy ball for the nose, and one heart sprinkle for the mouth on the front of each cake pop. If the chocolate hardens too quickly, use a small dab of melted chocolate as glue.
- Create feathers: Dip the tips of three candy corn pieces into melted chocolate and arrange them on top of each turkey cake pop to simulate feathers, holding them in place until the coating sets.
- Chill before serving: Place the decorated cake pops in the refrigerator to chill and allow the chocolate to fully harden before serving.
Notes
- For best results, allow the cake to cool thoroughly before crumbling to prevent sogginess.
- If the chocolate coating thickens, gently reheat in short bursts to maintain a smooth dipping consistency.
- Use tweezers or small tools for precise placement of candy decorations.
- These cake pops can be stored in an airtight container in the refrigerator for up to 3 days.
- Feel free to customize decorations to your preference or for other holidays.
