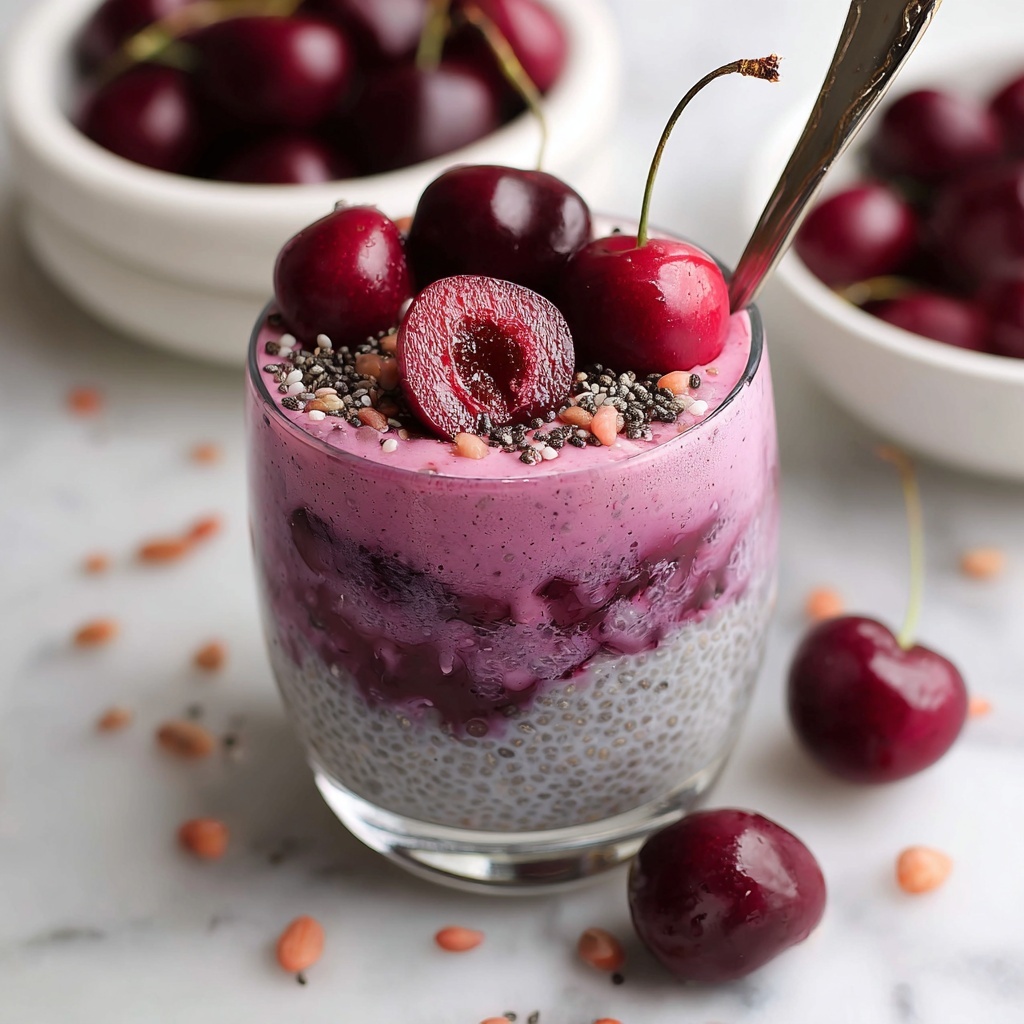
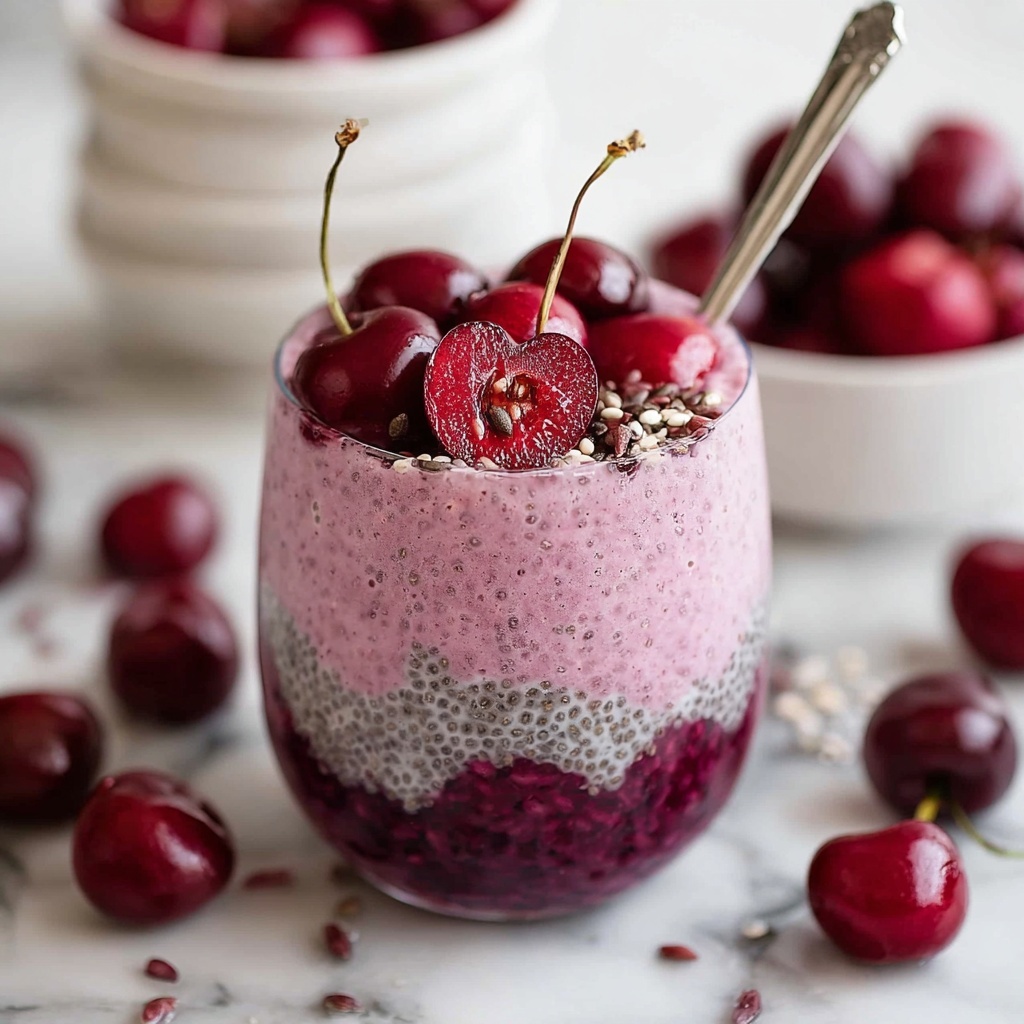
There is something truly magical about the **Cherry Chia Pudding with Toasted Cherries and Cream Recipe** that makes it an irresistible treat any time of day. This luscious, creamy pudding combines the perfect balance of tart frozen cherries and the subtle crunch of chia seeds, all wrapped in a dairy-free milk base that feels both nourishing and indulgent. Each spoonful bursts with flavor and texture, making it a fantastic way to brighten up your breakfast or satisfy your sweet tooth with a wholesome dessert. Let me take you through this delightful recipe that’s as easy as it is delicious.
Ingredients You’ll Need
The beauty of this recipe lies in its simplicity. Each ingredient plays a vital role, from the creamy dairy-free milk that forms the pudding’s base, to the whole chia seeds that provide that satisfying texture, right through to the fresh burst of flavor from the cherries and the cozy hint of almond extract.
- Frozen cherries: These bring tart sweetness and vibrant color, perfect for the topping and highlight of the pudding.
- Dairy-free milk: Choose your favorite kind like almond or oat milk—it creates the creamy body for the pudding without dairy.
- Maple syrup: A natural sweetener that gently enhances the pudding and cherries without overpowering them.
- Almond extract: Just a dash to deepen the flavor and add a lovely nutty aroma that pairs beautifully with cherries.
- Whole chia seeds: These tiny seeds absorb liquid to create that perfect gel-like texture and add a wholesome crunch.
How to Make Cherry Chia Pudding with Toasted Cherries and Cream Recipe
Step 1: Prepare Chia Pudding Base
Start by whisking together your dairy-free milk, 1 teaspoon of maple syrup, and the almond extract in a bowl. This blend forms the flavorful foundation of your pudding and makes sure the sweetness and aroma are evenly spread from the start.
Step 2: Add Chia Seeds
Next, add the whole chia seeds to the mixture and whisk vigorously for 1 to 2 minutes. This step is key to prevent any clumping and ensure every seed is coated and suspended in the milk. Let it rest for 5 minutes, then give it another good whisk to keep things smooth and consistent.
Step 3: Chill Pudding Base
Cover your bowl tightly and place it in the refrigerator for at least 4 hours, although overnight is best if you can wait. This chilling period allows the chia seeds to soak up the liquid and thicken into that rich, creamy pudding that feels like dessert even at breakfast.
Step 4: Prepare Cherry Topping
While the pudding sets, it’s time to make that spectacular toasted cherry topping. In a small saucepan over medium-low heat, combine the frozen cherries with the remaining 1 teaspoon of maple syrup. Allow the cherries to simmer gently for 8 to 12 minutes, stirring occasionally. They’ll soften beautifully and release their juices, creating a luscious, slightly syrupy sauce that smells divine.
Step 5: Cool Cherry Topping
Once the cherries have reached that perfect softness, remove the saucepan from the heat and let the topping cool completely. To speed up the process, transfer the cherries to a separate bowl—this will help you assemble your pudding sooner and keep everything fresh and vibrant.
Step 6: Assemble and Serve
Finally, spoon the chilled chia pudding into your favorite glasses or bowls. Top with a generous layer of the cooled toasted cherries. If you’re feeling fancy, repeat the layers for a stunning visual effect and added flavor bursts. Serve immediately and enjoy that perfect blend of creamy, tart, and sweet in every bite.
How to Serve Cherry Chia Pudding with Toasted Cherries and Cream Recipe

Garnishes
Adding a little something extra on top can transform this pudding into a showstopper. Think fresh mint leaves for a pop of color and freshness, or a sprinkle of toasted nuts like almonds or pistachios for added crunch and richness. A drizzle of extra maple syrup or a swirl of coconut cream can also elevate the experience wonderfully.
Side Dishes
This pudding pairs beautifully with light and fresh sides that balance its richness. Consider a crisp green salad with citrus dressing, a handful of fresh berries, or even a slice of toasted rustic bread with a smear of almond butter for a delightful textural contrast.
Creative Ways to Present
Presentation is half the fun. Serve your Cherry Chia Pudding with Toasted Cherries and Cream Recipe in clear glass jars to showcase the gorgeous layers. For a picnic, pack it in small mason jars with snap-on lids for easy transport. You can also layer it in parfait glasses with granola and yogurt for a more elaborate, café-style treat.
Make Ahead and Storage
Storing Leftovers
If you happen to have leftovers, simply cover the pudding tightly and store it in the refrigerator. It will keep well for up to 3 days, maintaining its creamy texture and fresh cherry flavor.
Freezing
Freezing chia pudding is possible but not always ideal because the texture may change slightly. If you choose to freeze, do so in airtight containers for up to a month, then thaw overnight in the fridge. The topping should be stored separately if frozen.
Reheating
This pudding is best enjoyed cold, so reheating is not typically recommended. However, if you prefer a warm snack, gently warm the cherry topping on the stove and serve it over the cold chia pudding for a comforting contrast of temperatures.
FAQs
Can I use fresh cherries instead of frozen?
Absolutely! Fresh cherries can be used and will make the topping even more vibrant. Just pit and chop them before simmering. Keep an eye on cooking time as fresh cherries may soften faster.
Is this recipe vegan and dairy-free?
Yes, when using plant-based milk like almond, oat, or coconut, this recipe is completely vegan and dairy-free, making it perfect for various dietary needs.
Can I substitute maple syrup for another sweetener?
You can! Honey, agave nectar, or even coconut sugar work well. Just adjust to taste, keeping in mind their varying sweetness levels and flavor profiles.
Why do chia seeds need to be whisked so much?
Whisking the chia seeds prevents clumping and ensures they are evenly distributed. This helps create a smooth, creamy pudding rather than a lumpy texture.
Can I make this pudding without refrigeration overnight?
While you can let it sit for a few hours, the pudding develops its full creamy texture and flavor after chilling overnight. Longer refrigeration time allows chia seeds to fully absorb the liquid and soften.
Final Thoughts
Making the Cherry Chia Pudding with Toasted Cherries and Cream Recipe feels like giving yourself a warm, delicious hug. It’s simple to prepare, delightfully refreshing, and packed with wholesome ingredients that love your body back. Whether you’re looking for a nutritious breakfast, a healthy dessert, or a snack that feels indulgent, this pudding ticks all the boxes. Trust me, once you try it, it will quickly become a favorite in your recipe collection—so go ahead, indulge and enjoy every spoonful!
Print
Cherry Chia Pudding with Toasted Cherries and Cream Recipe
- Prep Time: 15 minutes
- Cook Time: 12 minutes
- Total Time: 8 hours 20 minutes
- Yield: 2 servings
- Category: Dessert
- Method: Stovetop
- Cuisine: American
- Diet: Vegan
Description
This Cherry Chia Pudding is a delicious and nutritious dairy-free dessert or breakfast option that combines creamy chia pudding with a naturally sweet cherry topping. Made with whole chia seeds soaked in dairy-free milk and lightly sweetened with maple syrup and almond extract, it’s a wholesome treat that’s easy to prepare and perfect for make-ahead meals.
Ingredients
Chia Pudding Base
- ½ cup (125 ml) dairy-free milk
- 1 teaspoon maple syrup
- ⅛ teaspoon almond extract
- 3 tablespoons (30 g) whole chia seeds
Cherry Topping
- ½ cup (70 g) frozen cherries
- 1 teaspoon maple syrup
Instructions
- Prepare Chia Pudding Base: In a bowl, combine the dairy-free milk, 1 teaspoon maple syrup, and ⅛ teaspoon almond extract. Whisk thoroughly until the ingredients are well mixed and smooth.
- Add Chia Seeds: Add the whole chia seeds to the mixture and whisk vigorously for 1 to 2 minutes to ensure the seeds are evenly dispersed and to prevent clumps. Let the mixture sit for 5 minutes, then whisk once more to break up any settling.
- Chill Pudding Base: Cover the bowl and refrigerate it for at least 4 hours or preferably overnight. This resting time allows the chia seeds to absorb the liquid and create a creamy, thick pudding texture.
- Prepare Cherry Topping: In a small saucepan, combine the frozen cherries with the remaining 1 teaspoon maple syrup. Simmer over medium-low heat for 8 to 12 minutes, stirring occasionally until the cherries soften and release their juices, forming a slightly syrupy sauce.
- Cool Cherry Topping: Remove the cherry mixture from heat and let it cool completely. For faster cooling, transfer it to a separate bowl. Cooling ensures the topping doesn’t warm the pudding when assembled.
- Assemble and Serve: Spoon the chilled chia pudding into serving glasses or bowls. Layer with the cooled cherry topping, and repeat layers if desired. Serve immediately and enjoy the refreshing and nutrient-packed dessert.
Notes
- You can substitute frozen cherries with fresh cherries if in season.
- Adjust the sweetness by adding more or less maple syrup to taste.
- For a nuttier flavor, toast the chia seeds lightly before adding to the milk.
- If the pudding is too thick after chilling, stir in a little more dairy-free milk to adjust consistency.
- This pudding keeps well in the refrigerator for up to 3 days.
