
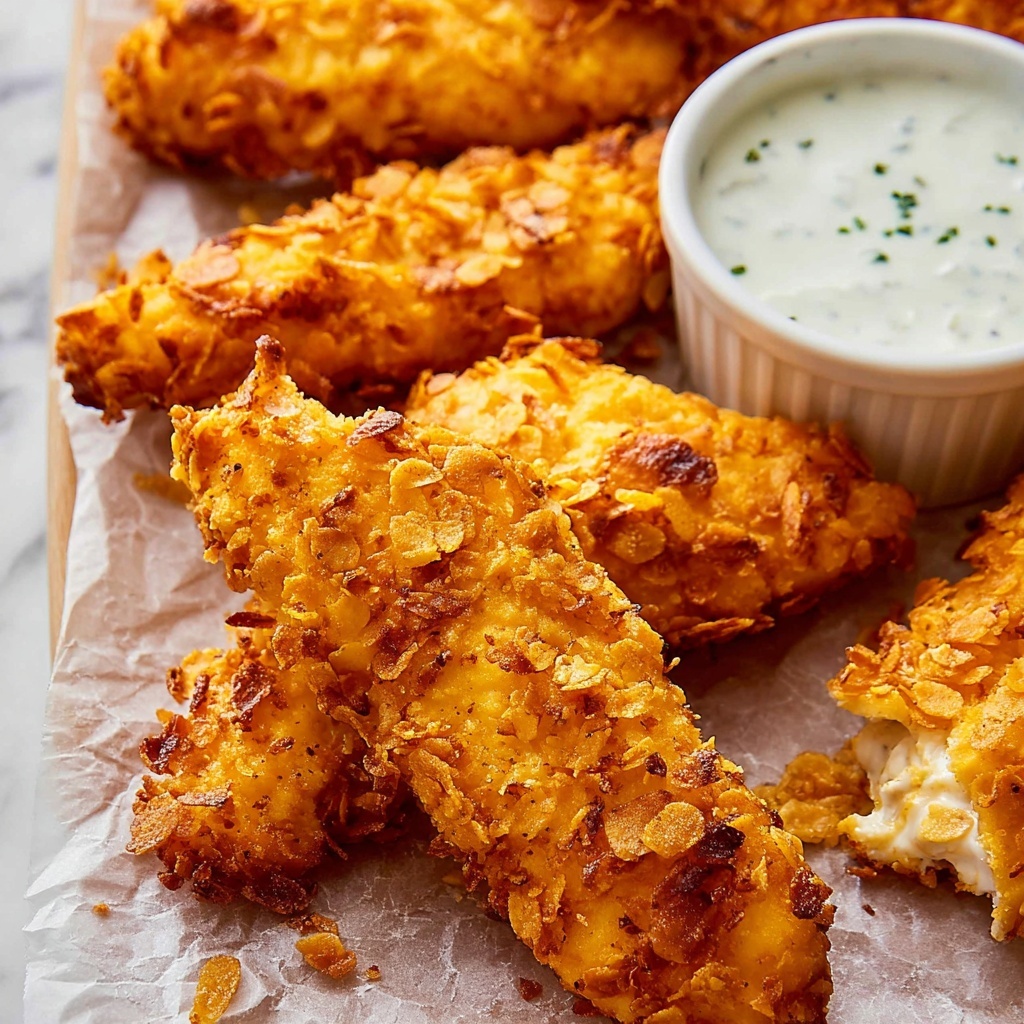
If you’re craving a truly delightful and crunchy snack that feels indulgent yet wholesome, this Crispy Baked Chicken Fingers Recipe is your new best friend in the kitchen. With golden, perfectly seasoned coating and juicy chicken inside, it’s a dish that’s sure to satisfy everyone at the table. What’s better is that it’s baked, not fried, giving you that satisfying crunch with less guilt. Whether you’re feeding family or impressing friends, this recipe balances simplicity and flavor in the most delicious way.
Ingredients You’ll Need
Gathering a handful of straightforward ingredients sets the foundation for these irresistible chicken fingers. Each component plays a key role: from the corn flakes that add an unbeatable crunch, to the touch of parmesan enhancing the savory notes, everything combines to build flavor, texture, and that classic golden color you’re aiming for.
- 2 Chicken breasts: Fresh, skinless, and trimmed for tender, juicy strips.
- 1 cup corn flakes (crushed): Adds a naturally crispy and light coating.
- 1 cup all-purpose flour: Helps the coating stick and ensures a beautiful crust.
- 1 egg: Acts as the perfect binder for the coating mixture.
- ½ tsp salt: Brings out all the wonderful flavors without overpowering.
- ½ tsp black pepper: Adds a gentle kick of warmth.
- 1 tsp sweet paprika: Gives a subtle smoky flavor and vibrant color.
- ¼ cup grated parmesan: Infuses a delicious savory richness that takes the crust to the next level.
How to Make Crispy Baked Chicken Fingers Recipe
Step 1: Preheat and Prep Your Oven
Start by setting your oven to 400°F. This high heat is crucial for getting those chicken fingers nice and crispy while they bake evenly. Then, line a baking tray with parchment paper and place a cooling rack on top. Spraying the cooling rack with non-stick cooking spray ensures your chicken won’t stick and gets crispy all around.
Step 2: Prepare the Chicken Strips
Slice your chicken breasts carefully into even strips to make sure they cook thoroughly and look uniform. Placing them in a large bowl makes it easy for the upcoming coating steps. Consistency in your strip size ensures that each bite has the right balance of juicy chicken and crispy crust.
Step 3: Mix Your Coating Ingredients
In a medium bowl, combine the crushed corn flakes, flour, salt, black pepper, sweet paprika, and grated parmesan. This mixture is your secret weapon for that unbeatable crispy texture packed with flavor. Give it a good mix—your chicken fingers are about to get beautifully coated.
Step 4: Whisk the Eggs
In a different bowl, whisk the egg thoroughly. This egg wash helps the coating stick to the chicken, creating a glorious crust when baked. Ensure it’s well-beaten to evenly coat every chicken strip.
Step 5: Coat the Chicken
Drop your chicken strips into the egg wash, stirring them around to make sure they’re fully coated. Next, one at a time, dip each strip into the corn flakes mixture. Press gently so the coating clings well to every surface, which guarantees that crispy finish you’ll love.
Step 6: Arrange and Bake
Place the coated chicken fingers onto your prepped cooling rack, making sure they’re spaced out and not touching. This allows hot air to circulate, crisping the coating from all sides. Bake for 20 minutes until they’re a gorgeous golden brown and cooked through. Keep an eye on them towards the end to avoid overbaking.
Step 7: Enjoy Your Crispy Baked Chicken Fingers Recipe
Once golden and crispy, your chicken fingers are ready to be enjoyed. This is one of those recipes that tastes just as good fresh out of the oven as they do dipped in your favorite sauce. Serve immediately for the best crunch.
How to Serve Crispy Baked Chicken Fingers Recipe

Garnishes
Simple garnishes like freshly chopped parsley or a sprinkle of extra parmesan lift the dish visually and elevate the flavor with minimal effort. A wedge of lemon can also add a refreshing zing that cuts through the richness, brightening every bite.
Side Dishes
Pair your crispy chicken fingers with classic sides such as creamy coleslaw, mashed potatoes, or a fresh garden salad for a balanced meal. For a fun take, serve with sweet potato fries or roasted veggies to keep things vibrant and full of texture.
Creative Ways to Present
Try stacking your chicken fingers in a rustic basket lined with parchment for a casual, finger-food vibe. Alternatively, serve them on skewers with dipping sauces in small bowls for a party-style presentation. These ideas not only look inviting but make sharing joyfully easy.
Make Ahead and Storage
Storing Leftovers
If you have any leftovers (which might be rare!), store them in an airtight container in the refrigerator. They’ll keep well for up to three days. Just be sure to place a paper towel beneath to help maintain that crispness by absorbing excess moisture.
Freezing
These chicken fingers freeze beautifully. Arrange them on a baking sheet and flash freeze before transferring to a freezer-safe bag or container. They’ll last up to a month. When you’re ready, bake them straight from frozen to keep that crispy texture intact.
Reheating
To bring back the crunch, reheat your chicken fingers in the oven at 375°F on a wire rack for about 10-15 minutes. Avoid the microwave—it tends to make the coating soggy. This method ensures they stay golden and tasty, almost like freshly baked.
FAQs
Can I use chicken thighs instead of breasts?
Absolutely! Boneless, skinless chicken thighs will work well and tend to be juicier. Just slice them into similar-sized strips to ensure even cooking and follow the recipe as usual.
What can I use if I don’t have corn flakes?
Panko breadcrumbs or crushed crackers are great substitutes. Just make sure to crush them finely and toss with parmesan and spices to mimic that crispy, flavorful coating.
Is this recipe kid-friendly?
Definitely! Kids usually adore anything crispy and dippable, and these chicken fingers are mild in spice. They’re a perfect finger food for lunchboxes or after-school snacks.
Can I make these gluten-free?
Yes, swap the all-purpose flour for a gluten-free flour blend and use gluten-free corn flakes or crushed gluten-free cereal. The result will still be deliciously crispy and safe for gluten-sensitive eaters.
What dipping sauces pair best with this recipe?
Classic choices like honey mustard, barbecue sauce, or ranch dressing complement these chicken fingers wonderfully. You can also mix up your favorite hot sauce with a little mayo for a spicy kick.
Final Thoughts
There’s something incredibly satisfying about biting into these crunchy, golden chicken fingers that you made at home. The Crispy Baked Chicken Fingers Recipe is a simple yet delicious way to treat yourself and your loved ones to a hearty, comforting meal without the fuss or guilt of frying. So go ahead—grab those ingredients and enjoy the magic of homemade crispy chicken fingers that will quickly become a household favorite.
Print
Crispy Baked Chicken Fingers Recipe
- Prep Time: 15 minutes
- Cook Time: 20 minutes
- Total Time: 35 minutes
- Yield: 2 servings
- Category: Main Dish
- Method: Baking
- Cuisine: American
Description
This Crispy Baked Chicken Fingers recipe offers a healthier twist on the classic fried favorite by baking the chicken strips to golden perfection. Coated with a crunchy mixture of crushed corn flakes, flour, parmesan, and spices, these chicken fingers are perfect as a snack or main dish with a satisfying crisp texture and delicious flavor.
Ingredients
Chicken
- 2 Chicken breasts
Breading Mixture
- 1 cup corn flakes (crushed)
- 1 cup all-purpose flour
- ½ tsp salt
- ½ tsp black pepper
- 1 tsp sweet paprika
- ¼ cup grated parmesan
Binding
- 1 egg
Instructions
- Preheat Oven: Preheat your oven to 400°F (204°C) to prepare for baking the chicken fingers.
- Prepare Baking Tray: Line a baking tray with parchment paper for easy cleanup and place a cooling rack on top to allow even air circulation.
- Non-Stick Preparation: Spray the cooling rack with non-stick cooking spray to prevent the chicken strips from sticking during baking.
- Cut Chicken: Slice the chicken breasts into strips and place them into a large bowl, ready for coating.
- Mix Breading: In a medium bowl, combine crushed corn flakes, all-purpose flour, salt, black pepper, sweet paprika, and grated parmesan to create the flavorful coating.
- Whisk Egg: In another medium bowl, whisk the egg thoroughly to use as the binding agent for the breading.
- Coat Chicken in Egg: Add the chicken strips to the whisked egg bowl and toss them to ensure each piece is well coated with the egg mixture.
- Coat Chicken with Breading: Dip each egg-coated chicken strip individually into the corn flakes mixture, making sure they are fully covered with the crunchy coating.
- Arrange on Rack: Place coated chicken strips evenly spaced on the prepared cooling rack, ensuring they do not touch to allow proper crisping.
- Bake: Bake the chicken fingers in the preheated oven for 20 minutes until they turn golden brown and are cooked through.
- Serve: Remove from the oven and serve immediately while crispy and hot. Enjoy your delicious baked chicken fingers!
Notes
- Using a cooling rack on the baking tray allows heat to circulate evenly, helping the chicken fingers become extra crispy without frying.
- You can substitute crushed corn flakes with panko breadcrumbs for an alternative crispy coating.
- Ensure chicken strips are not overcrowded and spaced apart on the rack to maintain crispiness.
- For extra flavor, add garlic powder or onion powder to the breading mixture.
- Make sure chicken is cooked to an internal temperature of 165°F (74°C) for food safety.

