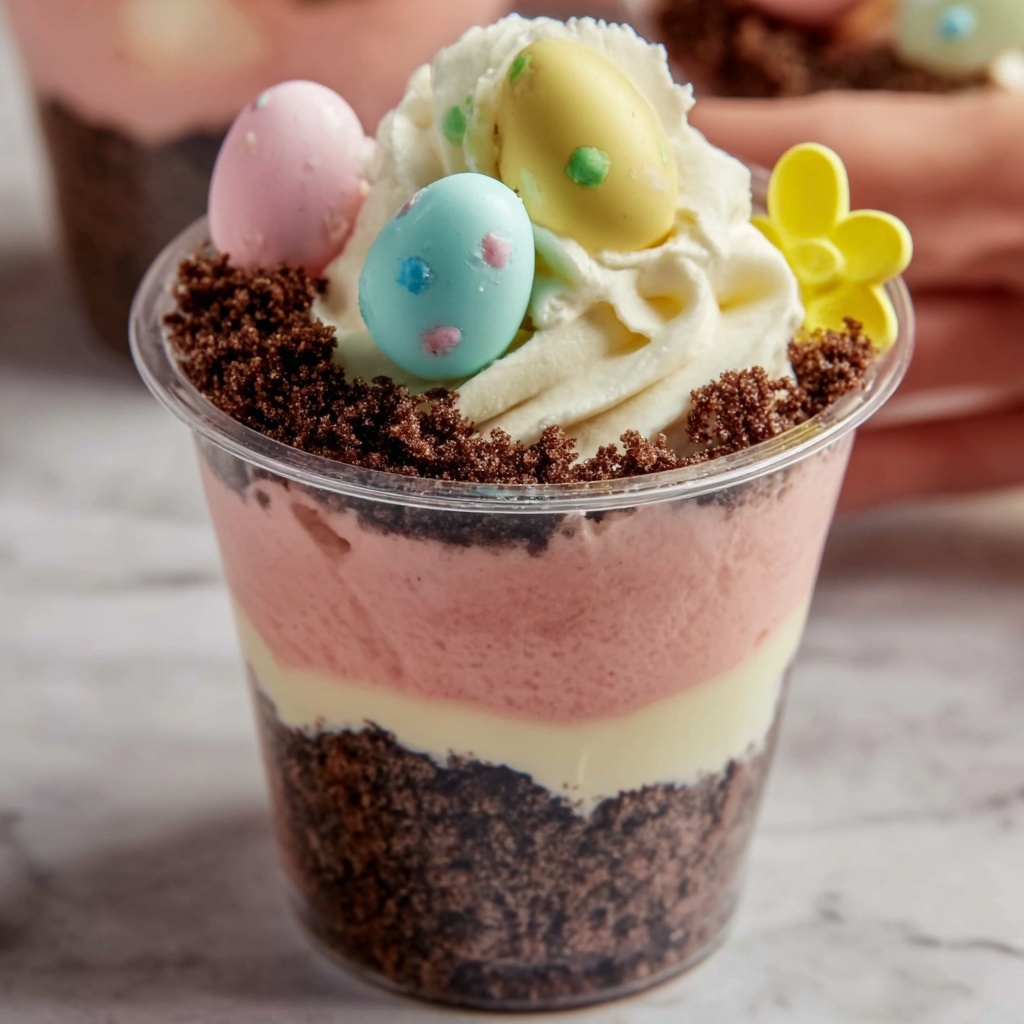
If you’re searching for a dessert that’s as fun to eat as it is to make, the Easter Dirt Cups Recipe is your perfect match. This playful treat combines creamy chocolate pudding, fluffy whipped topping, and crunchy crushed cookies, all layered to resemble a delightful garden of sweet “dirt.” With the addition of gummy worms and colorful candy eggs, it brings an Easter-themed whimsy to your table that kids and adults alike will adore. Plus, it’s incredibly easy to prepare, making it an ideal choice for last-minute celebrations or casual family gatherings.

Ingredients You’ll Need
The magic of this Easter Dirt Cups Recipe lies in its simplicity and the balance of textures and flavors each ingredient offers. From the rich chocolate pudding to the crunchy cookie layers, every element plays an essential role in creating that irresistible edible “dirt” experience.
- Instant chocolate pudding mix (3.9 oz): Provides the rich, creamy base with intense chocolate flavor that makes the dessert so indulgent.
- Cold milk (2 cups): Needed to whisk with the pudding mix to achieve the perfect, silky texture.
- Whipped topping (8 oz tub): Adds lightness and a smooth finish that balances the chocolate pudding’s density.
- Chocolate sandwich cookies, crushed (15-20 cookies): Give the “dirt” its authentic look and a satisfying crunch in every bite.
- Gummy worms (½ cup, optional): Introduce playful, chewy fun that perfectly fits the garden theme.
- Candy eggs (½ cup): Mini chocolate or candy-coated eggs bring bright pops of color and an Easter spirit to each cup.
- Powdered sugar (1 tablespoon, optional): Lightly sweetens the whipped topping if you prefer an extra hint of sweetness.
How to Make Easter Dirt Cups Recipe
Step 1: Whisk the Chocolate Pudding
Begin by mixing the instant chocolate pudding mix with cold milk in a medium-sized bowl. Whisk briskly for about two minutes until the mixture thickens into a luscious, silky pudding. This step lays the foundation for the creamy texture that will delight your taste buds.
Step 2: Fold in the Whipped Topping
Next, gently fold the whipped topping into the pudding. Use a spatula to combine them smoothly, keeping the mixture light and airy. This step ensures you get that perfect blend of creamy richness with a hint of fluffiness that keeps every spoonful heavenly.
Step 3: Create the First Pudding Layer
Take your favorite serving cups or bowls and spoon in the first layer of the pudding mixture. This sets the stage for the layered look, so be generous but neat to fit in all those delicious textures later.
Step 4: Add the Crushed Cookies ‘Dirt’
Sprinkle a layer of crushed chocolate sandwich cookies over the pudding. The cookies mimic real dirt perfectly, adding crunch and that familiar chocolate kick that contrasts beautifully with the smooth pudding underneath.
Step 5: Build Up the Layers
Continue layering by alternating pudding and crushed cookies until your cups are filled. Ending with a cookie layer on top creates that classic “dirt” appearance that makes this dessert a crowd-pleaser.
Step 6: Garnish with Gummy Worms and Candy Eggs
Decorate the top layer with gummy worms weaving through the cookie crumbs and sprinkle candy eggs for festive pops of color. These little finishing touches give the Easter Dirt Cups Recipe its playful charm and make it visually irresistible.
Step 7: Chill Before Serving
Place your completed dirt cups in the fridge for at least one hour. This allows the layers to set and the flavors to marry, delivering the best texture and taste when you serve them chilled.
How to Serve Easter Dirt Cups Recipe

Garnishes
While gummy worms and candy eggs are classic garnishes, you can also add a dusting of cocoa powder or chocolate shavings for an extra touch of elegance. Fresh mint leaves or tiny edible flowers can elevate the look if you’re serving these cups at a spring brunch.
Side Dishes
This dessert pairs wonderfully with light, refreshing sides like fresh fruit salad or a citrusy green salad. The contrast between the rich, creamy dirt cups and fresh, crisp sides will keep your meal balanced and exciting.
Creative Ways to Present
For a fun twist, serve the Easter Dirt Cups Recipe in mason jars or clear glass cups to show off the beautiful layers. You can also use small flower pots cleaned thoroughly or even mini gardening buckets for an extra garden-themed presentation that sparks smiles.
Make Ahead and Storage
Storing Leftovers
Leftover dirt cups can be stored in the refrigerator for up to two days. Cover them tightly with plastic wrap or transfer them to airtight containers to keep the cookie “dirt” crunchy and the pudding fresh.
Freezing
This dessert isn’t ideal for freezing because the pudding and whipped topping can separate and lose their pleasing texture once thawed. It’s best enjoyed fresh or within a couple of days refrigerated.
Reheating
Since this is a cold dessert, it’s meant to be served chilled and should not be reheated. Simply take the cups out of the fridge and let them sit a few minutes at room temperature if they’re too cold to enjoy immediately.
FAQs
Can I make Easter Dirt Cups Recipe dairy-free?
Absolutely! You can substitute the instant pudding mix and milk with dairy-free alternatives, such as coconut or almond-based pudding mixes and non-dairy milk. Use a dairy-free whipped topping to keep the texture light and creamy.
What if I don’t have instant pudding mix?
If you don’t have instant pudding mix, you can make homemade chocolate pudding from scratch. Just be sure to prepare it thick enough to hold the layers well. However, instant pudding provides the quickest and easiest route for this dessert.
Are there alternatives to gummy worms?
Yes! If gummy worms aren’t your thing, try jelly beans or small fruit gummies. You can even use edible candy flowers or chocolate bunnies to keep with the Easter theme while offering variety in texture and flavor.
Can I use different cookies instead of Oreos?
Oreos work perfectly for that classic “dirt” look, but crushed chocolate graham crackers or chocolate wafer cookies are great alternatives. Just pick something with a rich chocolate flavor and crunchy texture.
How long do Easter Dirt Cups last in the fridge?
They stay fresh and delicious for up to two days when stored properly. After that, the cookies may start to soften, and the pudding might lose its ideal texture, so best to enjoy them sooner rather than later.
Final Thoughts
This Easter Dirt Cups Recipe is such a cheerful, easy dessert to whip up whenever you want a sweet reminder of springtime fun. Its creamy layers, crunchy chocolate “dirt,” and festive toppings come together to make smiles all around. Whether you’re serving it for Easter, a family gathering, or just because, these delightful dirt cups are guaranteed to become a favorite you’ll want to make again and again.
Print
Easter Dirt Cups Recipe
- Prep Time: 10 minutes
- Cook Time: 0 minutes
- Total Time: 1 hour 10 minutes
- Yield: 6 servings
- Category: Dessert
- Method: No-Cook
- Cuisine: American
Description
These Easter Dirt Cups are a fun and festive no-bake dessert perfect for spring celebrations. Layers of creamy chocolate pudding, crushed chocolate sandwich cookies, and whipped topping mimic rich soil, while gummy worms and candy eggs add a playful Easter touch. Ready in just 10 minutes, these treats are easy to assemble and delight kids and adults alike.
Ingredients
Pudding Layer
- 1 (3.9 oz) package instant chocolate pudding mix
- 2 cups cold milk
- 1 (8 oz) tub of whipped topping (Cool Whip)
- 1 tablespoon powdered sugar (optional, to sweeten the whipped topping)
Dirt and Decorations
- 15–20 chocolate sandwich cookies (Oreos), crushed
- 1/2 cup gummy worms (optional for the “dirt” effect)
- 1/2 cup candy eggs (mini chocolate eggs or candy-coated eggs for decoration)
Instructions
- Prepare the pudding: In a medium bowl, whisk together the instant chocolate pudding mix and cold milk until the mixture thickens, which should take about 2 minutes.
- Fold in whipped topping: Gently fold the whipped topping (Cool Whip) into the chocolate pudding until the mixture is smooth and well combined. Optionally, mix in the powdered sugar to sweeten the whipped topping before folding.
- Start layering: Spoon a layer of the pudding mixture into the bottom of each serving cup or bowl.
- Add cookie “dirt” layer: Sprinkle a layer of crushed chocolate sandwich cookies on top of the pudding layer to mimic dirt.
- Repeat layers: Continue alternating layers of pudding and crushed cookies until the cups are filled, finishing with a top layer of crushed cookies.
- Garnish: Decorate the top with gummy worms and colorful candy eggs for a festive Easter presentation.
- Chill: Refrigerate the dirt cups for at least 1 hour to allow the layers to set and flavors to meld.
- Serve: Serve chilled and enjoy this delightful, playful dessert!
Notes
- For best results, use very cold milk to ensure the pudding thickens quickly.
- If you prefer a less sweet dessert, skip the powdered sugar or adjust to taste.
- Chocolate sandwich cookies can be crushed by placing them in a sealed plastic bag and using a rolling pin or by pulsing briefly in a food processor.
- These cups can be prepared a day in advance and refrigerated to save time.
- To make this dessert vegan, substitute dairy-free pudding mix and whipped topping alternatives.


