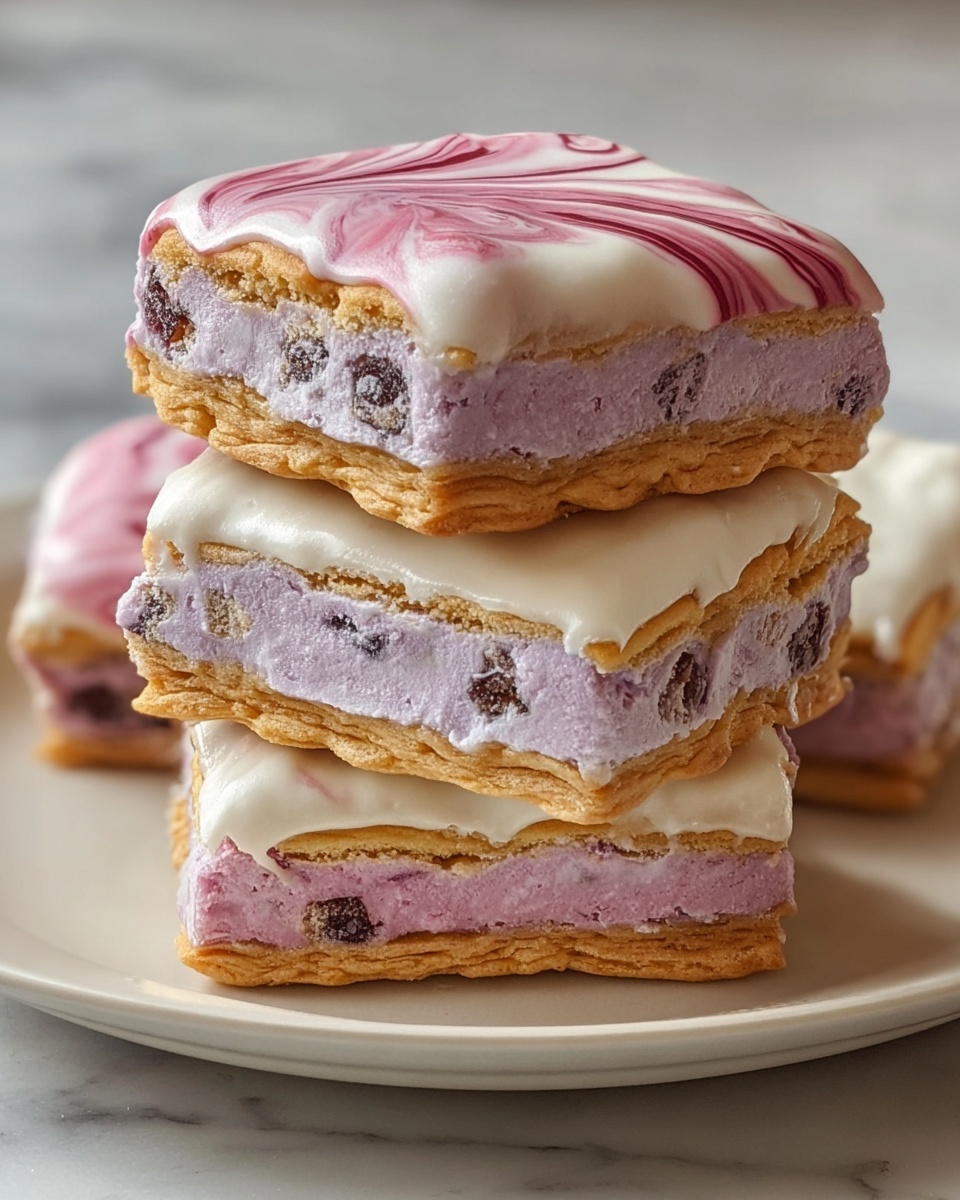
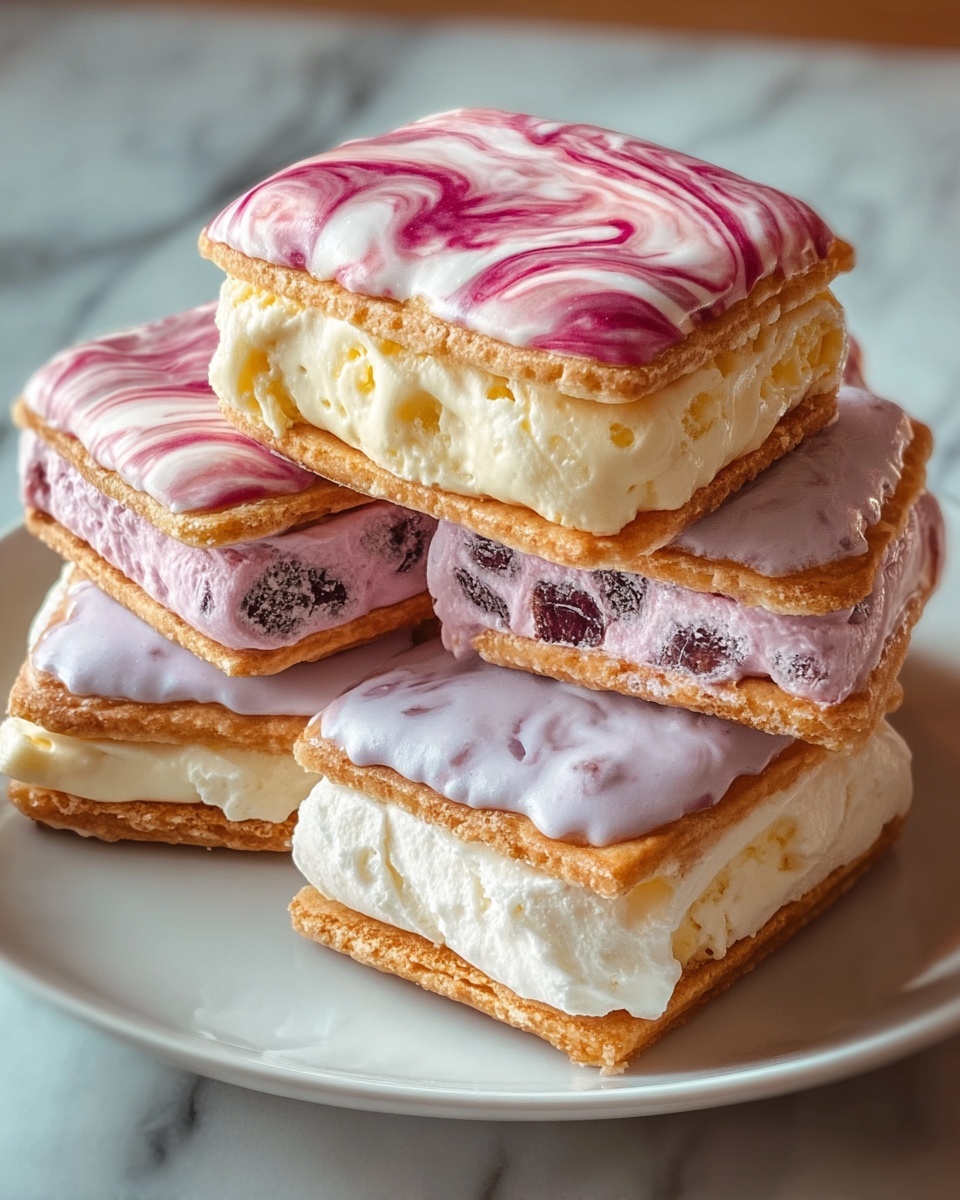
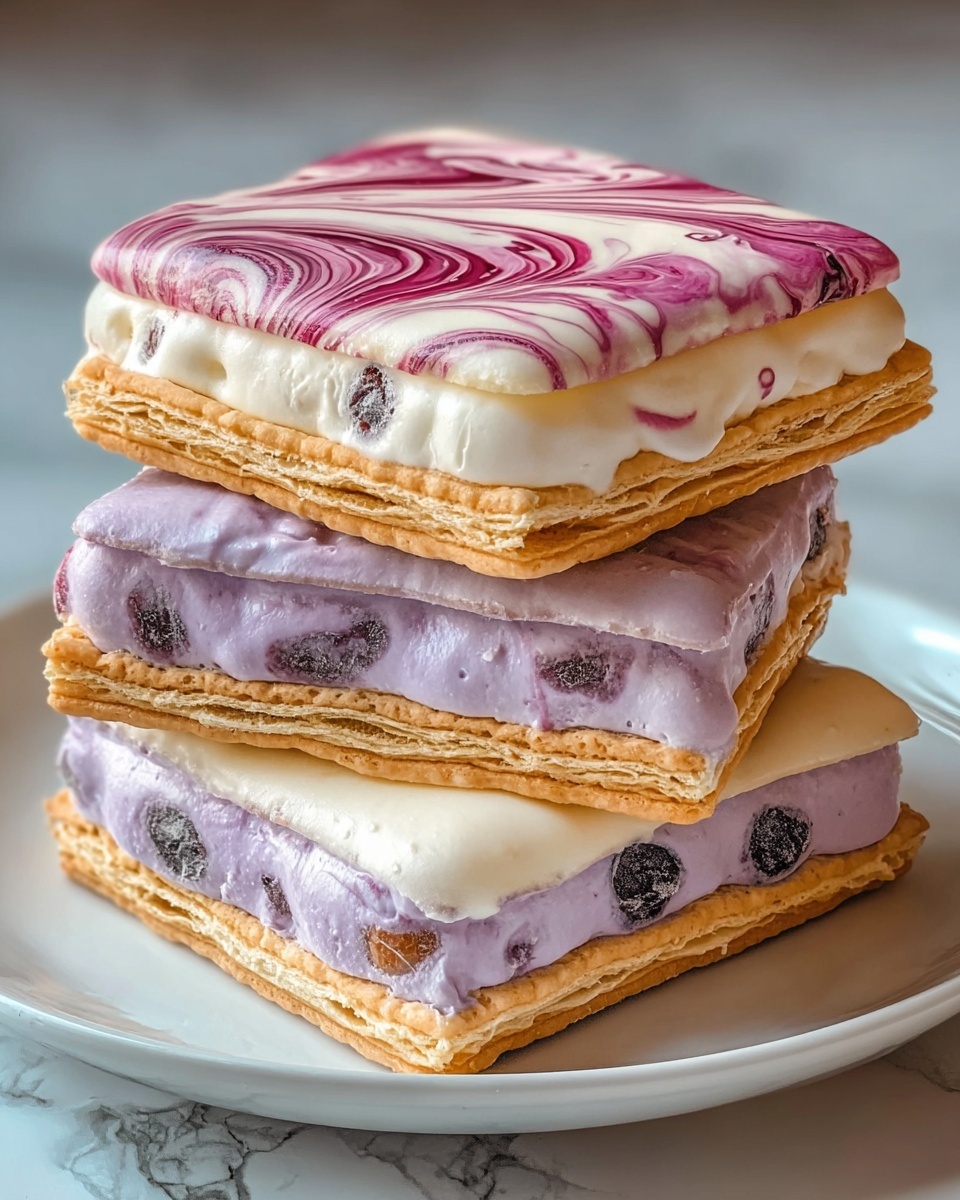
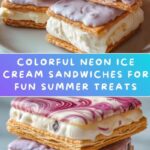
Get ready to wow your friends at your next party or summer gathering with the dazzling Glow Swirl Neon Ice Cream Sandwiches Recipe. These vibrant, multi-colored treats combine soft, neon-hued cookies with equally bright swirls of ice cream, creating a visual and flavorful experience that is as fun to look at as it is to eat. This recipe is perfect for anyone who loves a little whimsy and wants to add a pop of color to their dessert lineup—trust me, once you try these, they’ll become an instant favorite!
Ingredients You’ll Need
Each ingredient in this Glow Swirl Neon Ice Cream Sandwiches Recipe plays a crucial role, transforming simple elements into a colorful and tasty masterpiece. From the basic cookie dough components to the neon food coloring and creamy ice cream, every item is carefully chosen to give you that irresistible glow and delightful texture.
- 1 1/2 cups all-purpose flour: The perfect base that gives structure to the cookies.
- 1 teaspoon baking soda: Helps the cookies rise slightly for a soft yet sturdy texture.
- 1/2 teaspoon salt: Balances the sweetness and enhances flavor.
- 1/2 cup unsalted butter, softened: Adds richness and softness to the cookies.
- 1 cup granulated sugar: Sweetens the dough perfectly without overpowering.
- 1 large egg: Binds the dough together for that tender bite.
- 1 teaspoon vanilla extract: Infuses warmth and depth into the cookie flavor.
- 1 tablespoon milk (optional): Softens the dough if needed, making the cookies more tender.
- Neon food coloring (red, blue, green, or your choice): Creates the signature glow swirl effect for both dough and ice cream.
- 4 cups vanilla ice cream, softened: Acts as the creamy, sweet filling that contrasts beautifully with the colorful cookies.
- 1 tablespoon powdered sugar (optional): Stabilizes the ice cream, preventing it from melting too quickly.
How to Make Glow Swirl Neon Ice Cream Sandwiches Recipe
Step 1: Prepare the Cookie Dough
Start by heating your oven to 350°F (175°C) and lining a baking sheet with parchment paper to keep things clean and easy. This simple prep sets you up for perfectly baked cookies without any sticking issues.
Step 2: Mix Dry Ingredients
In a medium bowl, whisk together the flour, baking soda, and salt. Combining these dry ingredients first ensures they’re evenly distributed throughout your cookie dough, giving uniform texture and rise.
Step 3: Cream Butter and Sugar
In a large bowl, beat the softened butter and granulated sugar until your mixture is light and fluffy—this usually takes 2 to 3 minutes. This step is key to fluffy cookies with a tender crumb and that delightful melt-in-your-mouth feel.
Step 4: Add Egg and Vanilla
Beat in the egg and vanilla extract until combined. This adds moisture and flavor, making every bite as delicious as it looks.
Step 5: Combine Dry and Wet Ingredients
Gradually mix the dry ingredients into the wet mixture just until incorporated. Be careful not to overmix—you want your cookies to stay soft and tender.
Step 6: Adjust Dough Consistency
If your dough feels overly thick or difficult to work with, mix in a tablespoon of milk to soften it slightly. This adjustment will help your dough hold moisture and stay soft.
Step 7: Divide and Color the Dough
Separate the dough into 3 or 4 portions, depending on how many neon colors you want in your swirl. Then, add a few drops of your chosen neon food coloring to each portion and knead well until the colors are bright and fully blended. Wearing gloves is a smart choice here to avoid stained hands!
Step 8: Shape the Cookies
Roll small balls of each colored dough and arrange them close together on your lined baking sheet, making sure the different colors touch but don’t blend. Gently press the dough balls together and flatten lightly with your palm so the cookies form multicolored mounds that will bake into beautiful swirls.
Step 9: Bake
Bake the cookies for 8 to 10 minutes, just until the edges start to turn golden. Keep an eye on them to avoid overbaking—soft cookies will hold the ice cream better and make your sandwiches irresistibly chewy.
Step 10: Cool Completely
Transfer the cookies to a wire rack and let them cool completely before assembling. Cooling prevents the ice cream from melting too fast once it’s placed between the cookies.
Step 11: Prepare Neon Ice Cream Filling
Scoop out your softened vanilla ice cream into multiple bowls matching the number of colors used for your dough. Add a few drops of neon food coloring to each bowl, stirring well to achieve your desired vibrant shades. For a fun swirl effect, you can gently mix multiple colors together.
Step 12: Stabilize the Ice Cream
If you want your ice cream filling to hold its shape longer, mix in a tablespoon of powdered sugar. This simple trick keeps it from melting too quickly, especially important when you’re assembling the sandwiches.
Step 13: Assemble the Ice Cream Sandwiches
Once the cookies are fully cooled, scoop a generous amount of neon ice cream onto the flat side of one cookie. Top with a second cookie and press gently to form your sandwich. Repeat until all cookies are used.
Step 14: Freeze Until Firm
Place your assembled sandwiches onto a parchment-lined baking sheet and freeze for at least 1 to 2 hours. This chilling step is crucial for setting the ice cream, ensuring your sandwiches hold together beautifully and deliver that satisfying, cold bite.
Step 15: Enjoy Your Glow Swirl Neon Ice Cream Sandwiches Recipe!
When ready, enjoy your glow-in-the-dark perfect treats that’ll brighten any occasion, especially under UV light where their neon colors truly pop.
How to Serve Glow Swirl Neon Ice Cream Sandwiches Recipe
Garnishes
Elevate your Glow Swirl Neon Ice Cream Sandwiches Recipe by adding small edible toppings like colorful sprinkles, edible glitter, or neon sugar crystals pressed onto the ice cream edges before freezing. These little extras boost the playful vibe and add even more eye-catching fun.
Side Dishes
Consider serving these with simple sides like fresh berries or a light fruit salad. The natural sweetness and freshness balance the creamy richness of the ice cream sandwiches, making for a perfect summer dessert duo.
Creative Ways to Present
Want to step up your presentation? Serve your sandwiches on a platter under UV lights to make the neon colors truly glow. Tie each sandwich with a tiny ribbon or slide them into clear treat bags for party favors. You could even place them on a bed of dry ice for a misty, magical effect!
Make Ahead and Storage
Storing Leftovers
If you have leftovers, store the Glow Swirl Neon Ice Cream Sandwiches Recipe securely in an airtight container in the freezer. This keeps the cookies fresh and the ice cream firm without sacrificing flavor or texture.
Freezing
For the best results, freeze the sandwiches on a baking sheet first to keep their shape and prevent sticking, then transfer them to a sealed container or freezer bag. This double-layered method ensures your neon creations stay intact and vibrant.
Reheating
Since these are ice cream treats, avoid reheating. Instead, let the sandwiches sit at room temperature for 5 minutes before enjoying to soften the ice cream slightly for easier biting without losing that perfect chilly experience.
FAQs
Can I use different flavors of ice cream?
Absolutely! While vanilla lets the neon colors shine the most, feel free to experiment with any ice cream flavor you love. Just keep it softened enough to mix in your food coloring effectively.
What if I don’t have neon food coloring?
You can substitute with bright regular food coloring or natural color powders. The sandwich won’t glow under UV light but will still be colorful and delicious.
Can I make the cookies ahead of time?
Yes! You can bake the cookies a day or two in advance. Store them in an airtight container at room temperature until you are ready to assemble your sandwiches.
How do I prevent the ice cream from melting too fast?
Mixing powdered sugar into your neon-colored ice cream helps stabilize it, and keeping the sandwiches frozen until serving maximizes their delicious icy texture.
Are these ice cream sandwiches kid-friendly?
Definitely! Kids love the bright colors, the fun swirls, and the tasty combo of soft cookies and creamy ice cream. Just be cautious with the neon food coloring if you have little ones sensitive to dyes.
Final Thoughts
I can’t recommend the Glow Swirl Neon Ice Cream Sandwiches Recipe enough if you want to gather smiles, compliments, and happy memories. These colorful treats bring such a joyful pop of color and flavor to any occasion—plus, they’re a total blast to make. So grab your neon colors and get ready to create some glowing magic in your kitchen!
Print
Glow Swirl Neon Ice Cream Sandwiches Recipe
- Prep Time: 30 minutes
- Cook Time: 8-10 minutes
- Total Time: 1 hour 40 minutes (including freezing time)
- Yield: 12-15 sandwiches (depending on cookie size)
- Category: Dessert
- Method: Baking
- Cuisine: American
Description
Glow Swirl Ice Cream Sandwiches are a fun and vibrant treat combining colorful, soft cookies with neon-hued ice cream swirls. Perfect for parties, these sandwiches are visually stunning under UV light and offer a delightful mix of creamy and chewy textures.
Ingredients
Cookies
- 1 1/2 cups all-purpose flour
- 1 teaspoon baking soda
- 1/2 teaspoon salt
- 1/2 cup unsalted butter, softened
- 1 cup granulated sugar
- 1 large egg
- 1 teaspoon vanilla extract
- 1 tablespoon milk (optional, for extra softness)
- Neon food coloring (red, blue, green, or your choice of colors)
Ice Cream
- 4 cups vanilla ice cream (or any ice cream of your choice, softened)
- Neon food coloring (same colors as the cookies or any desired shades)
- 1 tablespoon powdered sugar (optional, for stabilization)
Instructions
- Prepare the Cookie Dough: Preheat your oven to 350°F (175°C). Line a baking sheet with parchment paper.
- Mix Dry Ingredients: In a medium bowl, whisk together the flour, baking soda, and salt until evenly combined.
- Cream Butter and Sugar: In a separate large bowl, cream the softened butter and granulated sugar together until light and fluffy, which takes about 2-3 minutes.
- Add Egg and Vanilla: Beat in the egg and vanilla extract until the mixture is smooth and well incorporated.
- Combine Dough: Gradually add the dry ingredients to the wet mixture, mixing just until combined to keep the dough tender.
- Adjust Dough Softness: If the dough is too thick or stiff, add a tablespoon of milk to soften it slightly, ensuring easier color mixing.
- Divide and Color Dough: Divide the dough into 3-4 portions depending on your desired number of colors. Add a few drops of neon food coloring to each portion and knead it in until the color is evenly distributed, using gloves or covering your hands to avoid staining.
- Assemble Color Dough Balls: Roll small balls of each colored dough and place them together on the prepared baking sheet, ensuring the colors touch but do not blend.
- Form Cookies: Gently press the dough balls together and flatten slightly with your palm to create multi-colored dough mounds shaped like cookies.
- Bake Cookies: Bake in the preheated oven for 8-10 minutes, or until the edges turn lightly golden. Take care not to overbake, as the cookies should remain soft.
- Cool Cookies: Remove from oven and allow the cookies to cool completely on a wire rack before assembling the sandwiches.
- Prepare Neon Ice Cream: In a bowl, divide softened vanilla ice cream into separate smaller bowls, one for each color you want to create.
- Color Ice Cream: Add neon food coloring drops to each bowl of ice cream and stir well to reach your desired bright shades. Mix colors if you want a fun swirl effect.
- Stabilize Ice Cream (Optional): To help prevent melting, stir in a tablespoon of powdered sugar into the colored ice cream.
- Assemble Ice Cream Sandwiches: Place a generous scoop of neon-colored ice cream on the flat side of one cooled cookie.
- Sandwich the Ice Cream: Place a second cookie on top and press gently to seal the ice cream between the cookies.
- Repeat: Continue assembling all sandwiches in the same manner.
- Freeze Sandwiches: Place the sandwiches on a baking sheet lined with parchment paper and freeze for at least 1-2 hours to allow the ice cream to firm up properly.
- Serve: Once chilled and firm, serve the Glow Swirl Ice Cream Sandwiches. They look especially vibrant under UV light, making them ideal for glow-in-the-dark or neon-themed events!
Notes
- Use gloves when working with neon food coloring to avoid staining your hands.
- Be careful not to overbake cookies to maintain their softness for the sandwich.
- For best results, let the ice cream soften slightly before coloring and assembling.
- The powdered sugar helps stabilize the ice cream, extending the time before melting.
- These sandwiches are perfect for themed parties due to their bright, glowing appearance under UV light.