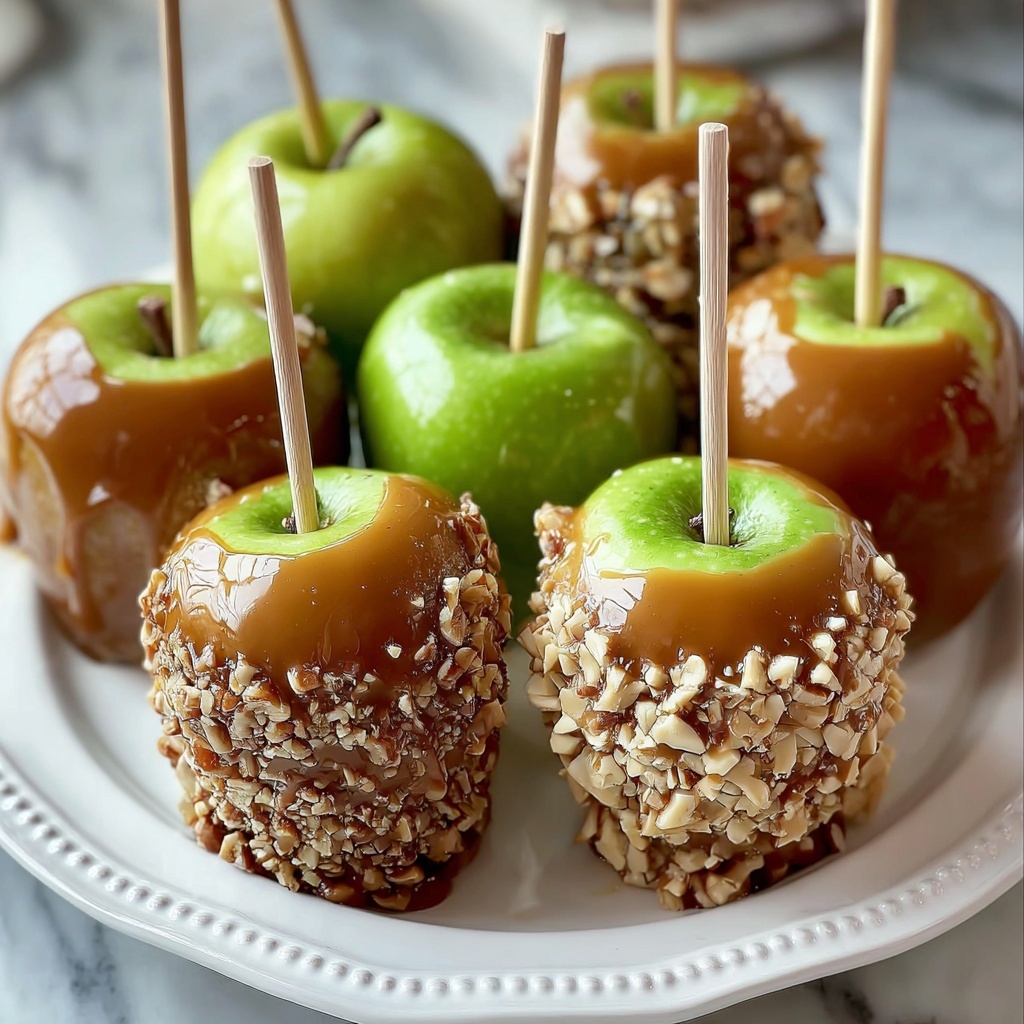
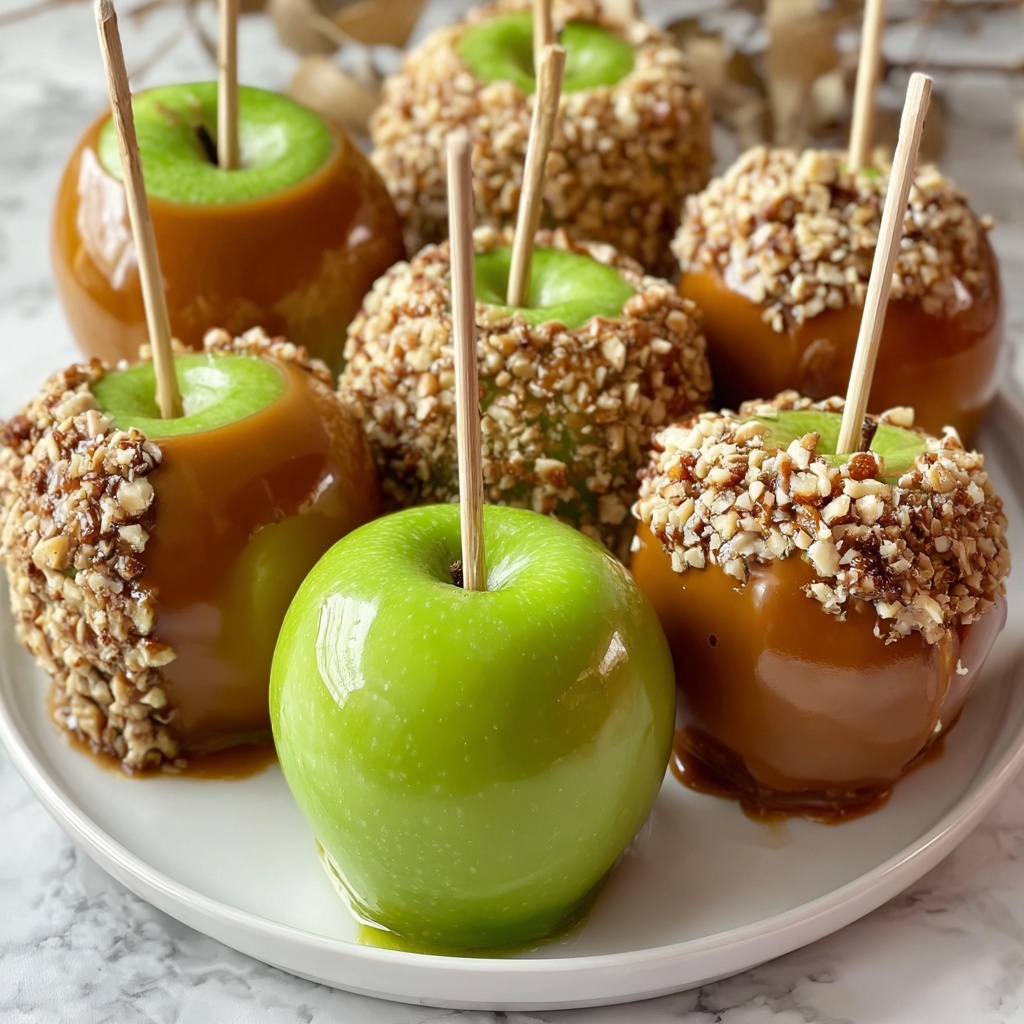
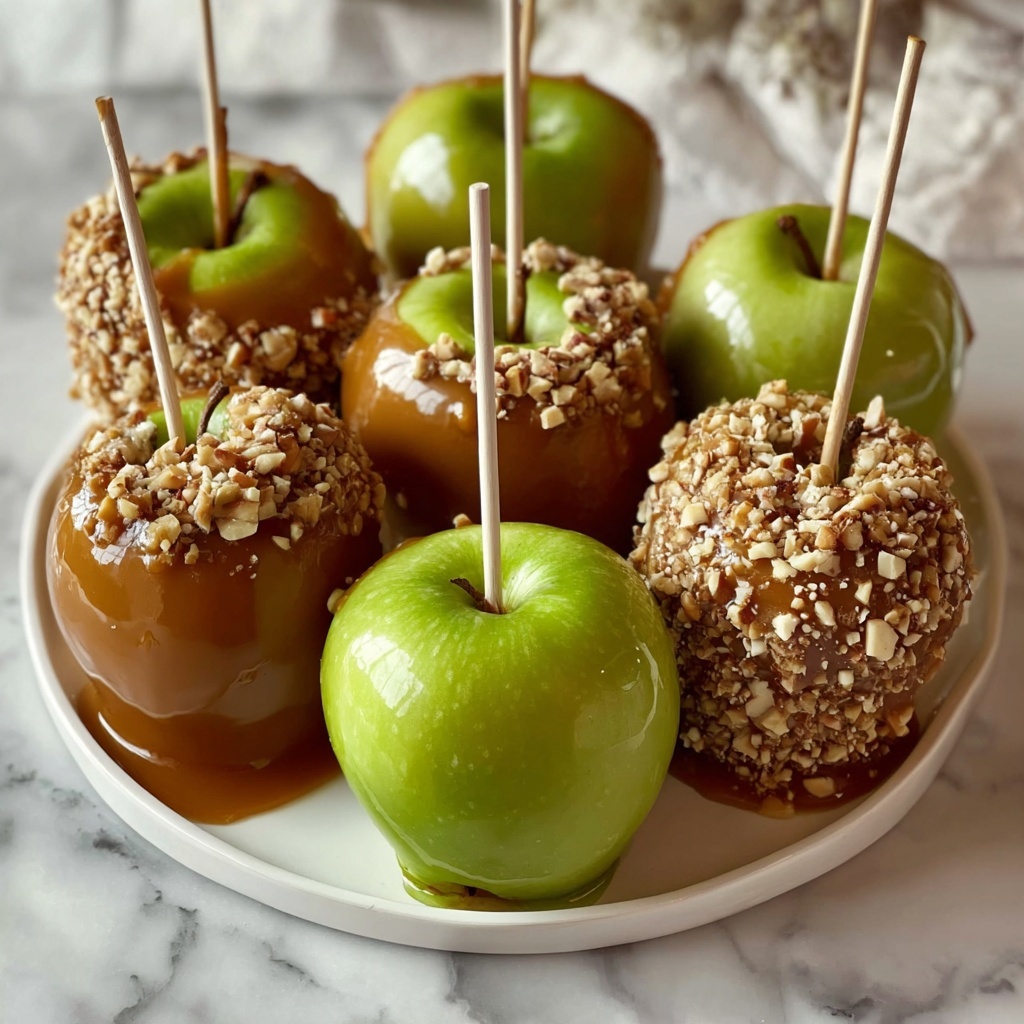
There is something utterly magical about sinking your teeth into a perfectly crafted caramel apple, and this Gourmet Caramel Apples Recipe takes that nostalgic treat to an entirely new level. Combining tart, crisp apples with a rich, buttery caramel coating that boasts just the right touch of sea salt and vanilla, this recipe transforms a simple snack into a show-stopping dessert. Whether you’re making these for a festive gathering or simply to satisfy a sweet craving, these gourmet caramel apples are sure to impress with their irresistible flavor and texture harmony.
Ingredients You’ll Need
Getting started on these gourmet caramel apples means gathering a handful of simple, quality ingredients that each play a critical role in creating that flawless caramel coating and perfectly balanced bite.
- 6 large tart apples (Granny Smith or Honeycrisp): Their crispness and natural tartness provide the perfect contrast to the sweet caramel.
- 6 wooden skewers or craft sticks: Essential for easy dipping and serving, giving you a comfortable grip.
- 1 cup (2 sticks) unsalted butter: Adds richness and creaminess to the caramel base.
- 2 cups packed brown sugar: Gives the caramel its deep, molasses-like flavor that’s key to gourmet caramel.
- 1 cup light corn syrup: Prevents crystallization and ensures a smooth, glossy caramel finish.
- 1 can (14 ounces) sweetened condensed milk: Boosts the caramel’s velvety texture and subtle sweetness.
- 1 teaspoon vanilla extract: Enhances the caramel with warm, fragrant undertones.
- 1/2 teaspoon sea salt: Balances sweetness and adds a sophisticated touch.
- Optional toppings (chopped nuts, mini chocolate chips, shredded coconut, crushed cookies, etc.): Adds exciting texture and personalized flair.
- Optional drizzles (melted chocolate, white chocolate, peanut butter): Takes presentation and taste to an extra indulgent level.
How to Make Gourmet Caramel Apples Recipe
Step 1: Prepare Your Apples
Start by washing and drying your apples thoroughly—any moisture will prevent caramel from sticking properly. Remove the stems, then firmly insert a wooden skewer or craft stick into the top of each apple. This sturdy handle makes the dipping process so much easier and safer.
Step 2: Prepare Your Workspace
Line a baking sheet with parchment paper or lightly greased foil. This step is simple but crucial, as it provides a non-stick surface for your apples to cool on without sticking or losing any precious caramel.
Step 3: Make the Caramel Base
In a heavy saucepan over medium heat, melt the butter to start creating your caramel base. Once melted, stir in the packed brown sugar and corn syrup, mixing until the mixture blends nicely. This combination is where much of the rich caramel flavor and smooth texture comes from, so take care to stir gently and consistently.
Step 4: Add Sweetened Condensed Milk
Gradually pour in the sweetened condensed milk while stirring continuously. This ingredient is the secret to that mock-gourmet texture—adding creaminess and body to the caramel. Attach a candy thermometer to your saucepan to monitor the temperature carefully.
Step 5: Cook to the Perfect Temperature
Bring the mixture to a gentle boil, stirring constantly. The goal here is to reach the “soft-ball stage” at 240°F, which ensures your caramel will be both sticky and firm enough to coat the apples without running off. Patience during this step truly pays off.
Step 6: Flavor and Season the Caramel
Remove the saucepan from heat as soon as your thermometer hits 240°F. Stir in the vanilla extract and sea salt immediately to infuse warmth and a perfect salty-sweet balance into your caramel mixture.
Step 7: Dip Your Apples
Holding an apple by its stick, carefully submerge it into the luscious caramel, swirling gently to cover the apple completely. Let the excess caramel drip off back into the pot—this helps you avoid soggy bottoms and keeps a nice even coating.
Step 8: Add Toppings
If you’re craving extra flair, quickly roll or sprinkle your caramel-coated apple with your choice of toppings like chopped nuts or mini chocolate chips. Press toppings lightly for them to stick securely to the warm caramel.
Step 9: Cool Your Masterpieces
Set your coated apples on the prepared baking sheet and repeat the dipping and topping process with the remaining apples. This gives the caramel time to firm up and ensures your apples keep their beautiful coating intact.
Step 10: Optional Sweet Drizzles
For a truly gourmet touch, drizzle melted chocolate, white chocolate, or even peanut butter over your caramel apples once they have slightly set. This contrast in textures and flavors elevates your creation to dessert-table stardom.
Step 11: Final Set
Allow the apples to cool fully at room temperature or pop them in the refrigerator to speed up the process. Cooling helps the caramel harden just enough to deliver that satisfying snap when you bite in.
How to Serve Gourmet Caramel Apples Recipe
Garnishes
Garnishes can transform your caramel apples from charming to dazzling. Sprinkling crushed cookies, chopped nuts, or even decorative sprinkles gives each apple a personalized touch that entices both the eyes and the palate. Drizzling contrasting chocolates adds elegant visual appeal and an extra dimension of flavor.
Side Dishes
While these apples are a hearty treat on their own, they pair beautifully with a simple scoop of vanilla ice cream or a cup of hot apple cider. The creamy ice cream balances the caramel’s richness, and the warm cider enhances the autumnal vibe, making your serving experience cozy and memorable.
Creative Ways to Present
Presentation is half the fun when serving these delightful treats. Arrange them upright in a decorative basket lined with wax paper or place them in clear cellophane bags tied with festive ribbons for an adorable gift. You can also set them on a tiered dessert stand to wow guests at any celebration.
Make Ahead and Storage
Storing Leftovers
If you have any leftover caramel apples (which is rare!), store them in an airtight container at room temperature for up to 2 days. Keeping them out of the fridge prevents the caramel from hardening too much or the apples from becoming mealy.
Freezing
Freezing caramel apples is not recommended because the texture of the apples will change once thawed, becoming mushy and less enjoyable. Instead, enjoy them fresh for the best experience.
Reheating
Reheating isn’t typically necessary with caramel apples, but if the caramel has hardened a bit too much, allowing them to sit at room temperature for 30 minutes can bring back some softness without melting the coating.
FAQs
Can I use any type of apple for this recipe?
You want to choose tart and firm apples like Granny Smith or Honeycrisp because their crispness balances the sweetness of the caramel perfectly and holds up well during dipping.
Why is a candy thermometer important in this recipe?
Using a candy thermometer ensures you reach the precise temperature for perfect caramel consistency. Without it, the caramel might be too soft or too hard, affecting the texture and stickiness.
Can I make this recipe without corn syrup?
Corn syrup helps prevent crystallization and keeps caramel smooth. If you prefer to avoid it, you can substitute with honey or glucose syrup, but results may vary slightly.
How long do these caramel apples keep their best flavor?
For optimal taste and texture, consume within 1-2 days. The apples will remain crisp and the caramel fresh, making every bite a delight.
What toppings pair best with caramel apples?
Classic choices like chopped nuts, shredded coconut, and mini chocolate chips work beautifully, but feel free to experiment with crushed cookies or colorful sprinkles for a fun twist.
Final Thoughts
There’s nothing quite like the joy of homemade treats, and this Gourmet Caramel Apples Recipe is a fantastic way to bring sweetness and smiles to any occasion. Easy enough to make with the family and impressive enough to serve at your next party, these caramel apples combine classic flavors with a polished, gourmet touch. Give it a try—you’ll be hooked from the very first bite!
Print
Gourmet Caramel Apples Recipe
- Prep Time: 0h 20m
- Cook Time: 0h 30m
- Total Time: 0h 50m
- Yield: 6 caramel apples
- Category: Dessert
- Method: Stovetop
- Cuisine: American
Description
Delicious homemade gourmet caramel apples featuring a rich, buttery caramel coating made from brown sugar, corn syrup, and sweetened condensed milk, finished with optional toppings like chopped nuts and drizzled chocolate for a perfect fall treat.
Ingredients
Apples
- 6 large tart apples (such as Granny Smith or Honeycrisp)
- 6 wooden skewers or craft sticks
Caramel
- 1 cup (2 sticks) unsalted butter
- 2 cups packed brown sugar
- 1 cup light corn syrup
- 1 can (14 ounces) sweetened condensed milk
- 1 teaspoon vanilla extract
- 1/2 teaspoon sea salt
Optional Toppings and Drizzles
- Chopped nuts, mini chocolate chips, shredded coconut, crushed cookies, etc.
- Melted chocolate, white chocolate, or peanut butter for drizzling
Instructions
- Prepare Apples: Wash and thoroughly dry the apples. Remove the stems and insert a wooden skewer or craft stick into the top of each apple, ensuring they are secure for dipping.
- Prepare Baking Sheet: Line a baking sheet with parchment paper or lightly greased foil, and set aside to place the caramel-coated apples for cooling.
- Make Caramel Base: In a heavy saucepan over medium heat, melt the butter. Stir in the brown sugar and corn syrup until well combined, creating the base for the caramel coating.
- Add Condensed Milk: Gradually add the sweetened condensed milk while continuously stirring to maintain smooth texture. Attach a candy thermometer to the saucepan’s side to monitor temperature.
- Cook Caramel: Bring the mixture to a boil, stirring constantly to prevent scalding. Continue boiling until the mixture reaches 240°F (soft-ball stage), ensuring the caramel will set properly.
- Flavor Caramel: Remove the saucepan from heat, then stir in the vanilla extract and sea salt to enhance the flavor profile of the caramel.
- Dip Apples: Holding an apple by its stick, carefully dip it into the caramel, swirling to coat completely. Allow excess caramel to drip back into the saucepan for even coating.
- Add Toppings: Immediately roll or sprinkle the caramel-coated apple with your chosen toppings, pressing gently so they adhere nicely.
- Cool Apples: Place the coated apples on the prepared baking sheet and repeat the dipping process with the remaining apples.
- Add Drizzles: Once the caramel has set slightly, drizzle melted chocolate, white chocolate, or peanut butter over the apples if desired for extra flavor and decoration.
- Set and Serve: Allow the apples to cool completely at room temperature or refrigerate to speed up setting before serving.
Notes
- Use tart apples like Granny Smith or Honeycrisp for the best balance of sweet and tangy flavors.
- Ensure apples are completely dry before dipping to help the caramel stick better.
- A candy thermometer is important for reaching the correct caramel temperature (240°F) to achieve the perfect soft-ball stage.
- Customize your toppings and drizzles as desired to suit your taste or occasion.
- Store leftover caramel apples in the refrigerator to maintain freshness for up to 3 days.


