
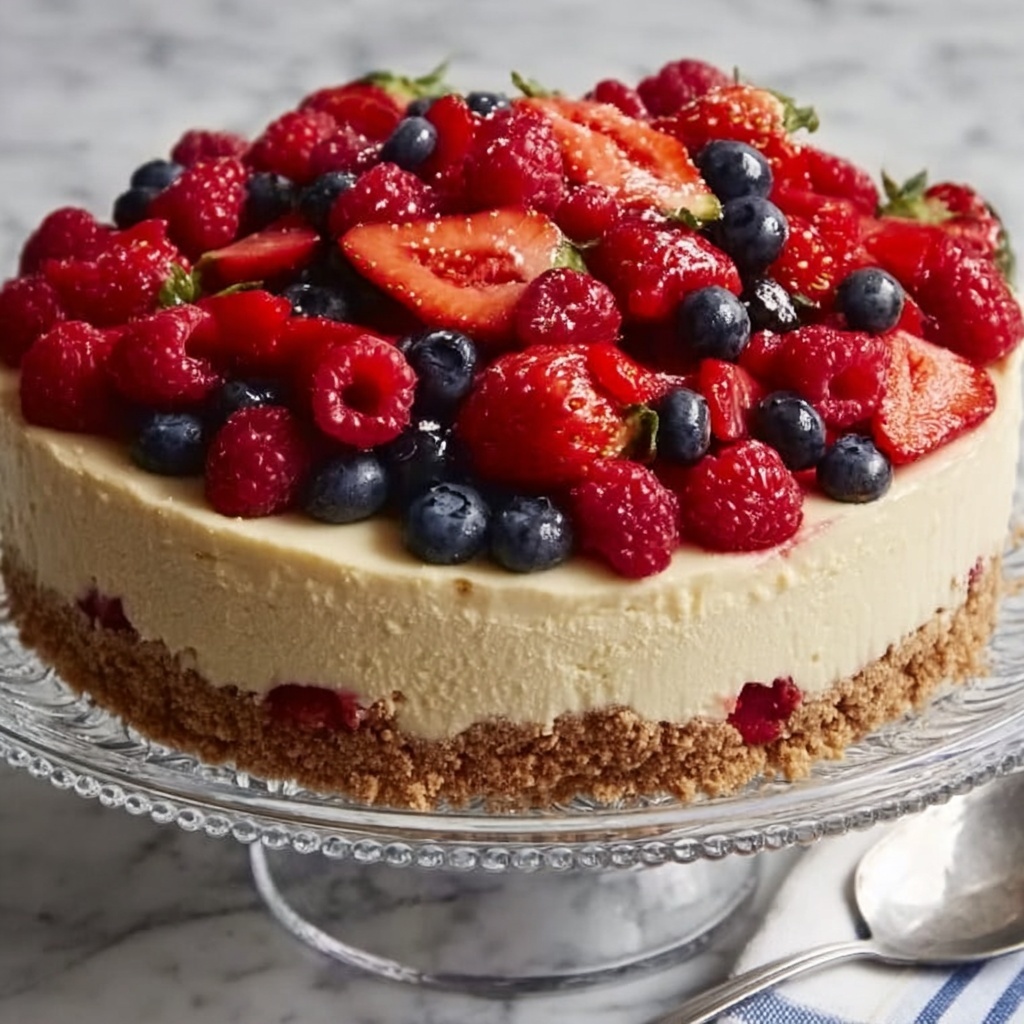
If you’re searching for an eye-catching and delightful dessert that brings a patriotic twist to your celebrations, this No-Bake Cheesecake Flag Cake Recipe is your dream come true. Imagine a creamy, luscious cheesecake packed with bright berries arranged in a striking flag design — all without turning on the oven. It’s a perfect blend of rich mascarpone, zesty lemon, and fresh fruit, making every bite both refreshing and indulgent. From the buttery crumb crust to the fluffy cream topping, this cake is as much a feast for the eyes as it is for the palate, ideal for summer parties, holidays, or anytime you want to impress with minimal fuss.
Ingredients You’ll Need
Gathering your ingredients for this recipe is wonderfully simple, yet each one plays a crucial role in creating the textures and flavors that elevate this cheesecake into a showstopper. The balance of tangy and sweet, crunchy and creamy, ensures every forkful delights from start to finish.
- Graham cracker crumbs (1 ½ cups): Provides a buttery, crunchy base that forms the perfect crust to hold the cheesecake filling.
- White sugar (¼ cup + ⅓ cup): Sweetens both the crust and the fluffy cheesecake filling for well-rounded sweetness.
- Unsweetened cocoa powder (2 tablespoons): Adds a subtle depth to the crust while complementing the creamy toppings.
- Butter, melted (6 tablespoons): Binds the graham cracker crumbs into a firm, flavorful crust with a rich mouthfeel.
- Cream cheese, room temperature (1 cup): The tangy, smooth base of the cheesecake filling that adds essential richness.
- Mascarpone cheese, room temperature (1 cup): Boosts creaminess and lends a delicate Italian flair to the dessert.
- Lemon zest (2 teaspoons) and lemon juice (2 teaspoons): Infuses the filling with light citrus brightness, cutting through the richness.
- Vanilla extract (1 teaspoon): Enhances the overall flavor with subtle warmth and aroma.
- Cold heavy whipping cream (1 ¼ cups): Piped into fluffy peaks, it lightens the filling for an airy, melt-in-your-mouth feel.
- Fresh strawberries (20 large, halved lengthwise): Provides vibrant red stripes and a juicy burst of natural sweetness.
- Fresh blueberries (24 large): Forms the rich blue field, adding color contrast and juicy freshness.
How to Make No-Bake Cheesecake Flag Cake Recipe
Step 1: Prepare the Crust
Start by combining the graham cracker crumbs, sugar, cocoa powder, and melted butter in a bowl until you have a crumbly mixture that holds together when pressed. Press this mixture evenly into the bottom of a 9×11-inch baking dish and refrigerate for about 30 minutes. This process sets the foundation for your cheesecake, creating a sturdy base that’s full of buttery, chocolaty goodness.
Step 2: Make the Cheesecake Filling
In a large bowl, whisk the cream cheese and mascarpone cheese together until smooth and creamy. Stir in the lemon zest, lemon juice, and vanilla extract for a fresh, aromatic flavor boost. The combo of tangy cream cheese and rich mascarpone creates a luxurious texture that’s perfectly balanced by citrus notes.
Step 3: Whip the Cream
In a separate chilled bowl, whisk the cold heavy whipping cream with ⅓ cup of sugar until soft peaks form. Gently fold this whipped cream into the cream cheese mixture until everything is incorporated and fluffy. This step is key to achieving the no-bake cheesecake’s famously light texture, turning the filling into a creamy cloud that melts on your tongue.
Step 4: Assemble the Cake Base
Spoon the creamy filling evenly over the chilled crust and smooth the surface with a spatula. Give the pan a few gentle taps on the counter to remove any air bubbles and settle the filling evenly. Cover tightly with plastic wrap and refrigerate for at least 3 hours to let it firm up into the perfect sliceable stew of flavors.
Step 5: Decorate the Flag Design
This is the artistic and truly fun part! Starting at the bottom edge of the cake, lay down a horizontal line of strawberry halves with the pointed ends facing right. Continue arranging strawberry stripes spaced about three-quarters of an inch apart, creating five full-length red stripes. Leave a square space on the upper left side for your blueberries, which you will arrange in neat rows with the blossom ends facing up to simulate the blue field of stars. Take your time to create a beautiful and patriotic pattern that will wow anyone who sees it.
Step 6: Serve and Enjoy
Once your masterpiece is arranged, slice your cheesecake into squares and serve chilled. The combination of creamy, crunchy, and fresh fruit flavors means each bite is a celebration in itself!
How to Serve No-Bake Cheesecake Flag Cake Recipe

Garnishes
Simple garnishes work best for this dessert — a light dusting of powdered sugar or a few extra fresh strawberries and blueberries scattered around the platter add a fresh, inviting look. Alternatively, a sprig of fresh mint brightens the presentation and adds a lovely aroma that complements the cheesecake’s citrus undertones perfectly.
Side Dishes
This cheesecake pairs beautifully with sparkling beverages like a crisp lemonade or a fruity rosé to keep your dessert course light and festive. For a richer complement, a small scoop of vanilla bean ice cream or a dollop of freshly whipped cream can deepen the indulgence without overwhelming the brightness of the berries.
Creative Ways to Present
You could turn this No-Bake Cheesecake Flag Cake Recipe into individual parfaits layered in glass cups, replicating the flag stripes with the same fruit arrangement on top. Alternatively, serve it on a decorated platter with edible flowers or patriotic-themed cake toppers for a special holiday table center. Whatever way you choose, presentation will elevate the fun and festivity.
Make Ahead and Storage
Storing Leftovers
Store any leftover cheesecake tightly covered in the refrigerator for up to three days. Keeping the cake airtight will preserve the fresh fruit’s texture and prevent the crust from becoming soggy, ensuring each piece tastes just as delightful the next day.
Freezing
You can freeze this cheesecake, but for best results, freeze it without the fresh fruit topping. Wrap tightly in plastic wrap and then aluminum foil, storing for up to one month. When you’re ready to enjoy it, thaw overnight in the fridge and add fresh fruit just before serving to maintain its vibrant looks and flavors.
Reheating
Since this is a no-bake, chilled cheesecake, it’s best served cold and not heated. Allow it to sit at room temperature for about 10 minutes before serving to soften slightly for the best texture and flavor experience.
FAQs
Can I use other fruits besides strawberries and blueberries?
Absolutely! While strawberries and blueberries create the classic flag effect, you can experiment with raspberries, blackberries, or even kiwi for different colors and tastes. Just keep your color scheme in mind to maintain the patriotic theme.
Do I need mascarpone cheese or can I just use cream cheese?
Mascarpone adds extra creaminess and a subtle sweetness, but if you don’t have it on hand, you can use all cream cheese. Your cheesecake will still be delicious, just slightly less rich and silky.
How long does it take to set in the refrigerator?
For this recipe, allow at least 3 hours to set firmly in the fridge, though overnight chilling is ideal to ensure the filling is fully firm and flavors meld beautifully.
Is this recipe suitable for kids to help make?
Yes! The no-bake nature makes it very kid-friendly, especially the decorating step, which is like edible art. Just supervise when using utensils, and let their creativity shine with the berry arrangement.
Can I make this recipe gluten-free?
To make it gluten-free, simply substitute the graham cracker crumbs with gluten-free cookies or gluten-free graham crackers. Make sure the other ingredients you use are also labeled gluten-free for safety.
Final Thoughts
This No-Bake Cheesecake Flag Cake Recipe is the perfect mix of easy prep, stunning looks, and irresistible flavors. Whether you’re celebrating a holiday or just want a special treat, this cheesecake is guaranteed to impress and satisfy. Don’t hesitate to gather the ingredients, unleash your inner artist, and share this delicious slice of joy with friends and family. Trust me, it’s a dessert you’ll want to make again and again!
Print
No-Bake Cheesecake Flag Cake Recipe
- Prep Time: 20 minutes
- Cook Time: 0 minutes
- Total Time: 3 hours 20 minutes
- Yield: 12 servings
- Category: Dessert
- Method: No-Cook
- Cuisine: American
Description
This No-Bake Cheesecake Flag Cake is a delightful, visually stunning dessert perfect for patriotic celebrations or any festive occasion. It features a rich, creamy cheesecake filling atop a chocolatey graham cracker crust, beautifully decorated with fresh strawberries and blueberries arranged to resemble the American flag. The preparation requires no baking, relying on chilling to set the layers, making it an easy yet impressive dessert.
Ingredients
Crust
- 1 ½ cups finely crushed graham cracker crumbs
- ¼ cup white sugar
- 2 tablespoons unsweetened cocoa powder
- 6 tablespoons butter, melted
Cheesecake Filling
- 1 cup cream cheese at room temperature
- 1 cup mascarpone cheese at room temperature
- 2 teaspoons grated lemon zest
- 2 teaspoons lemon juice
- 1 teaspoon vanilla extract
- ⅓ cup white sugar
- 1 ¼ cups cold heavy whipping cream
Decoration
- 20 large fresh strawberries, hulled and halved lengthwise, or as needed
- 24 large fresh blueberries, or as needed
Instructions
- Prepare the crust: In a bowl, combine graham cracker crumbs, ¼ cup sugar, cocoa powder, and melted butter until the mixture is crumbly and thoroughly combined.
- Set the crust: Transfer the crust mixture into a 9×11-inch baking dish and press it firmly and evenly onto the bottom. Cover with plastic wrap and refrigerate for about 30 minutes until set.
- Mix the cheese filling: In a bowl, blend together the cream cheese and mascarpone cheese until smooth. Add lemon zest, lemon juice, and vanilla extract, stirring well to combine.
- Whip the cream: In a separate metal or glass bowl, whisk the whipping cream with ⅓ cup sugar until soft fluffy peaks form. Gently fold the whipped cream into the cheese mixture until the filling is soft and evenly combined.
- Assemble the cheesecake layer: Spread the filling over the chilled crust in the baking dish, smoothing the top. Tap the pan gently on the countertop several times to settle the layers. Cover tightly with plastic wrap and refrigerate for at least 3 hours to chill and set.
- Arrange the strawberries: Start at the bottom long edge of the cake and place strawberry halves in a horizontal line with the pointed ends facing right. Create additional strawberry stripes above, extending the full length of the cake, leaving a square space in the top left corner.
- Create the flag stripes: Continue making strawberry stripes about ¾ inch apart, laying down three more full-length lines and one shorter line beneath the top right stripe to leave space for the blueberries.
- Make the blue field of stars: Fill the reserved square space in the upper left corner evenly with blueberries, placing them closely together with the blossom ends pointing up.
- Serve: Cut the flag cake into squares and serve chilled.
Notes
- Be sure to chill the crust and cheesecake filling adequately to allow for proper setting.
- For best results, use cold heavy whipping cream straight from the refrigerator.
- Feel free to adjust the amount of fruit depending on the size of your baking dish or personal preference.
- This dessert can be prepared a day ahead and kept refrigerated until serving.
- Use a metal or glass bowl for whipping cream to ensure better whip volume.


