
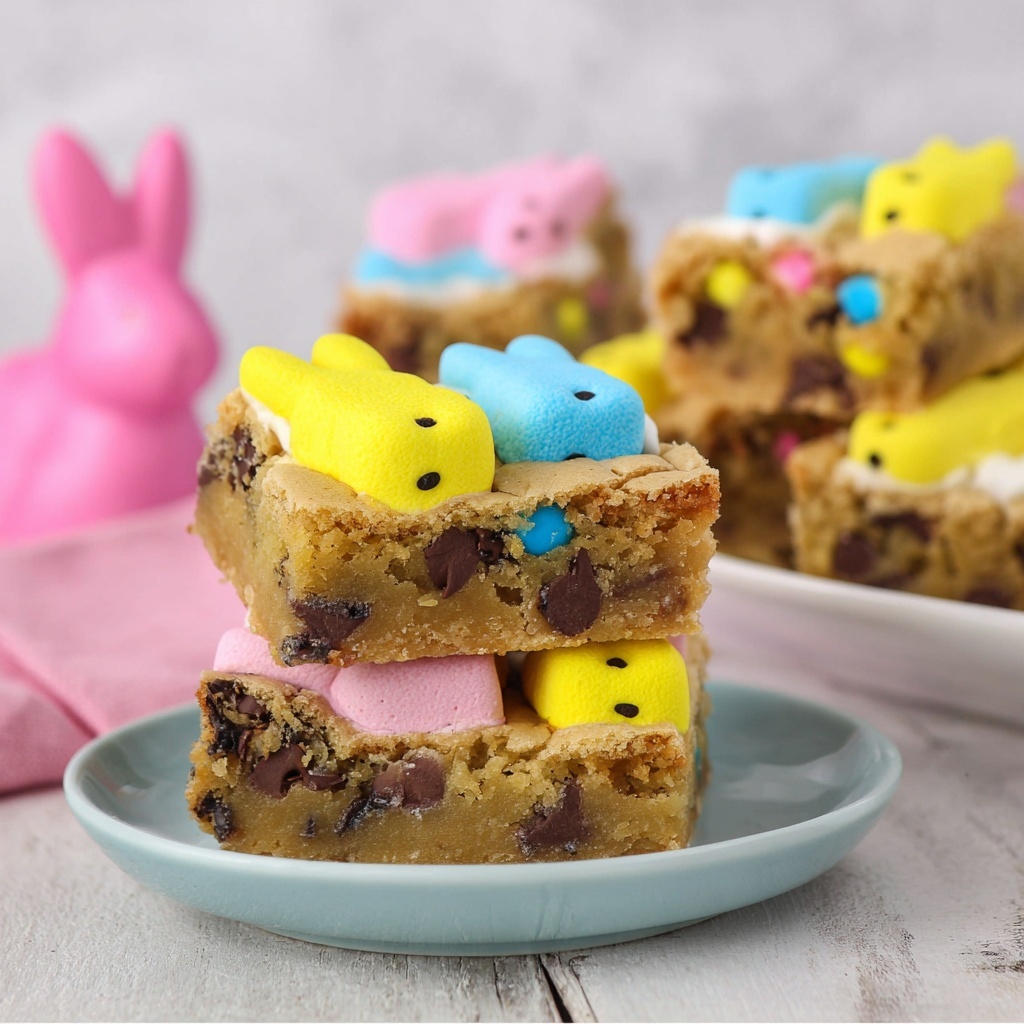
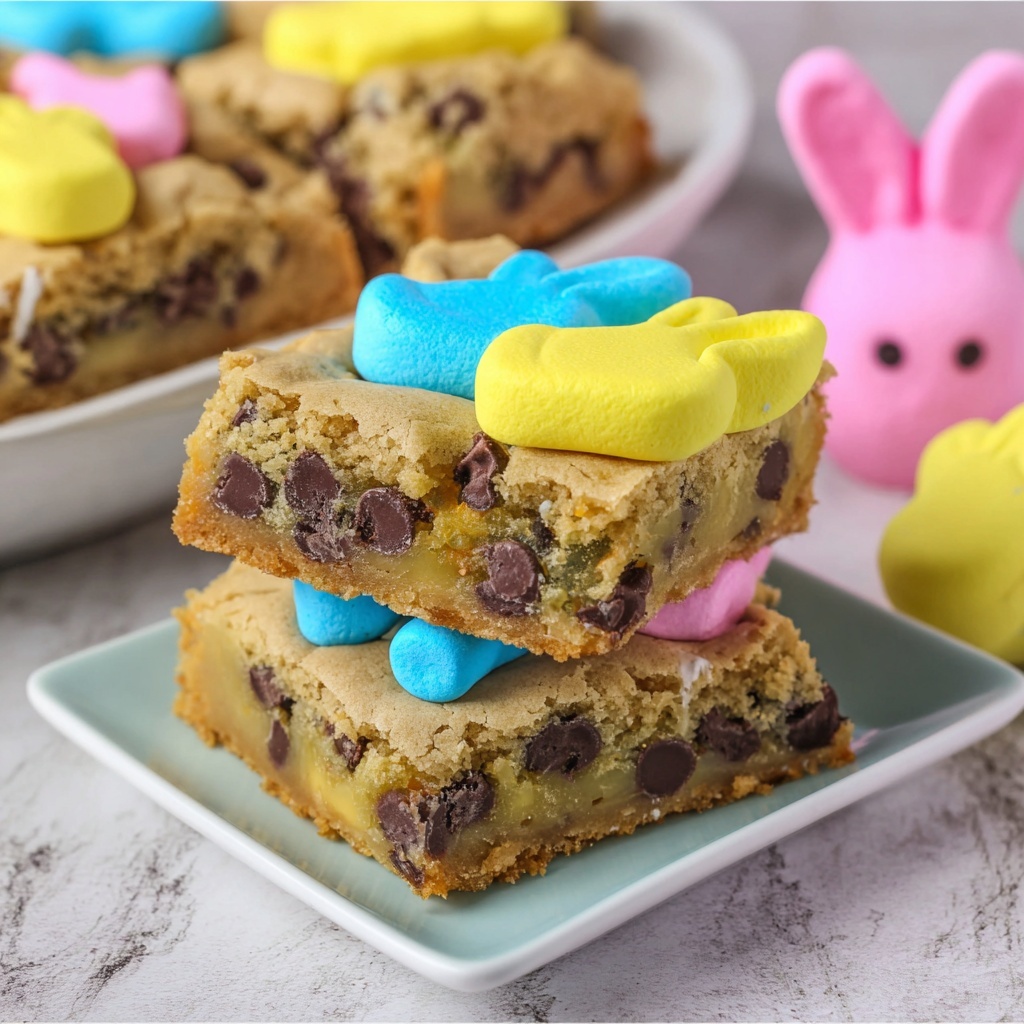
If you are ready to treat yourself and your loved ones to a festive and utterly delicious treat, this Peeps Cookie Bars Recipe is exactly what you need. Imagine soft, chewy cookie bars loaded with melty chocolate chips, colorful Easter M&M’s, and topped with those iconic, sweet Peep Bunnies that add a fun and gooey twist. This recipe is simple to make but delivers complex textures and vibrant colors that will light up your dessert table and delight everyone who takes a bite!
Ingredients You’ll Need
Every ingredient in this Peeps Cookie Bars Recipe plays a crucial role in creating the perfect balance of flavor, texture, and color. These simple staples come together to give you a cookie bar that’s chewy, rich, colorful, and fun to eat!
- 1 cup unsalted butter (melted): Adds richness and helps keep the bars soft and moist.
- 1 cup light brown sugar packed: Provides a deep caramel flavor and chewy texture.
- 3/4 cup granulated sugar: Balances the sweetness and adds a light crispness.
- 2 large eggs (room temperature): Binds the dough and adds moisture for tenderness.
- 1 egg yolk (room temperature): Makes the texture extra rich and fudgy.
- 2 teaspoons pure vanilla extract: Enhances all the flavors with warm sweetness.
- 2 2/3 cups all-purpose flour: The structure that holds everything together.
- 2 teaspoons cornstarch: Keeps the bars tender and soft.
- 1/2 teaspoon baking powder: Gives just the right amount of lift.
- 1 teaspoon salt: Balances sweetness and brings out flavor complexity.
- 1 1/4 cups chocolate chips: Melty pockets of richness in every bite.
- 1 1/4 cups Easter M&M’s: Adds crunch and colorful fun that brightens the bars.
- 12 Peep Bunnies: The star of this recipe—they melt into a gooey, sweet topping that’s as playful as it is tasty.
How to Make Peeps Cookie Bars Recipe
Step 1: Prepare Your Oven and Pan
Start by preheating your oven to 350 degrees. While it heats, spritz a 9×13-inch pan with non-stick baking spray to ensure your bars come out clean and perfect every time.
Step 2: Melt and Mix the Butter and Sugars
Melt the butter in a microwave-safe bowl for about 30 seconds until just liquefied. Combine melted butter with brown sugar and granulated sugar in a large bowl, stirring until smooth and glossy. Then, allow the mix to cool for a few minutes so you don’t scramble the eggs in the next step.
Step 3: Add Eggs and Vanilla
Once the butter mixture is slightly cooled, add your two large eggs, egg yolk, and vanilla extract. Whisk everything together until fully combined and silky-smooth. These ingredients will give your cookie bars that dreamy moist and tender texture.
Step 4: Combine Dry Ingredients
In a separate medium bowl, whisk together the flour, cornstarch, baking powder, and salt. This ensures even distribution of the leavening agent and salt, which means more consistent flavor and texture throughout the bars.
Step 5: Bring It All Together
Slowly stir the dry ingredients into the wet mixture until you have a thick cookie dough. Then fold in the chocolate chips and Easter M&M’s, making sure they’re evenly distributed so each bar is packed with chocolatey and colorful bites.
Step 6: Bake and Add Peeps Topping
Pour the dough into your prepared pan, spreading evenly with a spatula. Bake the bars for 20 to 25 minutes until golden around the edges but still soft in the center. As soon as you take them out, gently place the Easter Bunny Peeps on top, then pop the whole pan back into the oven for an additional 5 to 10 minutes so the Peeps melt into a sweet, gooey layer that’s pure magic.
Step 7: Cool and Enjoy
Remove the pan from the oven and let the Peeps Cookie Bars Recipe cool for 5 to 10 minutes. This lets everything set just right so they slice easily and hold their shape but are still soft and gooey—ready for you to dig in!
How to Serve Peeps Cookie Bars Recipe
Garnishes
Sprinkle a little extra mini chocolate chips or some crushed M&M’s on top before serving to enhance both the visual appeal and taste. A light dusting of powdered sugar can add an elegant touch to these fun bars.
Side Dishes
Enjoy these cookie bars alongside a cold glass of milk or a cup of your favorite hot tea or coffee. Their sweetness pairs beautifully with creamy or bitter beverages, balancing every bite.
Creative Ways to Present
Cut the Peeps Cookie Bars into fun, festive shapes using cookie cutters for parties or Easter celebrations. Present them on a colorful platter alongside pastel-colored napkins or decorate with edible glitter for an extra pop of festive cheer.
Make Ahead and Storage
Storing Leftovers
Store any leftover Peeps Cookie Bars Recipe in an airtight container at room temperature for up to 3 days. This keeps them soft and chewy. If your kitchen is warm, refrigeration may help but can slightly firm up the texture.
Freezing
For longer storage, wrap the bars tightly in plastic wrap and then foil, and freeze for up to 2 months. When you’re ready to enjoy, thaw overnight in the fridge for soft, delicious bars that taste fresh.
Reheating
To bring back that freshly baked sensation, warm a piece in the microwave for 10-15 seconds or in a low oven for a few minutes. This softens the chocolate chips and reactivates the gooeyness of the Peeps topping beautifully.
FAQs
Can I use other types of Peeps in this recipe?
Absolutely! While the classic Easter Bunny Peeps are perfect for this recipe, any Peep shape or color will work. Just be mindful that some Peeps may melt differently depending on their size and coating.
Can I make this recipe gluten-free?
You can substitute the all-purpose flour for a gluten-free baking blend of your choice. Be sure that the blend contains xanthan gum or another binder to maintain a chewy texture.
Are Peeps Cookie Bars suitable for kids?
Yes! These bars are a huge hit with kids because of the bright colors and fun Peeps topping. They’re a playful, tasty treat that makes snack time or celebrations extra special.
Can I add nuts or other mix-ins?
Definitely. Chopped nuts like pecans or walnuts add a nice crunch, and dried fruit can add a chewy contrast. Just mix them in at the same time you add the chocolate chips and M&M’s for a perfect balance.
How do I ensure my Peeps don’t burn in the oven?
Adding the Peeps in the last 5 to 10 minutes of baking helps prevent burning while still melting them enough to create that delicious gooey topping. Keep an eye on them, and if they start browning too quickly, reduce the oven temperature slightly.
Final Thoughts
This Peeps Cookie Bars Recipe is truly one of those joyful treats that make celebrations sweeter and everyday moments more fun. It’s easy to make, irresistibly delicious, and packed full of color and texture that bring smiles all around. Don’t wait for a holiday to whip up a batch—these bars are sure to become a favorite anytime you want something special to indulge in!
Print
Peeps Cookie Bars Recipe
- Prep Time: 10 minutes
- Cook Time: 30 minutes
- Total Time: 40 minutes
- Yield: 12 servings
- Category: Dessert, Snack
- Method: Baking
- Cuisine: American
Description
Delight in these festive Peeps Cookie Bars, loaded with rich chocolate chips, colorful Easter M&M’s, and topped with adorable Peep Bunnies. Soft, chewy, and perfect for a holiday treat or any sweet craving.
Ingredients
Wet Ingredients
- 1 cup unsalted butter (melted)
- 1 cup light brown sugar (packed)
- 3/4 cup granulated sugar
- 2 large eggs (room temperature)
- 1 egg yolk (room temperature)
- 2 teaspoons pure vanilla extract
Dry Ingredients
- 2 2/3 cups all purpose flour
- 2 teaspoons cornstarch
- 1/2 teaspoon baking powder
- 1 teaspoon salt
Add-ins and Toppings
- 1 1/4 cups chocolate chips
- 1 1/4 cup Easter M&M’s
- 12 Peep Bunnies
Instructions
- Preheat Oven: Preheat your oven to 350 degrees F to prepare for baking the cookie bars.
- Prepare Pan: Spray a 9×13 inch baking pan with non-stick baking spray to prevent sticking.
- Melt Butter: Melt the butter in a microwave-safe bowl for about 30 seconds until fully melted.
- Combine Sugars and Butter: In a large bowl, mix together the melted butter, light brown sugar, and granulated sugar until well combined.
- Cool Butter Mixture: Let the butter and sugar mixture cool for 2 to 3 minutes to avoid cooking the eggs later.
- Add Eggs and Vanilla: Stir in the eggs, egg yolk, and pure vanilla extract until fully incorporated.
- Mix Dry Ingredients: In a separate medium bowl, whisk together the all-purpose flour, cornstarch, baking powder, and salt.
- Combine Dry with Wet: Gradually add the dry mixture into the butter mixture, stirring until just combined to form the cookie dough.
- Add Chocolate and M&M’s: Fold in the chocolate chips and Easter M&M’s evenly throughout the dough.
- Spread Dough: Transfer the dough into the prepared pan and spread it out evenly using a spatula.
- Initial Bake: Bake the cookie bars for 20 to 25 minutes until edges are golden and a toothpick inserted comes out mostly clean.
- Add Peeps: Remove the pan from the oven and carefully place the 12 Peep Bunny marshmallows on top of the bars.
- Final Bake: Return the pan to the oven and bake an additional 5 to 10 minutes to slightly toast the Peeps and finish baking the bars.
- Cool: Remove from the oven and allow the cookie bars to cool in the pan for 5 to 10 minutes before slicing and serving.
Notes
- For best texture, ensure eggs are at room temperature before adding.
- Do not overbake initially; the bars should be soft but set before adding the Peeps.
- You can substitute Easter M&M’s with other colorful candies if desired.
- Peep Bunnies can be replaced with any other marshmallow shapes for different occasions.
- Allow bars to cool sufficiently to prevent crumbling when cutting.


