
If you’ve ever dreamed of baking bread with that perfect tangy flavor and wonderfully chewy texture, then getting your starter just right is key. This Simple Homemade Sourdough Starter: Step-by-Step Guide Recipe is your golden ticket to cultivating a lively, bubbly starter from scratch using just flour and water. It’s simple, rewarding, and sets the foundation for making irresistibly fresh sourdough bread right in your kitchen.
Ingredients You’ll Need
To create this magical sourdough starter, you only need two basic ingredients, both of which play an essential role in getting the fermentation going strong and healthy. The simplicity of these ingredients means you can easily source them and feel confident in starting your baking journey right away.
- 1 cup of all-purpose flour: This provides the natural yeast and bacteria needed to kick off fermentation, and choosing unbleached flour can help foster a more vibrant starter.
- 1/2 cup of lukewarm water: Water at just the right temperature encourages yeast activity, making sure your starter wakes up and bubbles with life.
How to Make Simple Homemade Sourdough Starter: Step-by-Step Guide Recipe
Step 1: Mix Flour and Water
Begin by combining exactly 1 cup of all-purpose flour with 1/2 cup of lukewarm water in a clean glass or plastic container. Stir thoroughly to eliminate any lumps, creating a smooth, thick batter-like consistency. This mixture serves as the perfect environment for wild yeast and bacteria to begin their fermentation dance.
Step 2: Cover and Rest
Cover your container loosely with a clean kitchen towel or plastic wrap, allowing airflow so natural yeasts can enter, but keeping out unwanted contaminants. Place it in a warm, cozy spot away from direct sunlight—somewhere around 70-75°F is ideal for the starter to thrive.
Step 3: Allow Fermentation
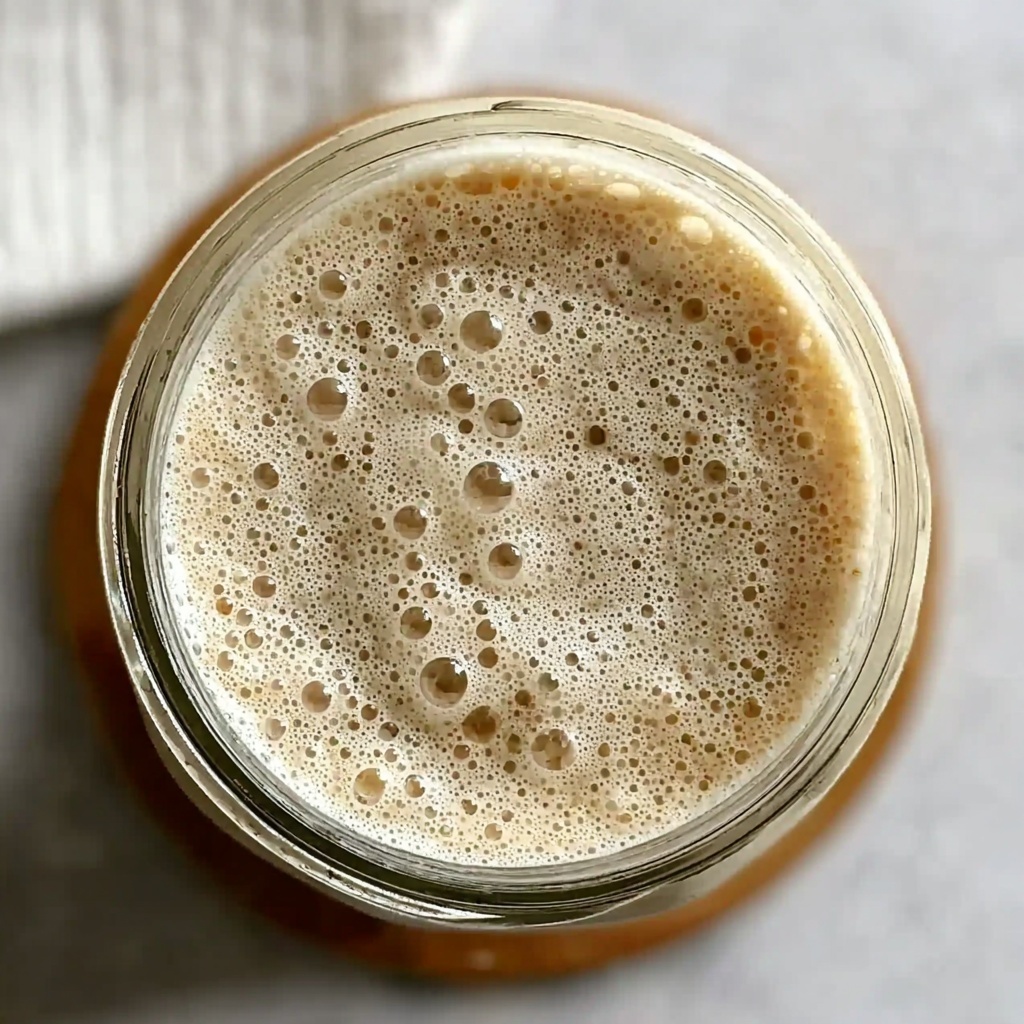
Let the mixture rest at room temperature for 24 hours. During this time, microscopic yeasts and bacteria will start feeding on the flour’s starches and sugars, releasing gases that create bubbles on the surface. Seeing these bubbles marks the exciting beginning of your starter’s life.
Step 4: Discard and Feed
After those first 24 hours, you’ll notice activity, but it’s time to take action to keep things balanced. Discard half of your starter to control acidity and avoid overcrowding the culture. Then feed the remaining starter by adding 1/2 cup of fresh flour and 1/4 cup of lukewarm water. Stir everything well to distribute nutrients evenly.
Step 5: Repeat Feeding Routine
Cover the container again and let it rest for another 24 hours. Repeat this daily feeding process, discarding half and replenishing with fresh flour and water. Within 5 to 7 days, your starter should be bubbly, have a pleasant tangy smell, and be ready to raise bread dough like a champ.
How to Serve Simple Homemade Sourdough Starter: Step-by-Step Guide Recipe

Garnishes
While the starter itself is not typically eaten on its own, once your sourdough is baked, it pairs beautifully with simple garnishes such as a sprinkle of flaky sea salt or a brush of melted butter to enhance its tangy depth and crusty character.
Side Dishes
Sourdough bread made from your starter is a superstar companion to soups, stews, and fresh salads. Its robust flavor stands up wonderfully to creamy dips and cheese boards, creating an inviting meal experience.
Creative Ways to Present
Show off your sourdough starter by turning it into delicious creations beyond classic bread: try sourdough pancakes for a tangy twist on breakfast or homemade sourdough pizza crust that boasts incredible texture and flavor.
Make Ahead and Storage
Storing Leftovers
If you don’t plan to bake daily, storing your sourdough starter in the refrigerator helps slow down yeast activity. Keep it loosely covered, and remember to feed it at least once a week so it stays lively and ready for your next baking adventure.
Freezing
You can freeze your active sourdough starter if you need a long break. Transfer a small portion to an airtight container or freezer bag, and thaw it at room temperature when ready to revive. Frozen starter can take a couple of feedings to become fully active again.
Reheating
To help your refrigerated or frozen starter bounce back, bring it to room temperature and feed it with fresh flour and water as usual. A warm spot—from your oven light or a sunny windowsill—can encourage rapid fermentation and revive the starter’s vitality.
FAQs
Can I use whole wheat or rye flour instead of all-purpose?
Absolutely! Whole wheat and rye flours tend to jump-start fermentation faster since they have more nutrients and natural yeast. Many bakers alternate or combine these with all-purpose flour to develop complex starter flavors.
What does it mean if my starter smells bad or develops mold?
A healthy sourdough starter should have a tangy, slightly yeasty aroma. If it smells rotten or has a pinkish tint or mold, it’s best to discard and start fresh as those are signs of contamination.
Why is it necessary to discard some starter during feeding?
Discarding helps keep acidity balanced and prevents the starter from growing too large and unmanageable. It also encourages stronger yeast activity to develop a resilient culture.
How do I know when my starter is ready to bake with?
Look for plenty of bubbles, a pleasant sour smell, and that it doubles in size within 6 to 8 hours after feeding. This indicates an active, vigorous starter that can reliably leaven bread dough.
Can I speed up the process so my starter is ready sooner?
While tempting, patience is key for flavor and structure. Warmer temperatures can help, but rushing can compromise your starter’s development. Stick with the 5-7 day routine for best results.
Final Thoughts
Embracing the magic of wild fermentation with this Simple Homemade Sourdough Starter: Step-by-Step Guide Recipe opens up a world of delicious possibilities in your kitchen. With just flour, water, and a bit of love, you’re nurturing a living culture that transforms humble ingredients into something truly extraordinary. I can’t wait for you to give it a try and savor freshly baked sourdough warm from your oven!
Print
Simple Homemade Sourdough Starter: Step-by-Step Guide Recipe
- Prep Time: 5 minutes
- Cook Time: 0 minutes
- Total Time: 5 to 7 days (including fermentation and feedings)
- Yield: About 1 cup of active sourdough starter
- Category: Bread Making
- Method: No-Cook
- Cuisine: Universal
- Diet: Vegan
Description
This simple sourdough starter recipe guides you through cultivating your own natural leavening agent for baking delicious homemade sourdough bread. By mixing flour and water and allowing natural wild yeasts to ferment over several days, you create a bubbly, active starter that adds a unique flavor and texture to your bread.
Ingredients
Starter Ingredients
- 1 cup all-purpose flour
- 1/2 cup lukewarm water
- Additional for feeding: 1/2 cup all-purpose flour, 1/4 cup lukewarm water
Instructions
- Mix Flour and Water: Combine 1 cup of all-purpose flour with 1/2 cup of lukewarm water in a clean glass or plastic container and stir thoroughly to eliminate any lumps.
- Cover and Rest: Loosely cover the container with a clean kitchen towel or plastic wrap, allowing airflow while protecting from contaminants, and place it in a warm spot away from direct sunlight.
- Allow Fermentation: Let the mixture sit at room temperature for 24 hours, during which you should begin to see bubbles forming on the surface indicating fermentation has started.
- Discard and Feed: After 24 hours, discard half of the mixture to maintain a balanced acidity and yeast environment. To the remaining mixture, add 1/2 cup of flour and 1/4 cup of lukewarm water, stirring well to combine.
- Repeat Feeding Routine: Cover the container again and let it rest at room temperature for another 24 hours. Continue this daily feeding routine by discarding half and feeding for 5-7 days until the starter is bubbly, active, and ready to use in baking.
Notes
- Use unchlorinated water if possible to encourage healthy yeast growth.
- Keep the starter in a warm (70-75°F or 21-24°C), draft-free environment for best results.
- The starter may develop a strong smell or hooch (liquid on top); stirring it back in or discarding excess will keep it healthy.
- Once active, you can store the starter in the refrigerator and feed weekly if not baking frequently.
- The feeding amount and schedule can be adjusted based on your baking frequency and ambient temperature.


