Description
This simple sourdough starter recipe guides you through cultivating your own natural leavening agent for baking delicious homemade sourdough bread. By mixing flour and water and allowing natural wild yeasts to ferment over several days, you create a bubbly, active starter that adds a unique flavor and texture to your bread.
Ingredients
Scale
Starter Ingredients
- 1 cup all-purpose flour
- 1/2 cup lukewarm water
- Additional for feeding: 1/2 cup all-purpose flour, 1/4 cup lukewarm water
Instructions
- Mix Flour and Water: Combine 1 cup of all-purpose flour with 1/2 cup of lukewarm water in a clean glass or plastic container and stir thoroughly to eliminate any lumps.
- Cover and Rest: Loosely cover the container with a clean kitchen towel or plastic wrap, allowing airflow while protecting from contaminants, and place it in a warm spot away from direct sunlight.
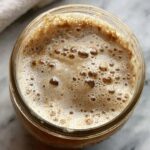
- Allow Fermentation: Let the mixture sit at room temperature for 24 hours, during which you should begin to see bubbles forming on the surface indicating fermentation has started.
- Discard and Feed: After 24 hours, discard half of the mixture to maintain a balanced acidity and yeast environment. To the remaining mixture, add 1/2 cup of flour and 1/4 cup of lukewarm water, stirring well to combine.
- Repeat Feeding Routine: Cover the container again and let it rest at room temperature for another 24 hours. Continue this daily feeding routine by discarding half and feeding for 5-7 days until the starter is bubbly, active, and ready to use in baking.
Notes
- Use unchlorinated water if possible to encourage healthy yeast growth.
- Keep the starter in a warm (70-75°F or 21-24°C), draft-free environment for best results.
- The starter may develop a strong smell or hooch (liquid on top); stirring it back in or discarding excess will keep it healthy.
- Once active, you can store the starter in the refrigerator and feed weekly if not baking frequently.
- The feeding amount and schedule can be adjusted based on your baking frequency and ambient temperature.